


Convert Website to Android App using WebView – Android Studio + No-Code Solution (2026 Guide)
Published on:
19 May, 2026

Converting a website into an Android app using WebView is the easiest way to launch your mobile app without rebuilding from scratch. It is quicker, more affordable, and works smoothly if your website is mobile responsive. Your website loads inside a mobile app, so users don’t have to find you on a browser.
This guide will help you understand the meaning of WebView apps, the step-by-step Android WebView process, pros & cons, and common issues & fixes.
What is a WebView App?
A WebView app uses Android’s built-in WebView component to display the website inside a native app shell. It is the website displayed on the mobile screen without a browser and address bars.
The WebView is an Android view extension that allows you to display website pages as part of your app’s layout. By default, it does not have features like navigation controls or an address bar.
This way is very useful when your website is well-designed along with being mobile-responsive, and you want to reach & grow your mobile audience quickly. Any updates you make on the website will automatically reflect in your Android app. You don’t require any app approval or submissions from the app stores.
When Should You Use WebView?
WebView is an ideal solution for a faster Android app launch. Below is a way to figure out if it is the right fit for you.
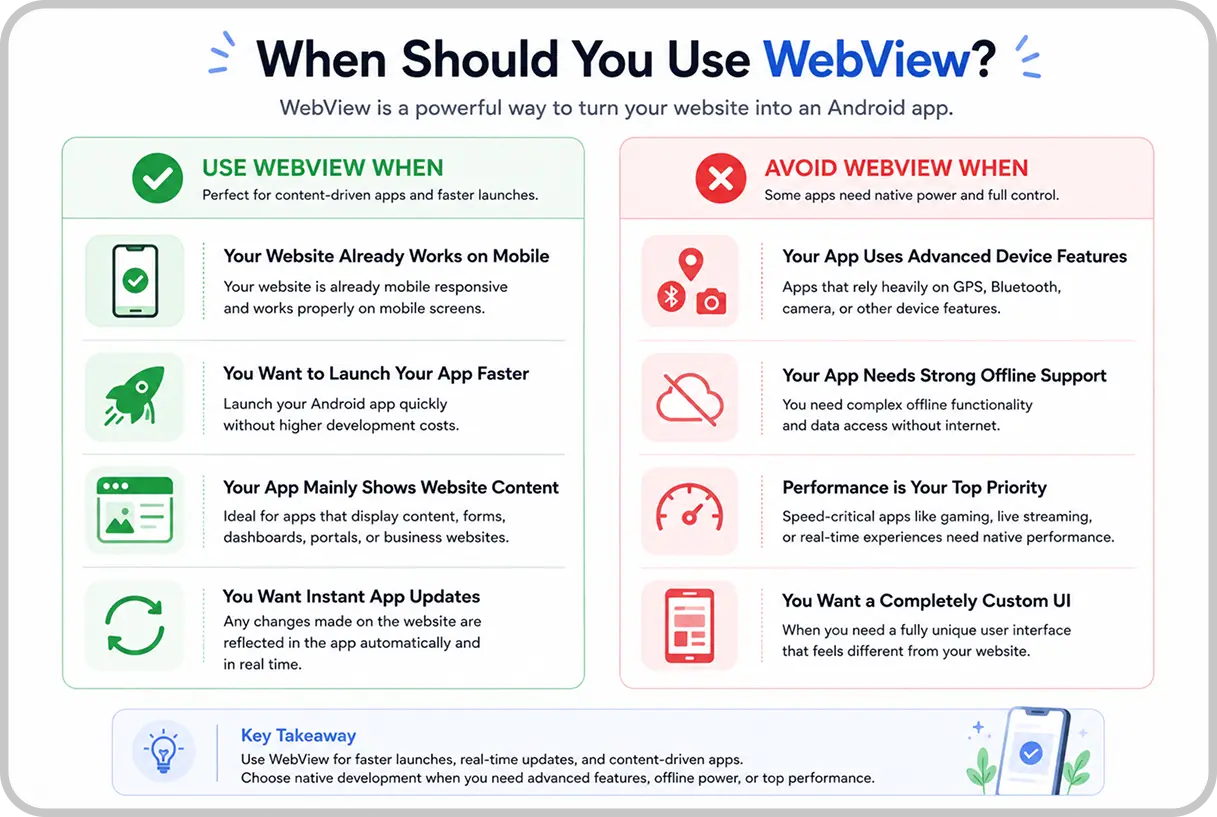
Use WebView When
-
Your website is already mobile responsive and works properly on mobile screens.
-
You want to launch your mobile app faster without higher budgets.
-
Your Android app only displays content, forms, or dashboards from your website.
-
You want automatic and real-time updates in the mobile app.
-
Any changes made on the website are reflected in Android automatically and in real time.
Avoid WebView When
-
Your mobile app requires heavy use of device features like GPS, Bluetooth, or the camera.
-
You want complex offline functionality.
-
App performance and speed are the most important things you want. For example, it is mainly required for gaming or real-time apps.
-
You require a fully custom user interface that feels different from your website.
Step-By-Step to Create an Android WebView App
Below is the step-by-step process to follow to create a WebView app in Android Studio.
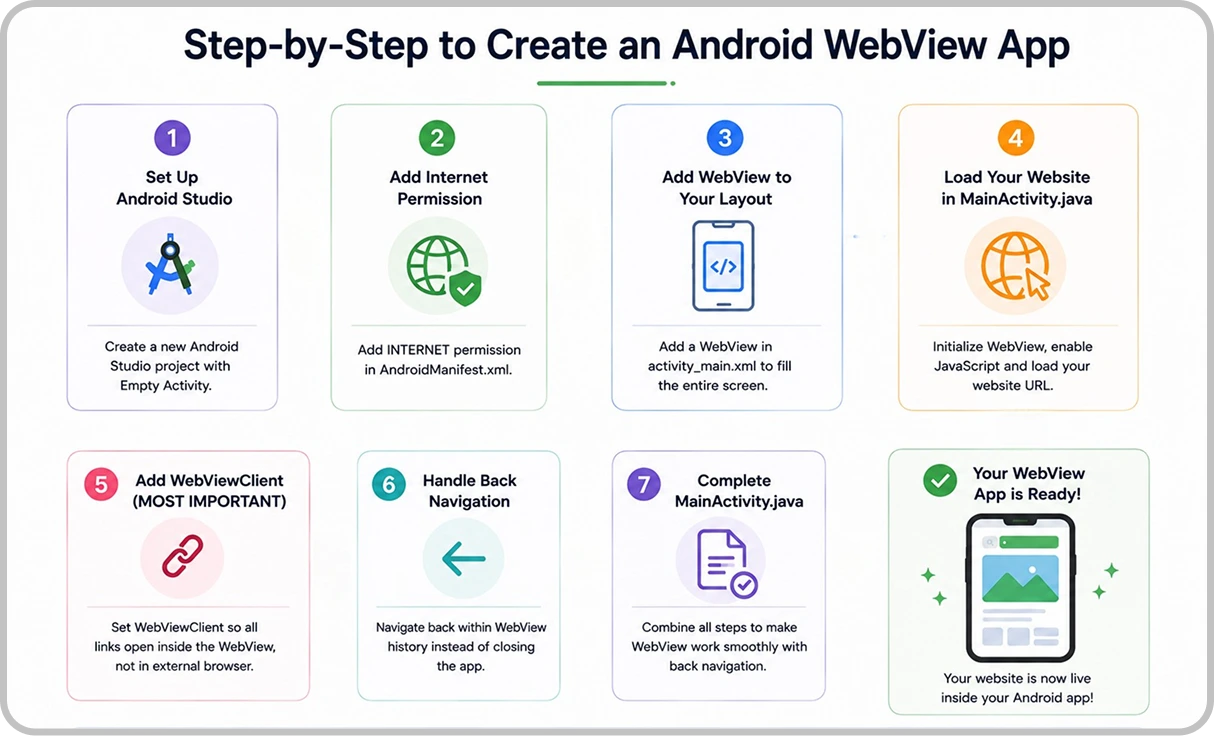
Step 1: Set Up Android Studio
-
Open Android Studio and click on Start a new Android Studio project.
-
Choose Empty Activity.
-
Set the name of your app with the package name.
-
Click Finish to create the project.
Step 2: Add Internet Permission in the AndroidManifest.xml File
An important step that is ignored by most guides and tutorials, leading to WebView not loading. To fetch and load URLs in the WebView, your app requires permission to access the internet.
The line below must be added to the AndroidManifest.xml file above the application tag.
<uses-permission android:name="android.permission.INTERNET" />
Your manifest should look like this:
<?xml version="1.0" encoding="utf-8"?>
<manifest xmlns:android="http://schemas.android.com/apk/res/android" package="com.example.mywebapp">

               <uses-permission android:name="android.permission.INTERNET" />

<application ... >
       <activity android:name=".MainActivity">
          ...
       </activity>
</application>

</manifest>
Without internet permission, your WebView will display a blank screen even if your code is completely correct.
Step 3: Add WebView to Your App Layout
In the activity_main.xml file, add a WebView that fills the entire screen.
<WebView
           android:id="@+id/webview"
           android:layout_width="match_parent"
           android:layout_height="match_parent" />
The match_parent values make sure the WebView fills the full width and height of the mobile screen. So your website displays properly without any space around it.
Step 4: Load Your Website in MainActivity
In your MainActivity file, add the following elements given below:
Java Version
WebView myWebView = (WebView) findViewById(R.id.webview);
myWebView.getSettings(). setJavaScriptEnabled(true); myWebView.loadUrl("https://yourwebsite.com");
By default, JavaScript is disabled in a WebView. You can enable it through the WebSettings attached to your WebView. Most modern websites need JavaScript to function smoothly, making this line important.
Kotlin Version (Recommended: New Projects)
val webView: WebView = findViewById(R.id.webview)
webView.settings.javaScriptEnabled = true
webView.loadUrl("https://yourwebsite.com")
Step 5: Add WebViewClient (MOST IMPORTANT)
When the user clicks a link from a website page in your WebView, the behavior is for Android to launch the mobile app that manages URLs. The default web browser opens and loads the destination URL. You can disable this behavior for your WebView so links open within your WebView by providing a WebViewClient.
myWebView.setWebViewClient(new WebViewClient());
You have to add this above line of code after loadUrl. All links the user clicks upon will open inside the WebView rather than landing in Chrome or another browser.
Step 6: Handle Back Navigation
Without handling back navigation, tapping on the back button closes the complete app, even if the user just wants to go back one page inside the website.
-
canGoBack(): Checks if a page was loaded previously
-
goBack(): Loads the previous page
Below is a small addition to make the user experience more natural.
@Override
public void onBackPressed() {
         if (myWebView.canGoBack()) {
            myWebView.goBack();
          } else {
                super.onBackPressed();
}
  }
Step 7: Complete MainActivity File
Your MainActivity file should look like this:
Java Version
import android.os.Bundle;
import android.webkit.WebView;
import android.webkit.WebViewClient;
import androidx.appcompat.app.AppCompatActivity;

public class MainActivity extends AppCompatActivity {

          WebView myWebView;

          @Override
          protected void onCreate(Bundle savedInstanceState) {
                    super.onCreate(savedInstanceState);
                    setContentView(R.layout.activity_main);

          myWebView = (WebView) findViewById(R.id.webview);
          myWebView.getSettings().setJavaScriptEnabled(true);
              myWebView.setWebViewClient(new WebViewClient());
          myWebView.loadUrl("https://yourwebsite.com");

}

@Override
public void onBackPressed() {
        if (myWebView.canGoBack()) {
            myWebView.goBack();
        } else {
              super.onBackPressed();
           }
     }
}
Kotlin Version
import android.os.Bundle
import android.webkit.WebView
import android.webkit.WebViewClient
import androidx.appcompat.app.AppCompatActivity

class MainActivity : AppCompatActivity() {

    private lateinit var webView: WebView

    override fun onCreate(savedInstanceState: Bundle?) {
        super.onCreate(savedInstanceState)
        setContentView(R.layout.activity_main)

        webView = findViewById(R.id.webview)
        webView.settings.javaScriptEnabled = true
        webView.webViewClient = WebViewClient()
        webView.loadUrl("https://yourwebsite.com")
    }

    override fun onBackPressed() {
        if (webView.canGoBack()) webView.goBack()
        else super.onBackPressed()
    }
}
WebToNative: a No-Code Website to App Converter
This approach is focused on non-technical people who don’t have any coding experience or technical knowledge.
WebToNative is a no-code and low-code mobile app builder that transforms your website into a mobile app for Android and iOS. It includes mobile app features like push notifications, location support, splash screens, app linking, app syncing with website, and security. It automatically synchronizes your mobile app with your website in real time. WebToNative is ideal for everyone, whether a business owner or a freelancer, from a person to an entire company.
Common Issues and How to Fix Them
Below are a few common issues faced in the process and how you can fix them. So, you don't lag in the middle of the process.
1. WebView shows a blank screen or loads nothing.
This is one of the most common issues faced while creating the WebView app in Android Studio. Your app does not have permission to access the internet.
The Fix: Open AndroidManifest.xml and add this line above the application tag.
<uses-permission android:name="android.permission.INTERNET" />
Without internet permission, the WebView will always show a blank screen or nothing. Many developers spend hours debugging the issue of a single line of code.
2. Links are opening in the browser instead of the mobile app.
Android manages all the URL clicks by opening them in the device browser by default. So when the user taps on any link on your website, they are redirected to the browser instead of the app.
The Fix: Add a WebViewClient. Enter the below line of code after your loadUrl line. Once this line is placed correctly, all the links will open inside the mobile app.
myWebView.setWebViewClient(new WebViewClient());
3. Tapping on the back button closes the entire mobile app.
When a user clicks on the back button, the user exits from the mobile app completely. Even if the user has just navigated three pages on your website.
The Fix:
Override onBackPressed():

@Override
public void onBackPressed() {
           if (myWebView.canGoBack()) {
               myWebView.goBack();
           } else {
                              super.onBackPressed();
}
}
Also, check canGoBack() if there is any page history inside the WebView. If yes, then go back to one page. If not, it exists in the app.
4. JavaScript is not working properly on the website.
JavaScript is turned off in WebView by default. Many websites appear to be incomplete or improper without JavaScript.
The Fix: Enable JavaScript with:
myWebView.getSettings().setJavaScriptEnabled(true);
Add this before your loadUrl call. If your website depends on JavaScript frameworks.
5. The mobile app is working on an emulator instead of on a real device.
If your website URL starts with http:// instead of https://, Android will block it on real devices. From Android (API Level 28), non-secure HTTP traffic is blocked by default.
The Fix: Move your website to HTTPS. If this is not possible immediately, then add android:usesCleartextTraffic=”true” inside the application tag in the manifest as a temporary solution. This is a must to switch your website to HTTPS as soon as possible.
6. White flash before the page loads.
When a WebView app opens, there is a brief white screen before the website completes loading. This happens because the WebView takes a few seconds to load the page.
The Fix: Add a splash screen to display while the website is loading in the background. This way, users will visualize your branding instead of a boring white screen.
7. File upload not working in WebView.
By default, WebView does not support file uploads. If your website has a form that allows users to upload a profile picture, a file, or a document. It will not work inside the app without an additional setup.
The Fix: Add a WebChromeClient and an onShowFileChooser method to enable file selection in your app. This tells the app to open the device’s file picker when a user taps on any file upload button on your website.
8. The camera is not working in WebView.
If your website uses the camera for uploading photos or video calls, it will not work inside the WebView by default. The app has no camera access unless you explicitly grant it.
The Fix: Two things are required together. First, add the CAMERA permission in your AndroidManifest.xml file. Second, handle the camera request through WebChromeClient in your code. If any one of them is missing, any of the similar camera features on your website will fail inside the app.
Best Practices for an Efficient WebView App
1. Make Your Website Mobile Responsive First
Before creating a mobile app, open your website and look at how it appears on mobile devices. Check everything: the button at the right place, fonts, content, and elements. If everything seems perfect, then begin with the app development.
2. Enable Push Notifications
This alone is a reason why many website owners switch to mobile apps. Push notifications add a personal touch to the user experience. You can directly reach the user even if they are not active by just sending a notification to their mobile screen.
3. Add a Splash Screen
Adding a splash screen to your mobile app helps users to visualize your app in their minds, leaving a long-lasting impression. It is a small thing, but it makes your app look more attractive and professional.
4. Test the Mobile App on Different Devices
Android runs on different devices with multiple screen sizes. Something that appears to be perfect on an emulator or your mobile phone might look a bit different on another device. Test your app on at least three different devices with different screen sizes and Android versions.
5. Use Caching for Performance
If your website has content that does not change frequently, enable WebView caching to make the app load faster. Users on slow-loading apps are likely to leave the mobile app even if it is useful. WebView performance optimization starts with your website, including minimizing JavaScript, compressing images, and enabling browser caching for faster load times.
You can enable it with:
myWebView.getSettings().setCacheMode(WebSettings.LOAD_DEFAULT);
This tells WebView to use cached content when available and only fetch from the network when required.
6. Keep Your Website Performance Good
A WebView app’s performance depends on your website’s performance. If your website takes more than 4 seconds to load in a browser, it will take the same amount of time while loading on a mobile device. You must look for your website’s performance thoroughly.
7. Handle Cookies Properly
If your WebView website has login or sign-up sessions or tracking, you must enable third-party cookies using CookieManager. Without this, users may get logged out every time they reopen the app.
FAQs
1. Can I publish my WebView on the Google Play Store?
A. Yes. Google Play Store accepts WebView apps. It also depends on whether your app has met the Play Store requirements or not. If not, then your app will be rejected, and again you will have to submit for approval.
2. Will changes on my website be reflected in the app automatically?
A. Yes. All the changes made on the website will be reflected automatically inside the Android app.
3. Does a WebView app work offline?
A. No. A WebView requires an internet connection to work properly. As the WebView app depends on the website, websites cannot work without an internet connection.
4. Are WebView apps safe?
A. Yes. WebView apps are safe, but only when built correctly. Your website must use HTTPS so that you won’t get blocked by Android due to security issues.
5. Can I add push notifications to my WebView app?
A. Yes. Use third-party platforms or integrations to set up push for your WebView apps. You can also integrate Firebase Cloud Messaging (FCM) to manually add push notifications in your Android app.
6. What is the iOS equivalent of Android WebView?
A. On iOS, the equivalent is WebView. It is more secure and quicker than the older UIWebView, which Apple has discontinued. If you are building for both platforms, you need to manage WebView separately for Android and WKWebView for iOS or use a no-code platform like WebToNative that handles both automatically.
7. WebView Vs React Native: Which should I choose?
A. If you already have an exciting website, WebView is the fastest, easiest, and budget-friendly way to build your Android app. If you prefer deep app integration, with heavy animations and a complete native experience, choose React Native.
8. Can WebView apps have access to device features?
A. No. You have to grant this permission using the Android Manifest file and handle it using the JavaScript APIs. For basic WebView apps, this requires extra development.
Conclusion
Using WebView to convert your website into an Android app is the fastest approach to reach a wider mobile audience. By following the steps properly, you can get your working Android app within a short time period.
Android Studio gives you complete control over the code. WebToNative simplifies the entire process for non-technical individuals and groups, or even developers. This complete guide shares everything from creating a WebView app to fixing issues so that you can deliver a smooth app experience to users.
Similar Blogs