


How to Invite Testers to TestFlight – A Complete Guide 2026
Published on:
19 June, 2026
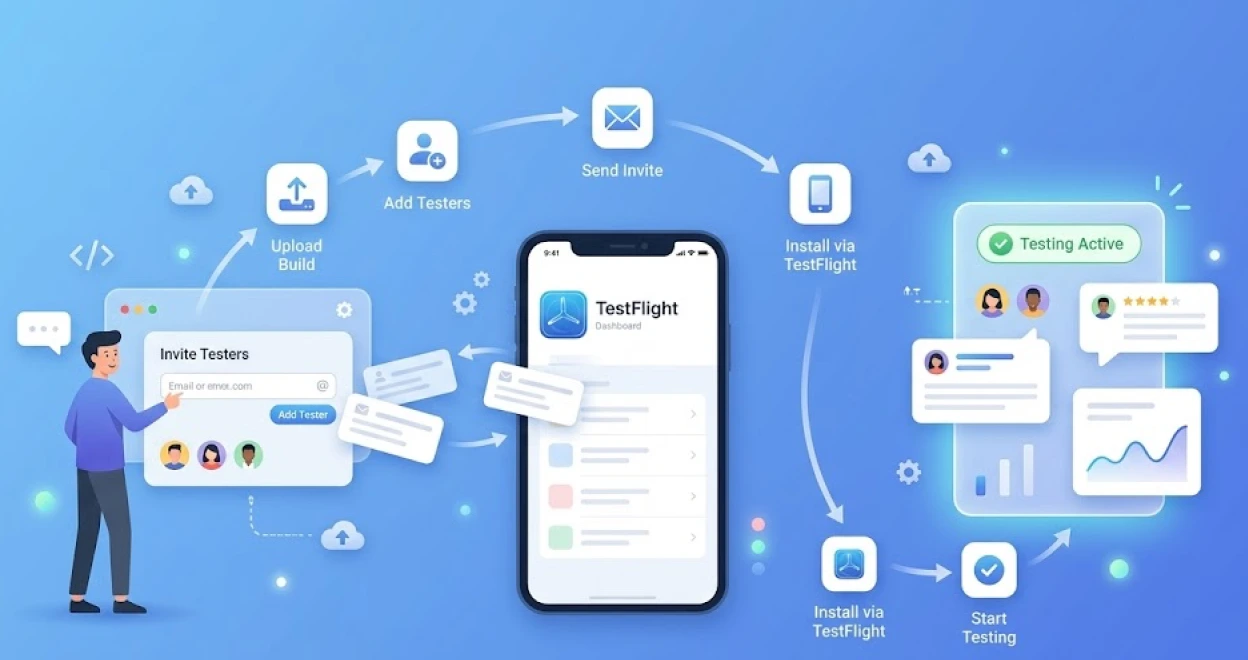
You have built your iOS app. Now it’s time to test it with real people before hitting the Apple App Store. That’s where TestFlight comes in, Apple’s official beta testing platform that allows you to release pre-built apps to testers, collect feedback, and detect bugs before the public app launch.
Our team has been using TestFlight for years, and honestly, it has made the entire testing process much easier. You can view and test multiple iOS apps together in one place instead of juggling manual effort. Bugs and fixes are easier to handle as testers are using the actual build instead of the simulator. The most amazing thing about Version Handling is that you can keep your older versions also with newer versions to help better understand the app's build. One more thing I want to add is that sharing access is also simplified; a link or a redeem code is all you need to share the app for testing within minutes.
You might feel, after hearing the testing, that it is meant for developers. Trust me, the process is easier than you think. It is just that someone must be there to explain it to you in easier terms, and I will take the process as smoothly as possible so that even if you are from a non-tech background or a developer running the first beta testing, it will be easier for you to test your app.
This guide walks you through every step to invite both internal and external testers to TestFlight.
What is TestFlight?
TestFlight is Apple’s free beta testing platform built inside App Store Connect. It allows you to share your iOS app with testers before making it live on the Apple App Store. Testers download the TestFlight app on their iPhone or iPad. From there, they install your app, test it, and send feedback on your build.
TestFlight supports two types of testers. Internal and External testers, but the process to invite both testers is different.
Internal Vs External Testers: What is the Difference?
Before you start to invite testers, you must understand which type of tester you are working with.
| Internal Testers | External Testers | |
|---|---|---|
| Who Are They | Members of your App Store Connect team | Anyone outside your App Store team |
| How They Join | Email invitation through App Store Connect | Email invitation or public link |
| Roles Required | Account Holder, Marketing, App Manager, Developer, Admin | No role required |
| Maximum Testers | 100 | 10,000 |
| Apple Review Required | No | Yes (Only First Build) |
| Build Availability | 90 Days | 90 Days |
| Managed Apple Account Supported | No | No |
QUICK: If they are in your dev team, they are internal. If they are customers, beta users, or anyone outside your organization, they are external.
Essentials: Before You Start
Ensure you have the following things before inviting any tester:
-
Your app must be added to the App Store Connect
-
Your approved build uploaded through Xcode or Instruments
-
Your Apple Developer Program membership must be active
-
Your beta app description and beta app review information must be filled in before external sharing (Apple’s requirement for external testers)
How to Invite External Testers to TestFlight
Inviting external testers to TestFlight allows for collecting feedback from beta users, clients, or real-world users. You can invite up to 10,000 external testers per iOS mobile app.
Step 1: Upload Your Build
Upload your app build through Xcode or App Store Connect. The app build must go through Apple’s TestFlight App Review before making it accessible to external testers. A lighter review than the complete App Store review, as it is required for your first external build.
NOTE: You can submit up to 6 builds for the TestFlight app review within 24 hours. Ensure one build per version can be in review at a time.
Step 2: Create an External Testing Group

-
Open App Store Connect and go to your app.
-
Click on the TestFlight tab.
-
In the sidebar, under External Testing. Click the + icon.
-
Give your group a name.
-
Click on Create.
Groups allow you to organize testers and control which build each group receives. You can have multiple groups with different builds only if you are testing features with specific testers.
Step 3: Add a Build to the Group

-
Select the external testing group you just created.
-
Click on Add Builds.
-
In the dialog box, select the platform and version.
-
Choose a build from the table. And click on Add. In the What to Test field, describe what you want testers to focus on.
-
Add localized testing notes for different languages (Optional).
-
Enable "Automatically Notify Testers" if you want testers to be alerted once the build is approved.
Step 4: Wait for Apple’s Review
Apple will review your first external build before distributing. This usually takes 24 hours to 48 hours. Once approved, future builds of the same version might not require another review.
Step 5: Invite Testers
You have two ways to invite external testers:
Option A – Email Invitation

-
In your group, click on the Testers tab.
-
Click + and enter the email address manually or upload a CSV file with multiple email addresses.
-
TestFlight sends each tester an invitation email with an installation link.
Option B – Public Link

-
Click on Create Public Link.
-
Choose Open to Anyone or Filter by Criteria based on device or platform.
-
Set a tester limit between 1 and 10,000 (Optional).
-
Share the link anywhere on social media, Slack, Discord, or email campaigns.
This option is the fastest way to onboard a large number of beta testers without manually entering every email address.
Step 6: Notify Testers
If you don’t enable automatic notifications, you have to manually notify testers once the build is approved.
-
Go to the Build, inside your external testing group.
-
Click on Notify Testers.
-
Testers will receive a notification to download or install the build through the TestFlight app.
How to Invite Internal Testers to TestFlight
Inviting internal testers to TestFlight allows for collecting feedback from the members of their App Store Connect team. They do not require Apple’s review approval. Once you add a build to an internal group, it is available immediately. You can add up to 100 internal testers.
Step 1: Create an Internal Testing Group
-
Open App Store Connect. And go to your app.
-
Click on the TestFlight tab.
-
In the sidebar, under Internal Testing. Click on the + icon.
-
Set the name for the Group.
-
Click on Create.
-
Enable Automatic Distribution to send new builds to all group members automatically without any manual effort (Optional).
Step 2: Invite Testers
-
Click on Invite Testers
-
A dialog box showcasing all the eligible App Store Connect users from your team.
-
Select the users you want to add. Ensure they hold an Account Holder, App Manager, Developer, Marketing Role, or Admin.
-
Click on Add.
Step 3: Add a Build to the Group
-
Click on Add Builds.
-
Now, click on Next.
-
In the What to Test, describe the focus areas for this build.
-
Add any localized testing notes if required.
-
Click on Add.
Step 4: Testers Access the Build
Once the build is added, invited internal testers automatically receive an email address with instructions to install the TestFlight app and access the build. The build remains available for 90 days from the date of upload.
Tips to Get Stronger Feedback from TestFlight Testers
Getting testers into TestFlight is just the beginning. But getting the feedback from the TestFlight testers is the step where most app owners or developers' teams fail or don’t get the desired feedback or answers.
Below are a few tips to make the most of your beta testing and collect feedback to improve your iOS app.
1. Be precise in your “What to Test” notes.
Incomplete instructions, such as “test the app” might lead to unclear and unreliable feedback. You should mention exact screens or flows like “test the checkout flow and verify the payment successful message appears correctly." These specific and clear instructions lead to detailed and actionable feedback from testers.
2. Create separate groups for different use cases.
Users notice different issues each time they interact with the iOS app. Dividing testers into groups based on level of experience, knowledge, or device type. The segregation allows comparing feedback and tracking behaviors & patterns effectively.
3. Set a tester’s limit on your public link.
Begin with 50 to 100 testers when using a public link for external testing. Verify the build with these smaller groups and gradually increase the testers' limit. It helps prevent duplicate error reports, giving time to fix important issues early.
4. Keep track of the Crashes tab in App Store Connect.
TestFlight automatically collects crash reports from testers before reporting the issues manually. Check this tab regularly and track each report thoroughly before uploading a fresh build or submitting your iOS app for the App Store review.
5. Ensure builds are updated regularly.
Testers leave the apps quickly if nothing changes between the app versions. Regularly fixing bugs and pushing new updated builds signals to the testers that their feedback is being heard and actioned on. It helps engage testers more efficiently and deeply with the app.
6. Reward active testers.
Acknowledging testers who consistently report bugs or issues and provide comprehensive feedback. A small thank-you note, a subscription to your app, and loyalty rewards inside your app make the testers motivated and continue to provide quality input about your app.
Frequently Asked Questions
Q1. How many testers can I invite to TestFlight?
A. You can invite up to 100 internal testers and up to 10,000 external testers per iOS app through the TestFlight app.
Q2. Is the Apple Developer Program free?
A. No, the Apple Developer Program is a paid membership program needed for publishing apps on the Apple App Store and distributing beta app builds through TestFlight.
Q3. Does Apple review the TestFlight builds?
A. External testing builds require an Apple review before they can be distributed. Internal testing builds do not require an Apple review and are available to testers immediately after the upload.
Q4. What is TestFlight’s email policy?
A. Apple sends an invitation containing a link to join the beta testing when a developer invites testers through email. Testers ensure to accept the invitation with their Apple ID through the TestFlight app.
Q5. How long are TestFlight builds available?
A. All TestFlight builds expire after 90 days from the date of apps uploaded.
Q6. What does a beta version of a mobile app mean?
A. A beta version is a pre-release version of an app that is shared with testers before launching on the Apple App Store. It helps developers to detect errors or bugs, gather testers' feedback, and test new features. This makes it easier for developers to fix the issues and deliver a smooth app experience to people.
Q7. Can I invite testers without their email address?
A. Yes, for external testers, you can create a public link and share it anywhere. Anyone with the link can join your testing group, up to the limit you set.
Q8. What is the difference between a public link and an email invitation in TestFlight?
A. An email invitation sends a direct invite to a particular user. A public link can be shared broadly and allows anyone to join. It is useful for bigger beta programs or community testing in TestFlight.
Q9. Can a tester use TestFlight without an Apple ID?
A. No, testers need an Apple ID and the TestFlight app installed on their devices to access the beta builds.
Q10. Do external testers require downloading a separate app?
A. Yes, external testers must download the TestFlight app from the App Store on their iPhone or iPad before they install and test your beta build.
Q11. What happens when my TestFlight build expires after 90 days?
A. The build will no longer be available to testers. You will need to upload a new build and re-upload it into the testing groups.
Q12. How can I test an iOS app without using TestFlight?
A. You can test an iOS app without TestFlight by installing it directly from Xcode on a registered device using an Ad Hoc distribution or deploying it through a Mobile Device Management solution.
Q13. Do I have to pay to use the TestFlight app?
A. No. The TestFlight app is free for testers to download and use. Developers must ensure having an active Apple Developer Program membership to distribute iOS apps through the TestFlight app.
Q14. Does TestFlight require a Unique Device Identifier (UDID)?
A. No, TestFlight does not require testers to share their device UDID. Apple handles the device registration automatically through the tester’s Apple ID. This makes it easier for the testers to distribute their beta apps without collecting device information manually.
Conclusion
TestFlight is an effective way to test the functionality of your iOS app before making it live on the Apple App Store. The process is straightforward once you understand the difference between internal and external testers. Whether you are a development team running an internal QA session or opening a public beta test for users, the above steps are enough to conduct a successful test of your iOS app.
Similar Blogs