


SendBird
Building real-time chat from scratch means solving message delivery, read receipts, typing indicators, offline queuing, push routing, and scaling — months of engineering that isn't your core product.
Sendbird is a communication platform that handles all of that through its SDKs and cloud infrastructure. WebToNative's Sendbird plugin integrates Sendbird's official native iOS and Android SDKs directly into your app — giving your users a native chat experience controllable from your website's JavaScript.
This feature is available for both Android and iOS. You can start with the Pro plan to access this Add-on on Webtonative.
Where to Find It In Your Dashboard
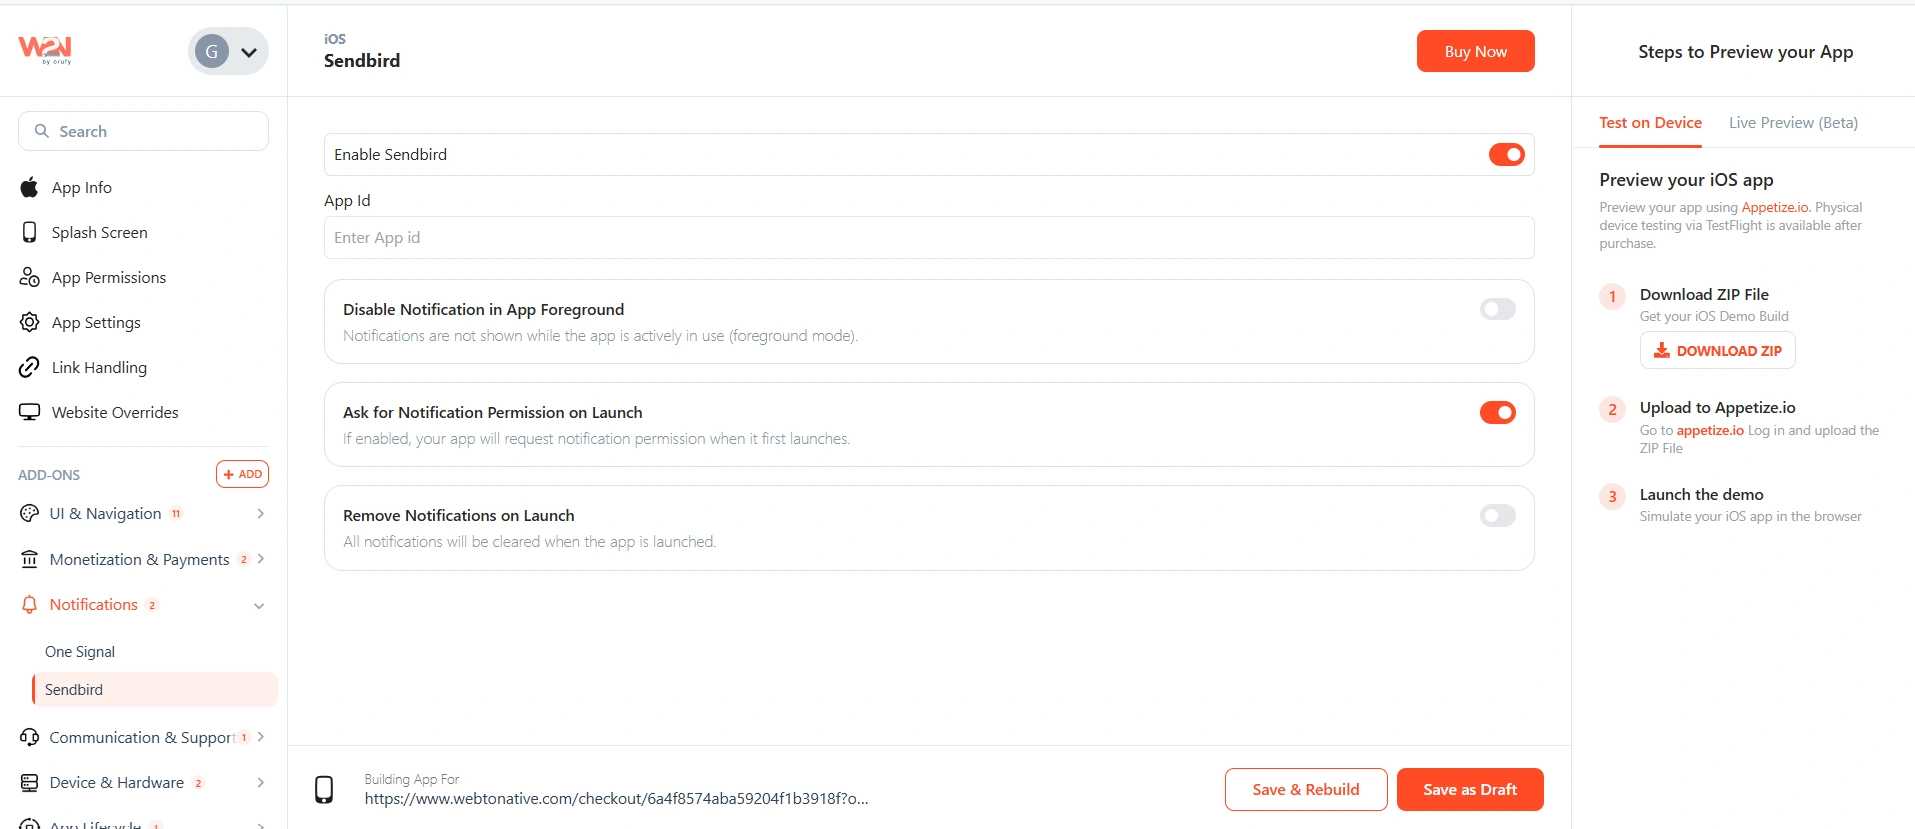
My Apps ➡️ Edit your app ➡️ Add-ons ➡️ Notification ➡️ SendBird
What's included in the SendBird Add-on
Native chat UI
A full-featured, polished chat interface built with Sendbird's native UI kit — smooth scrolling, message bubbles, timestamps, read receipts, and typing indicators.

Group channels
Create group conversations with any set of users. Supports 1-on-1 chats and multi-user group channels. Reuse existing channels with the distinct channel option.

Push notifications
Messages arrive as push notifications even when the app is backgrounded or closed — via APNs on iOS and Firebase Cloud Messaging on Android.
JavaScript bridge
Control everything from your website — initialize users, create channels, open the chat UI, and handle callbacks through simple JavaScript function calls.

User management
Connect users with their own IDs and profiles. Update nicknames and profile images at any time. Sendbird creates new users automatically on first connection.

Session management
Soft-disconnect for temporary pauses (push continues), or full logout when a user signs out (push unregistered, local data cleared).
Why native chat — not a web widget?
| Web-based chat widget in WebView | WebToNative native Sendbird plugin |
|---|---|
| Laggy scrolling — HTML in a WebView can't match native performance | Smooth scrolling and transitions — uses Sendbird's native UI kit |
| Unreliable push notifications — WebView can't access APNs or FCM directly | Reliable push via APNs (iOS) and Firebase Cloud Messaging (Android) |
| Feels out of place — doesn't match mobile UI conventions | Feels like a first-class native feature to users |
| Poor background behavior — notifications stop when the app is closed | Full background behavior — messages arrive even when the app is closed |
When the toggle is Disabled: Notification behavior settings
The three settings below apply to notification behavior across your app — they work even if Sendbird is disabled. They are also shared with OneSignal and Firebase if you use those. Configure them regardless of whether you're using Sendbird chat.
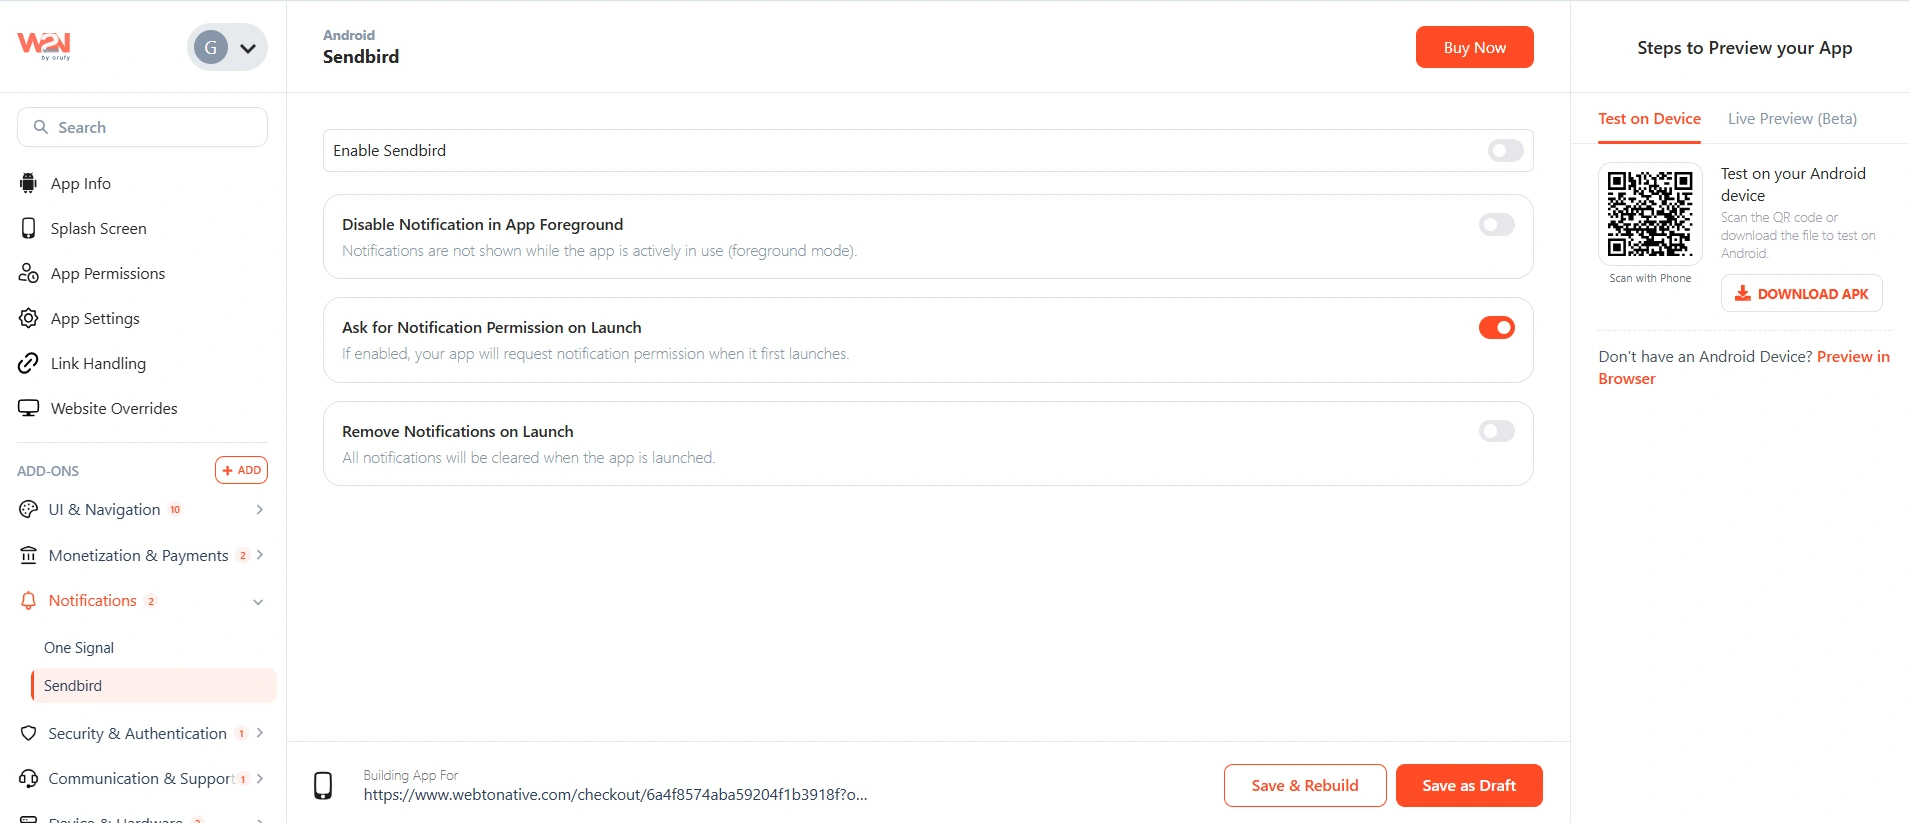
Disable Notifications in App Foreground
When ON, push notification banners are suppressed while the user is actively using the app — the notification arrives silently without interrupting them. When OFF, push banners appear even while the app is open. Example: Instagram suppresses push banners and shows a small in-app banner at the top instead, so your experience isn't interrupted by a full-screen notification.
Ask for Notification Permission on Launch
Modern Android and iOS require explicit user permission before notifications can be delivered. When enabled, the system permission dialog appears the first time the app launches. When disabled, you can defer this prompt — requesting permission later via a specific Trigger URL (a page path inside your app that, when visited, triggers the permission dialog) or through a manual action in your website's JavaScript.

Remove Notifications on Launch
When ON, all pending notifications from your app are automatically cleared from the device's notification tray when the user opens the app. Example: WhatsApp clears all message notifications the moment you open the app — you don't need to dismiss them manually.
Steps to Apply Push Notifications with SendBird on Webtonative Dashboard
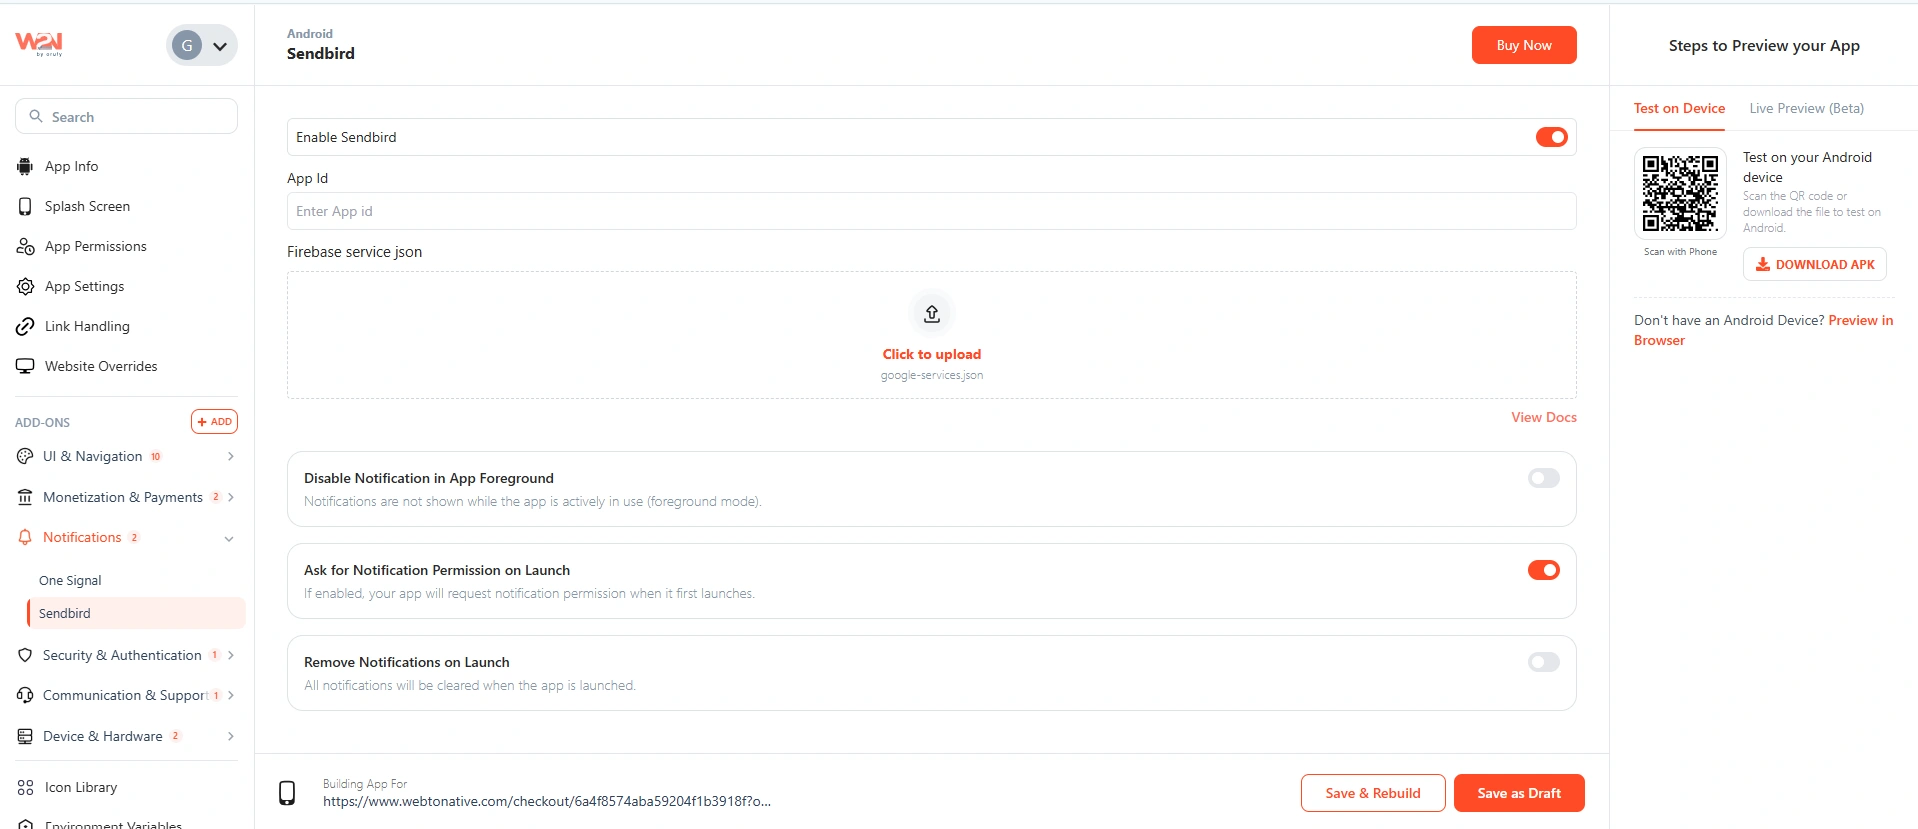
Enable the toggle
Enable the toggle to start making changes.
Enter your Sendbird Application ID
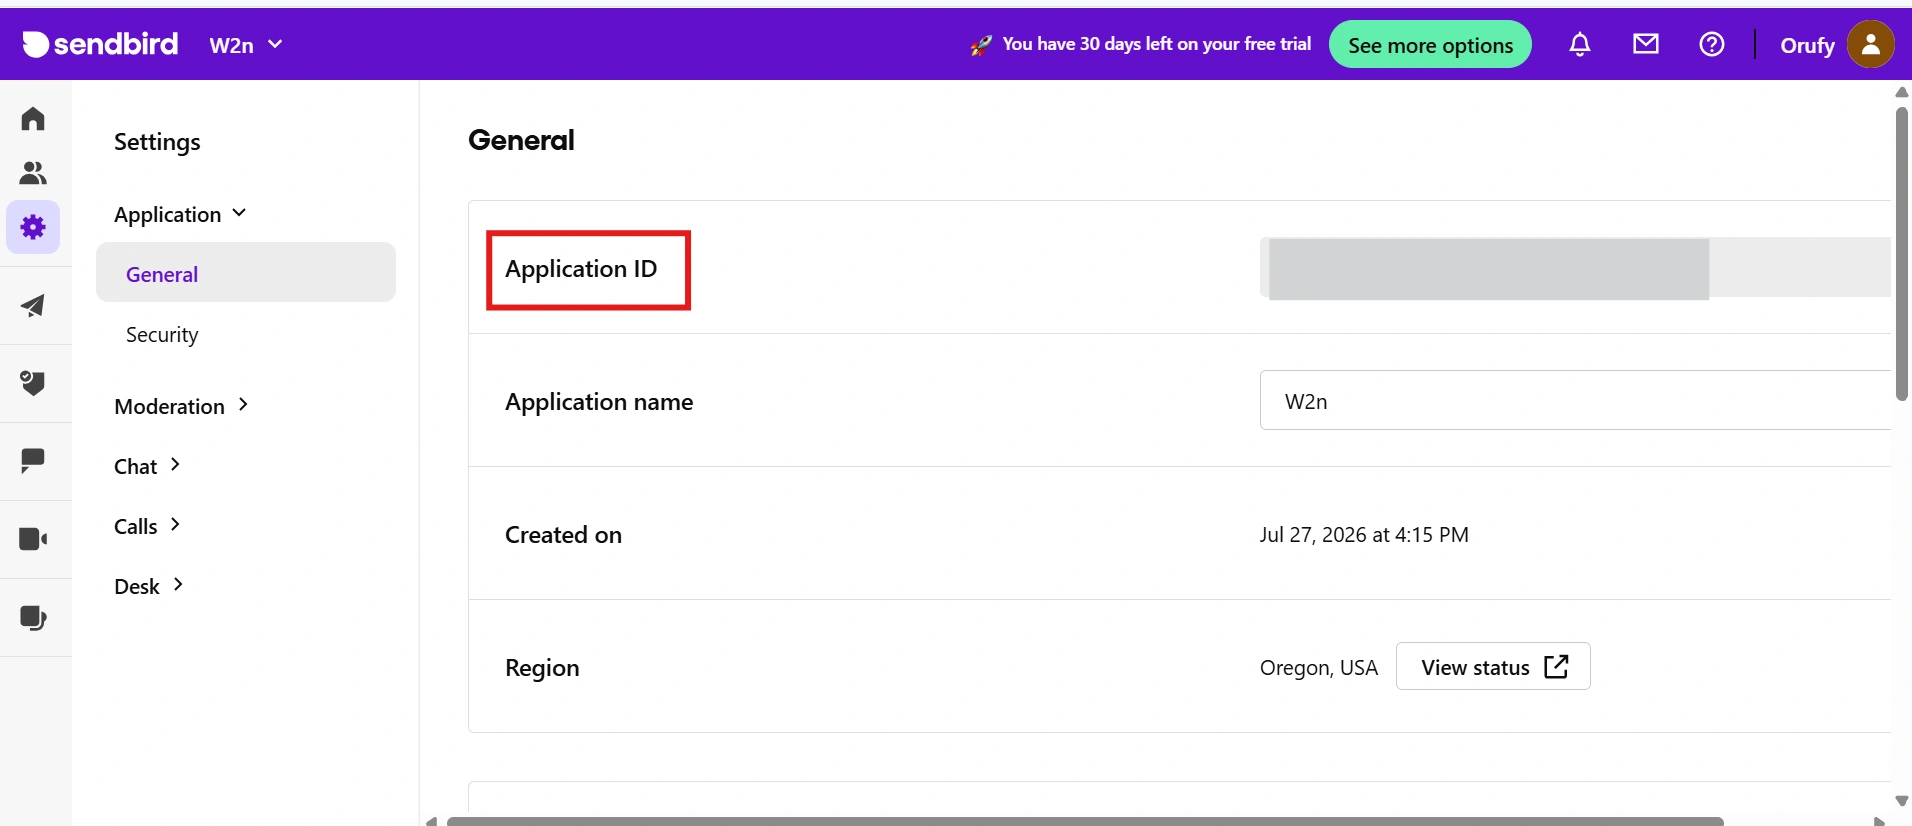
Find your Application ID in the Sendbird dashboard (https://dashboard.sendbird.com/ (opens in a new tab)). This connects WebToNative to your specific Sendbird environment.
Sendbird Dashboard › Settings › General › Application ID
Upload Firebase Service JSON
Android
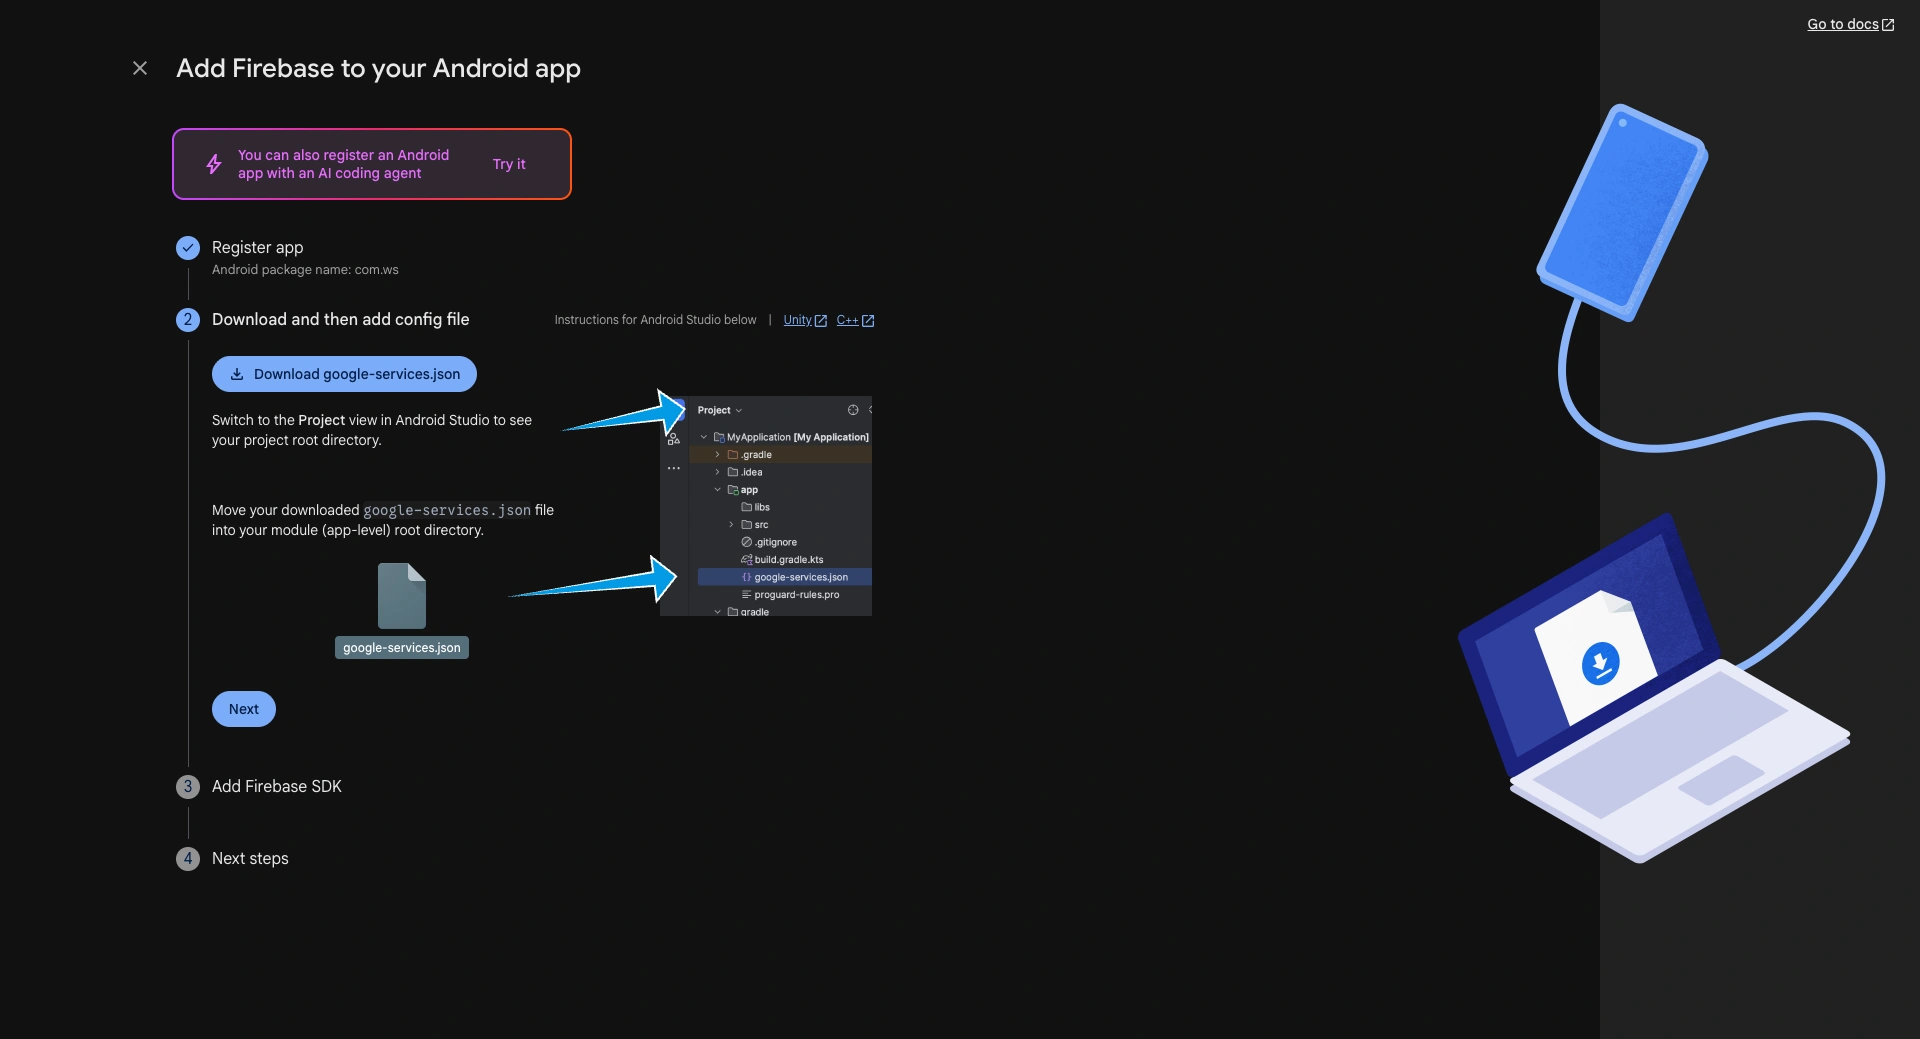
The google-services.json file is required for Android push notifications. It authorizes Firebase Cloud Messaging to deliver notifications to your app.
iOS
The google-services.json file is not required. iOS uses APNs credentials configured directly in the Sendbird dashboard — not a Firebase file.
How to get google-services.json
- Go to Firebase Console (https://console.firebase.google.com/ (opens in a new tab)) and open your project.
- Click the gear icon → Project Settings.
- Go to the General tab → scroll to Your apps.
- If your Android app isn't listed yet, click Add app → Android. Enter your package name — find this on the App Info page in your WebToNative dashboard.
- Click Download google-services.json.
- Upload the downloaded file in the WebToNative dashboard.
Setting up Firebase for iOS as well? Read the complete guide: Firebase Notification Integration for iOS →https://www.webtonative.com/support/pluginsetup/firebasenotificationintegrationios (opens in a new tab)
Enable notification behavior settings
Configure the three notification behavior toggles described above to match your app's UX requirements.
- Disable Notifications in App Foreground
- Ask for Notification Permission on Launch
- Remove Notifications on Launch
Save and Rebuild
Click Save then Save & Rebuild to generate a new app build with the Sendbird push configuration active.
Push notifications must be tested on a real physical device. iOS simulators cannot receive APNs, and Android emulators have limited FCM support. Always use a real device before going live.
Sendbird dashboard — push credentials
After configuring WebToNative, set up push credentials inside your Sendbird dashboard so Sendbird can deliver notifications to your users' devices.
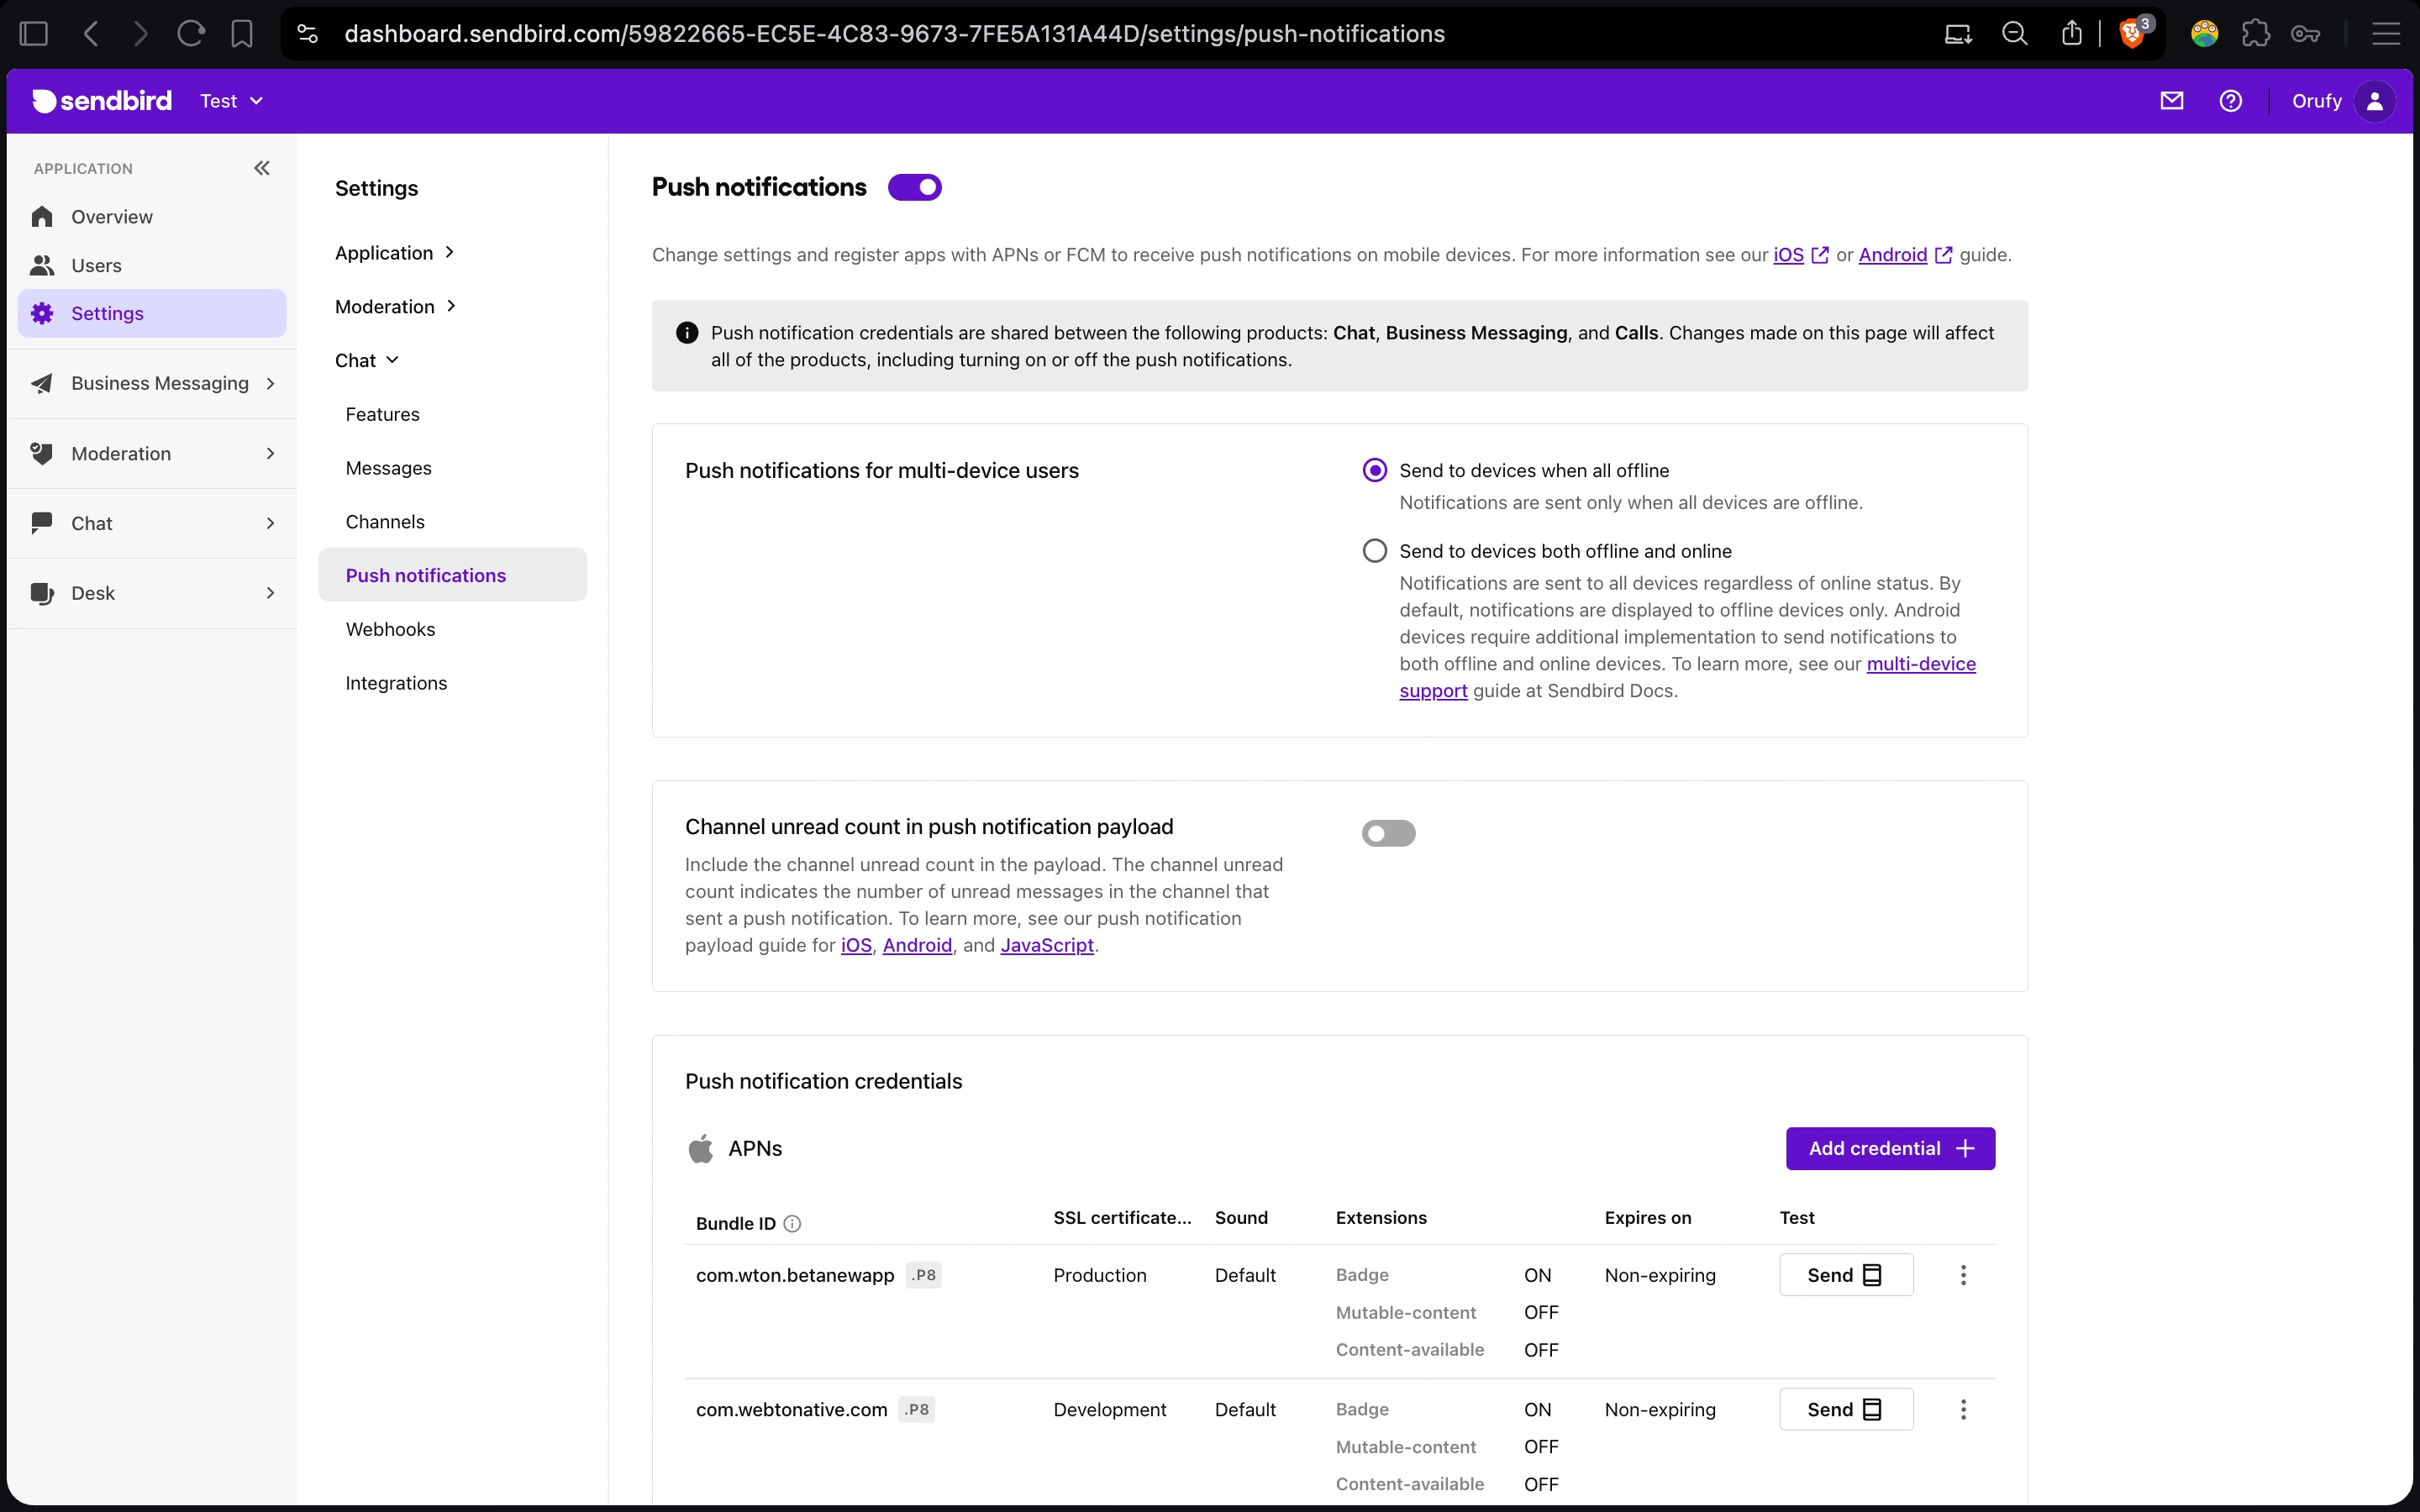
Navigate to Push Notifications in Sendbird
- Log in to your Sendbird dashboard.
- Create an application (if you haven't already) — enter the application name and select your server region.
- In the sidebar, go to Settings.
- Expand the Chat menu.
- Click Push Notifications.
Android — Firebase Service Account Key
To send push notifications to Android devices, Sendbird needs a Firebase Service Account Key. This is different from google-services.json — it is a private key that lets Sendbird securely call Firebase on your behalf.

ervice-account-key.json
A private key file from Firebase. Sendbird uses it to authenticate against Firebase Cloud Messaging (FCM HTTP v1 API) and send push notifications to Android devices.
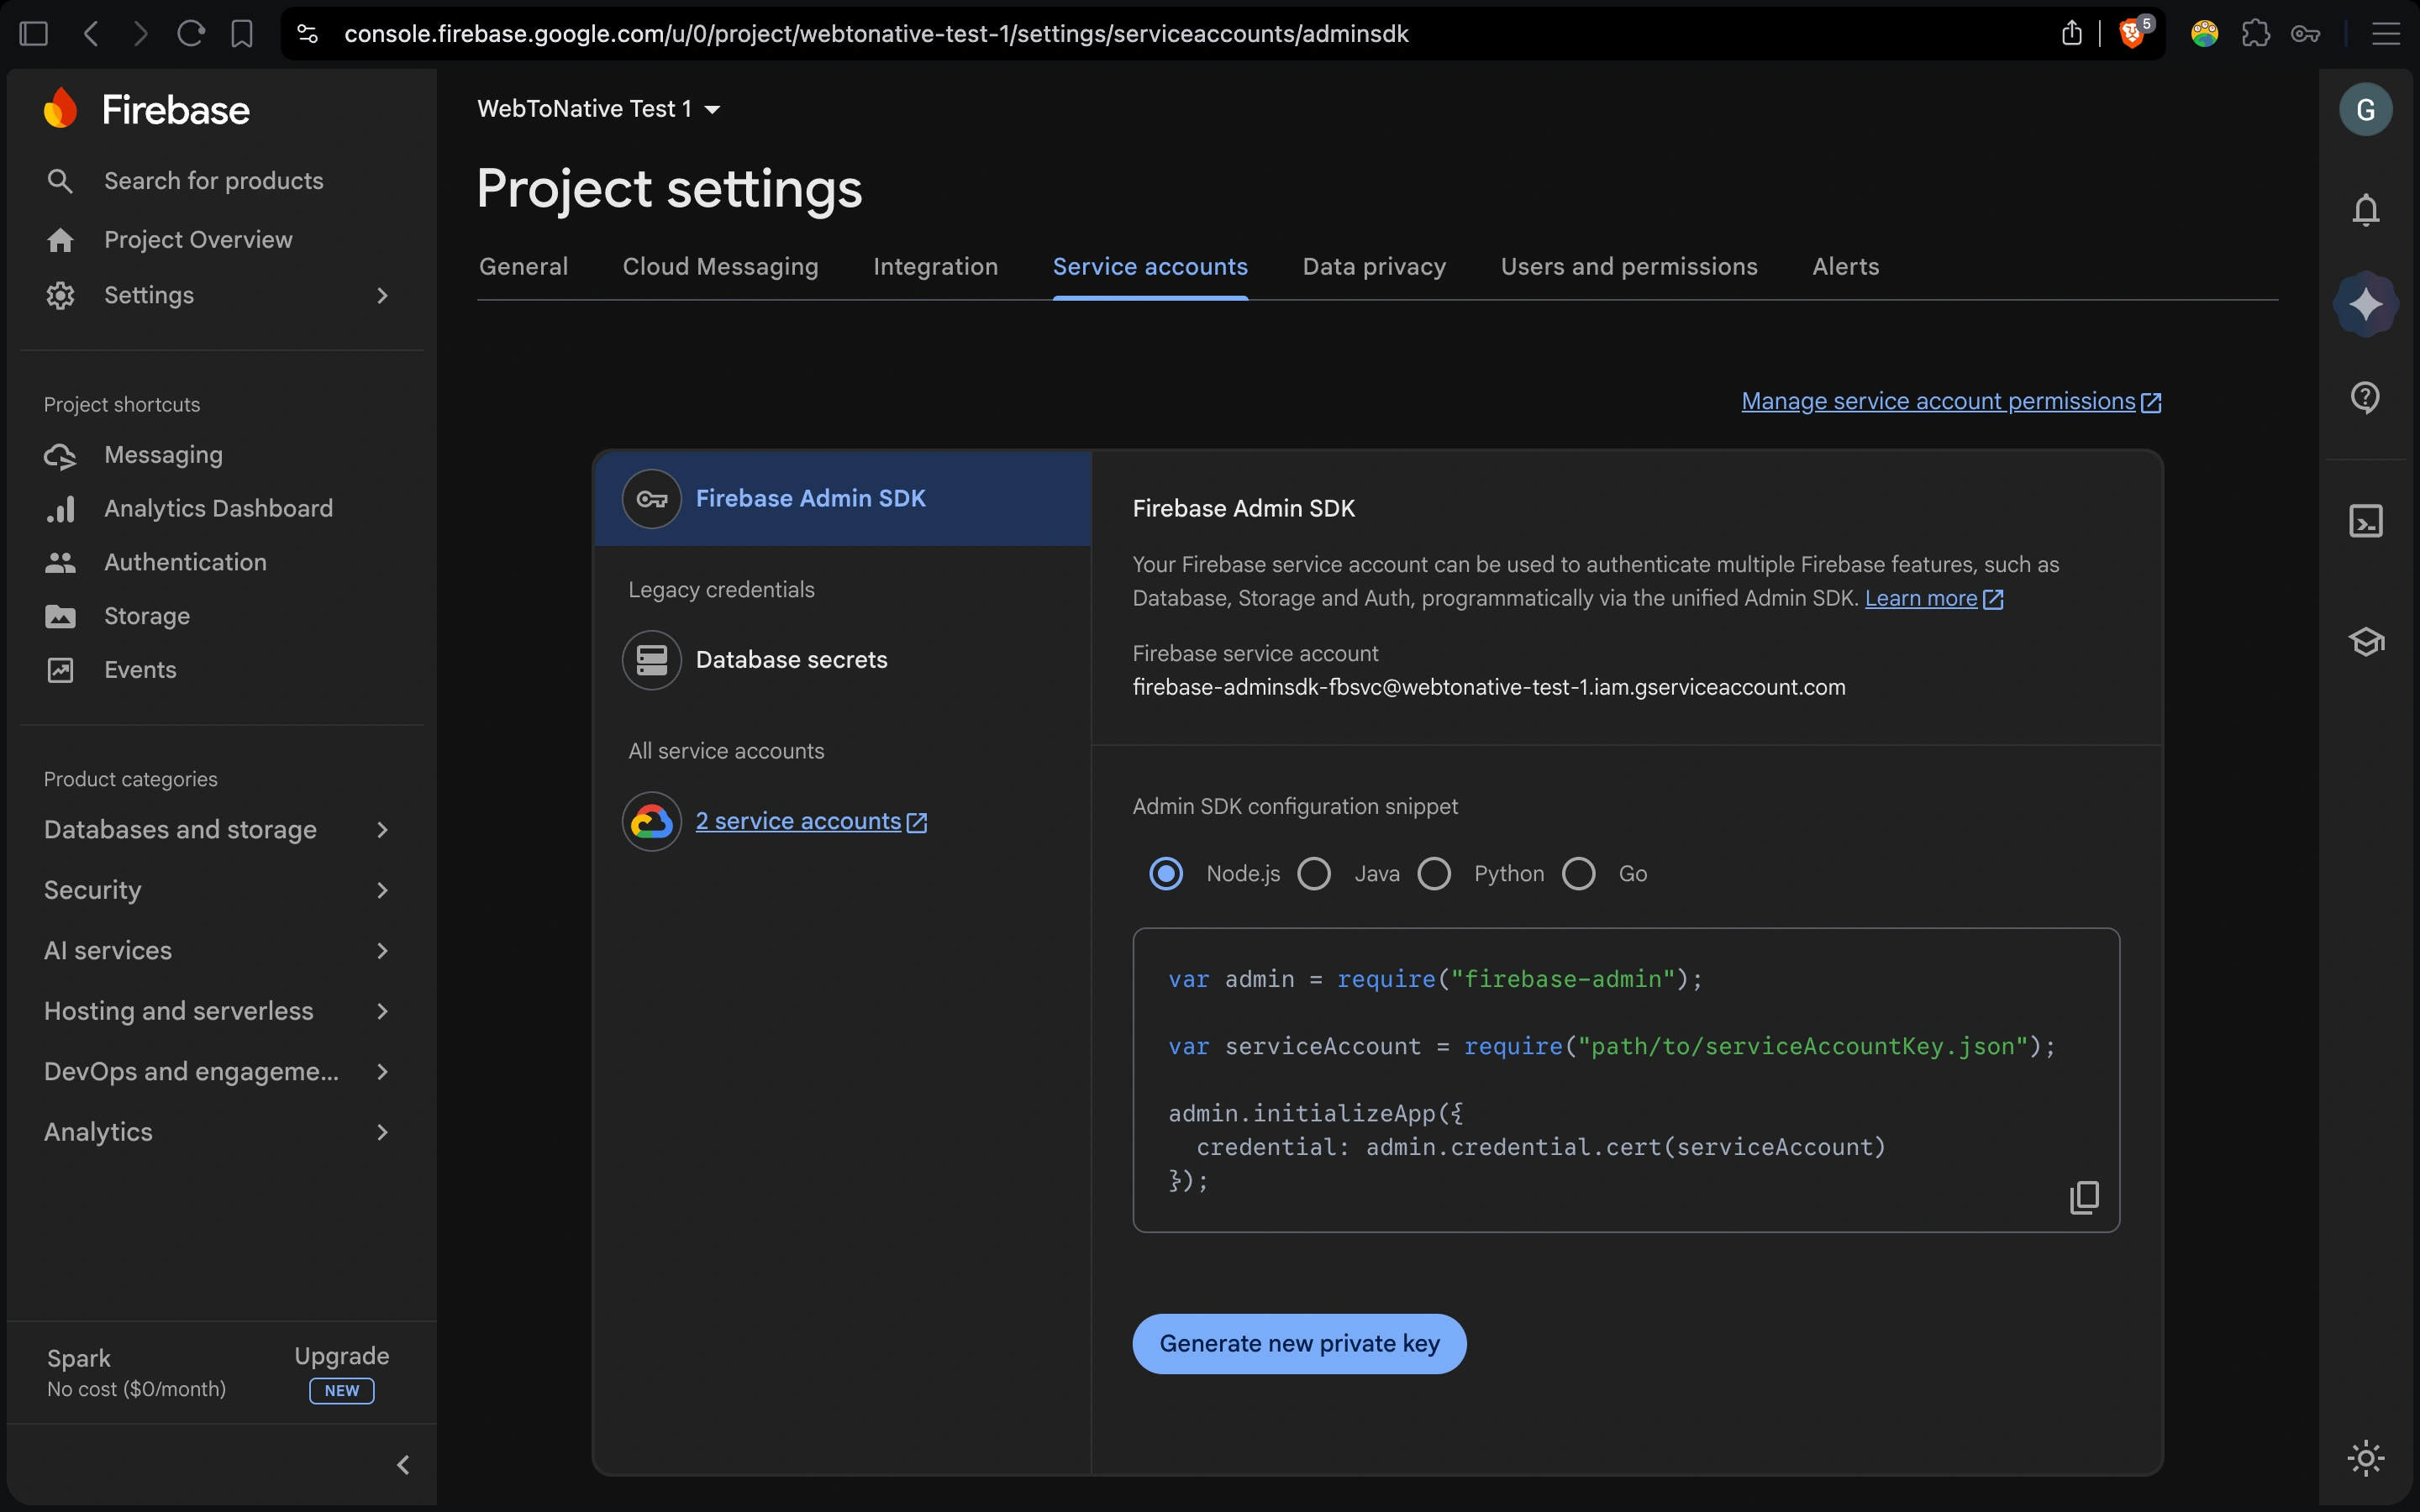
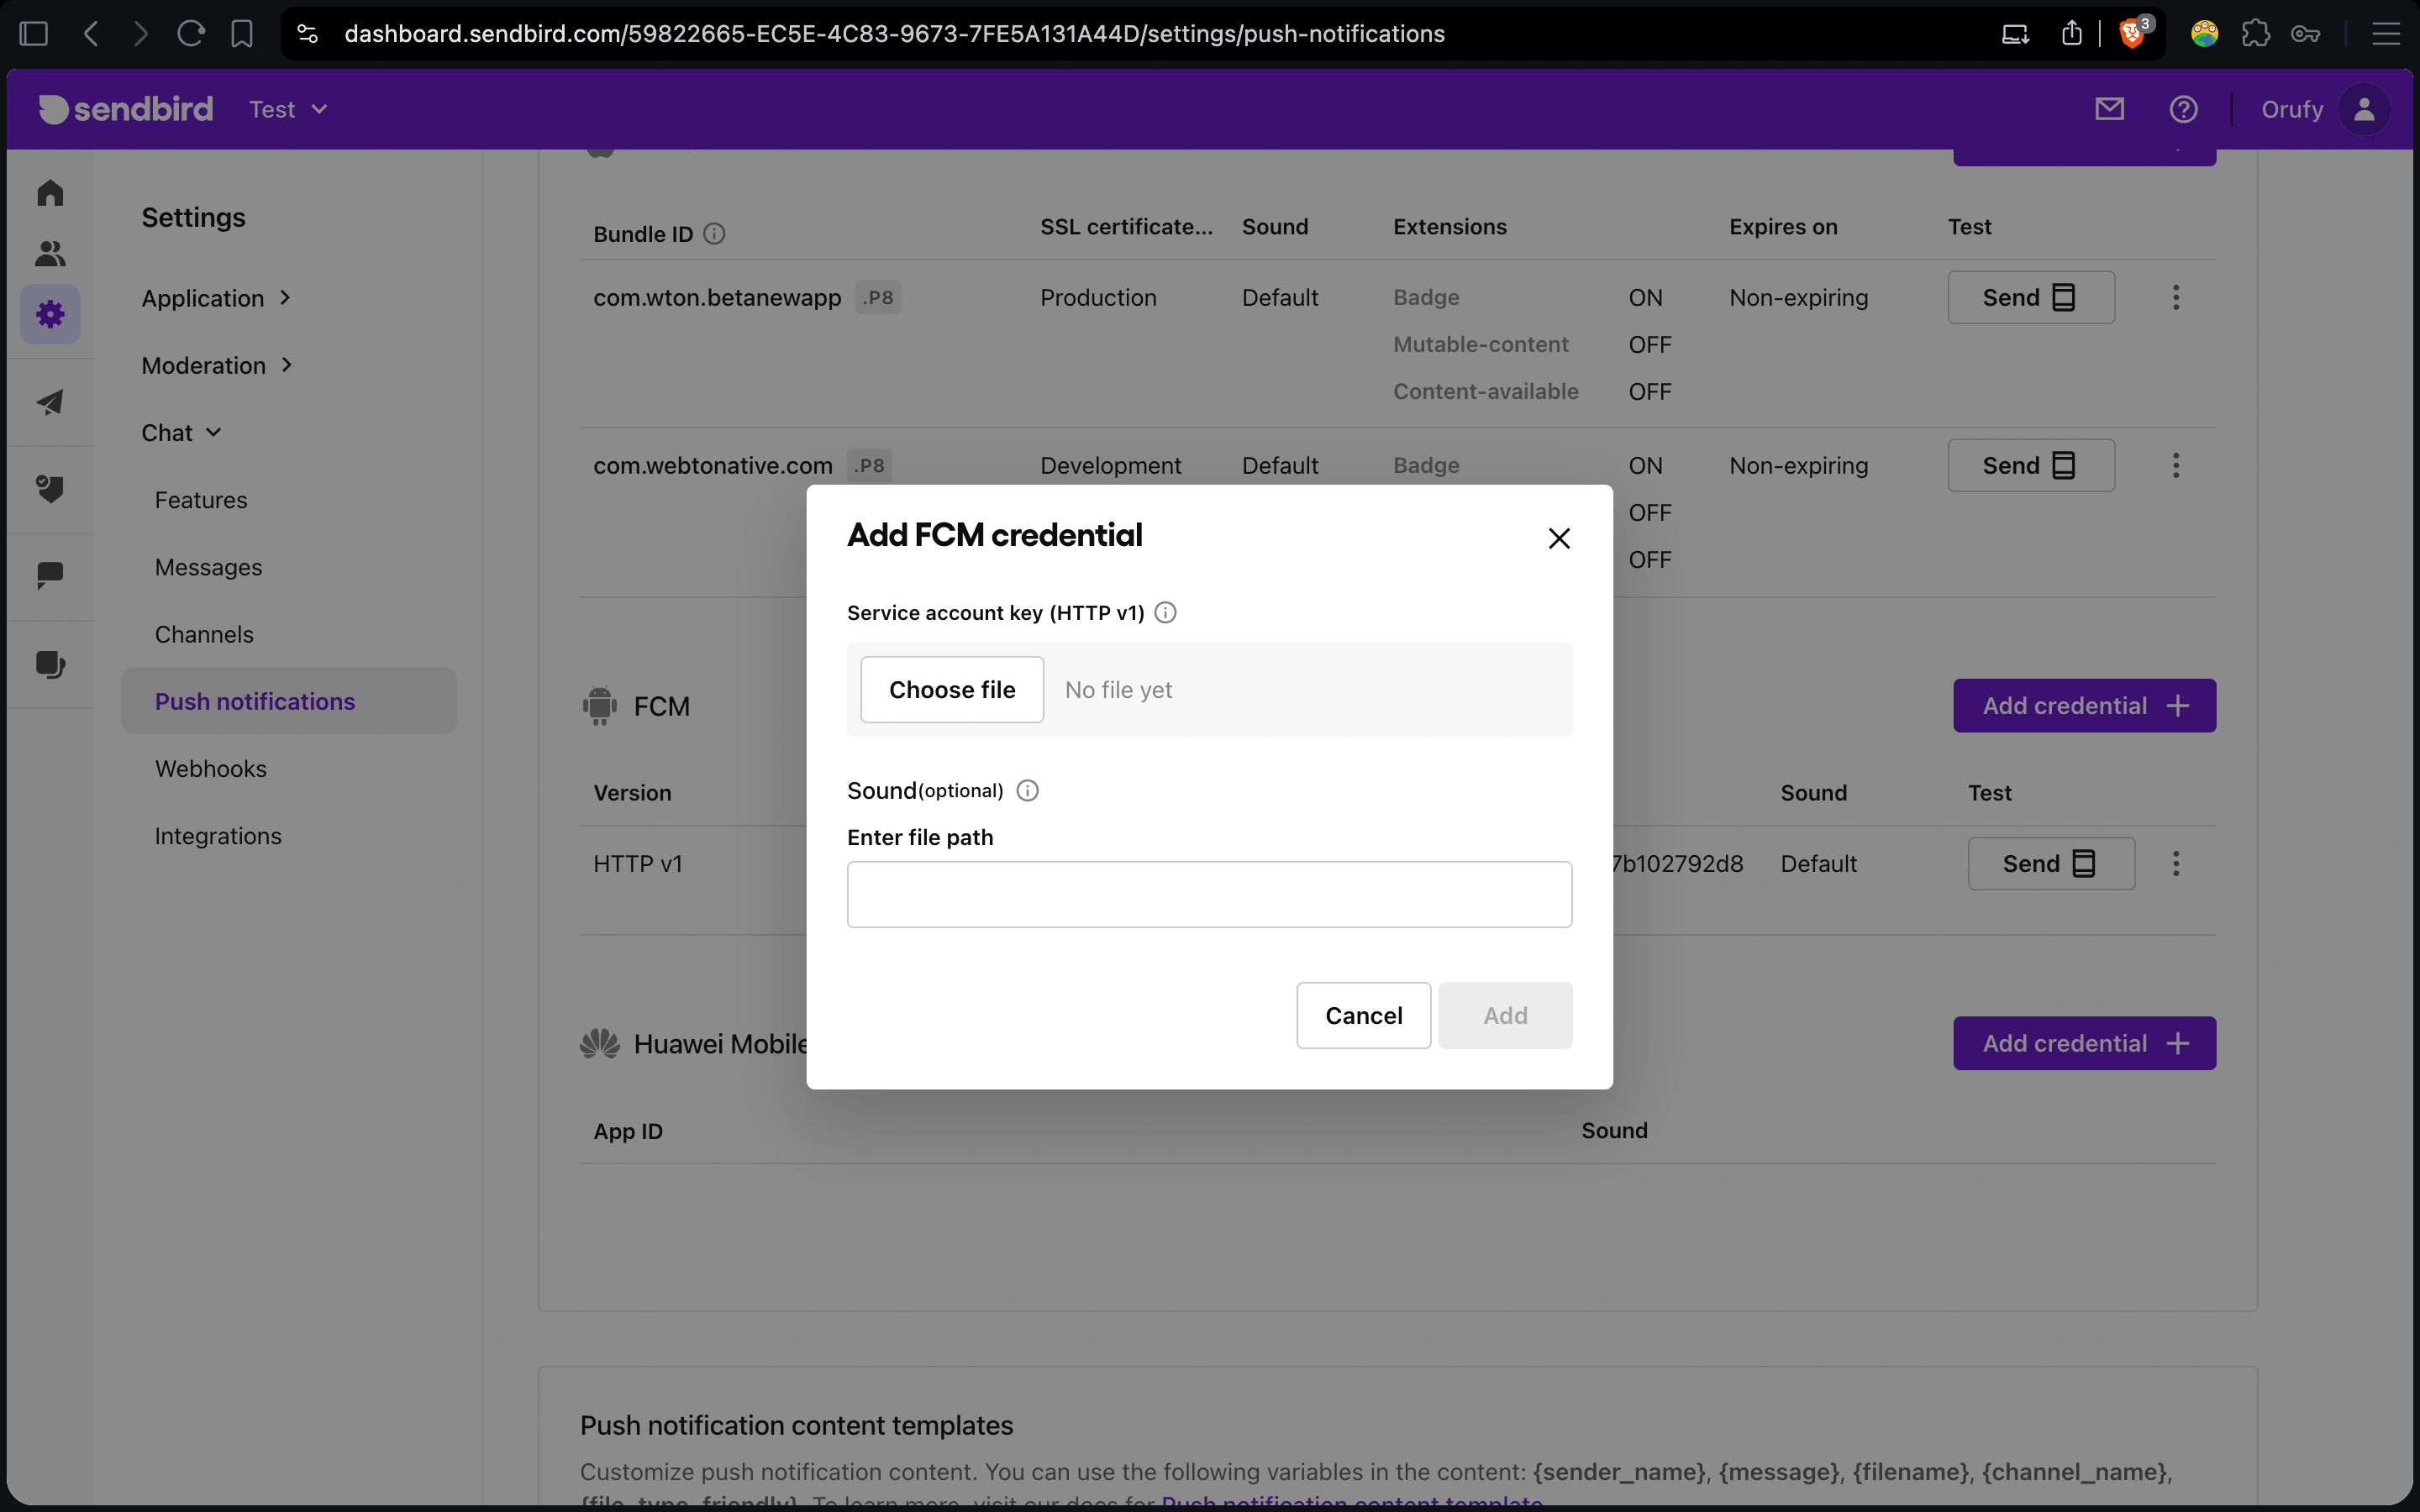
How to get the Service Account Key
- Go to Firebase Console → open your project.
- Click the gear icon → Project Settings.
- Click the Service accounts tab.
- Click Generate new private key → confirm by clicking Generate key.
- A .json file downloads automatically. Keep this file safe — it gives Sendbird permission to send notifications to your users.
- In the Sendbird dashboard Push Notifications page, click Add Credentials → upload this file.
iOS — Apple Push Notification (APNs) Key
iOS push notifications use Apple's APNs system. Sendbird needs an APNs authentication key from your Apple Developer account to deliver messages to iPhones and iPads.
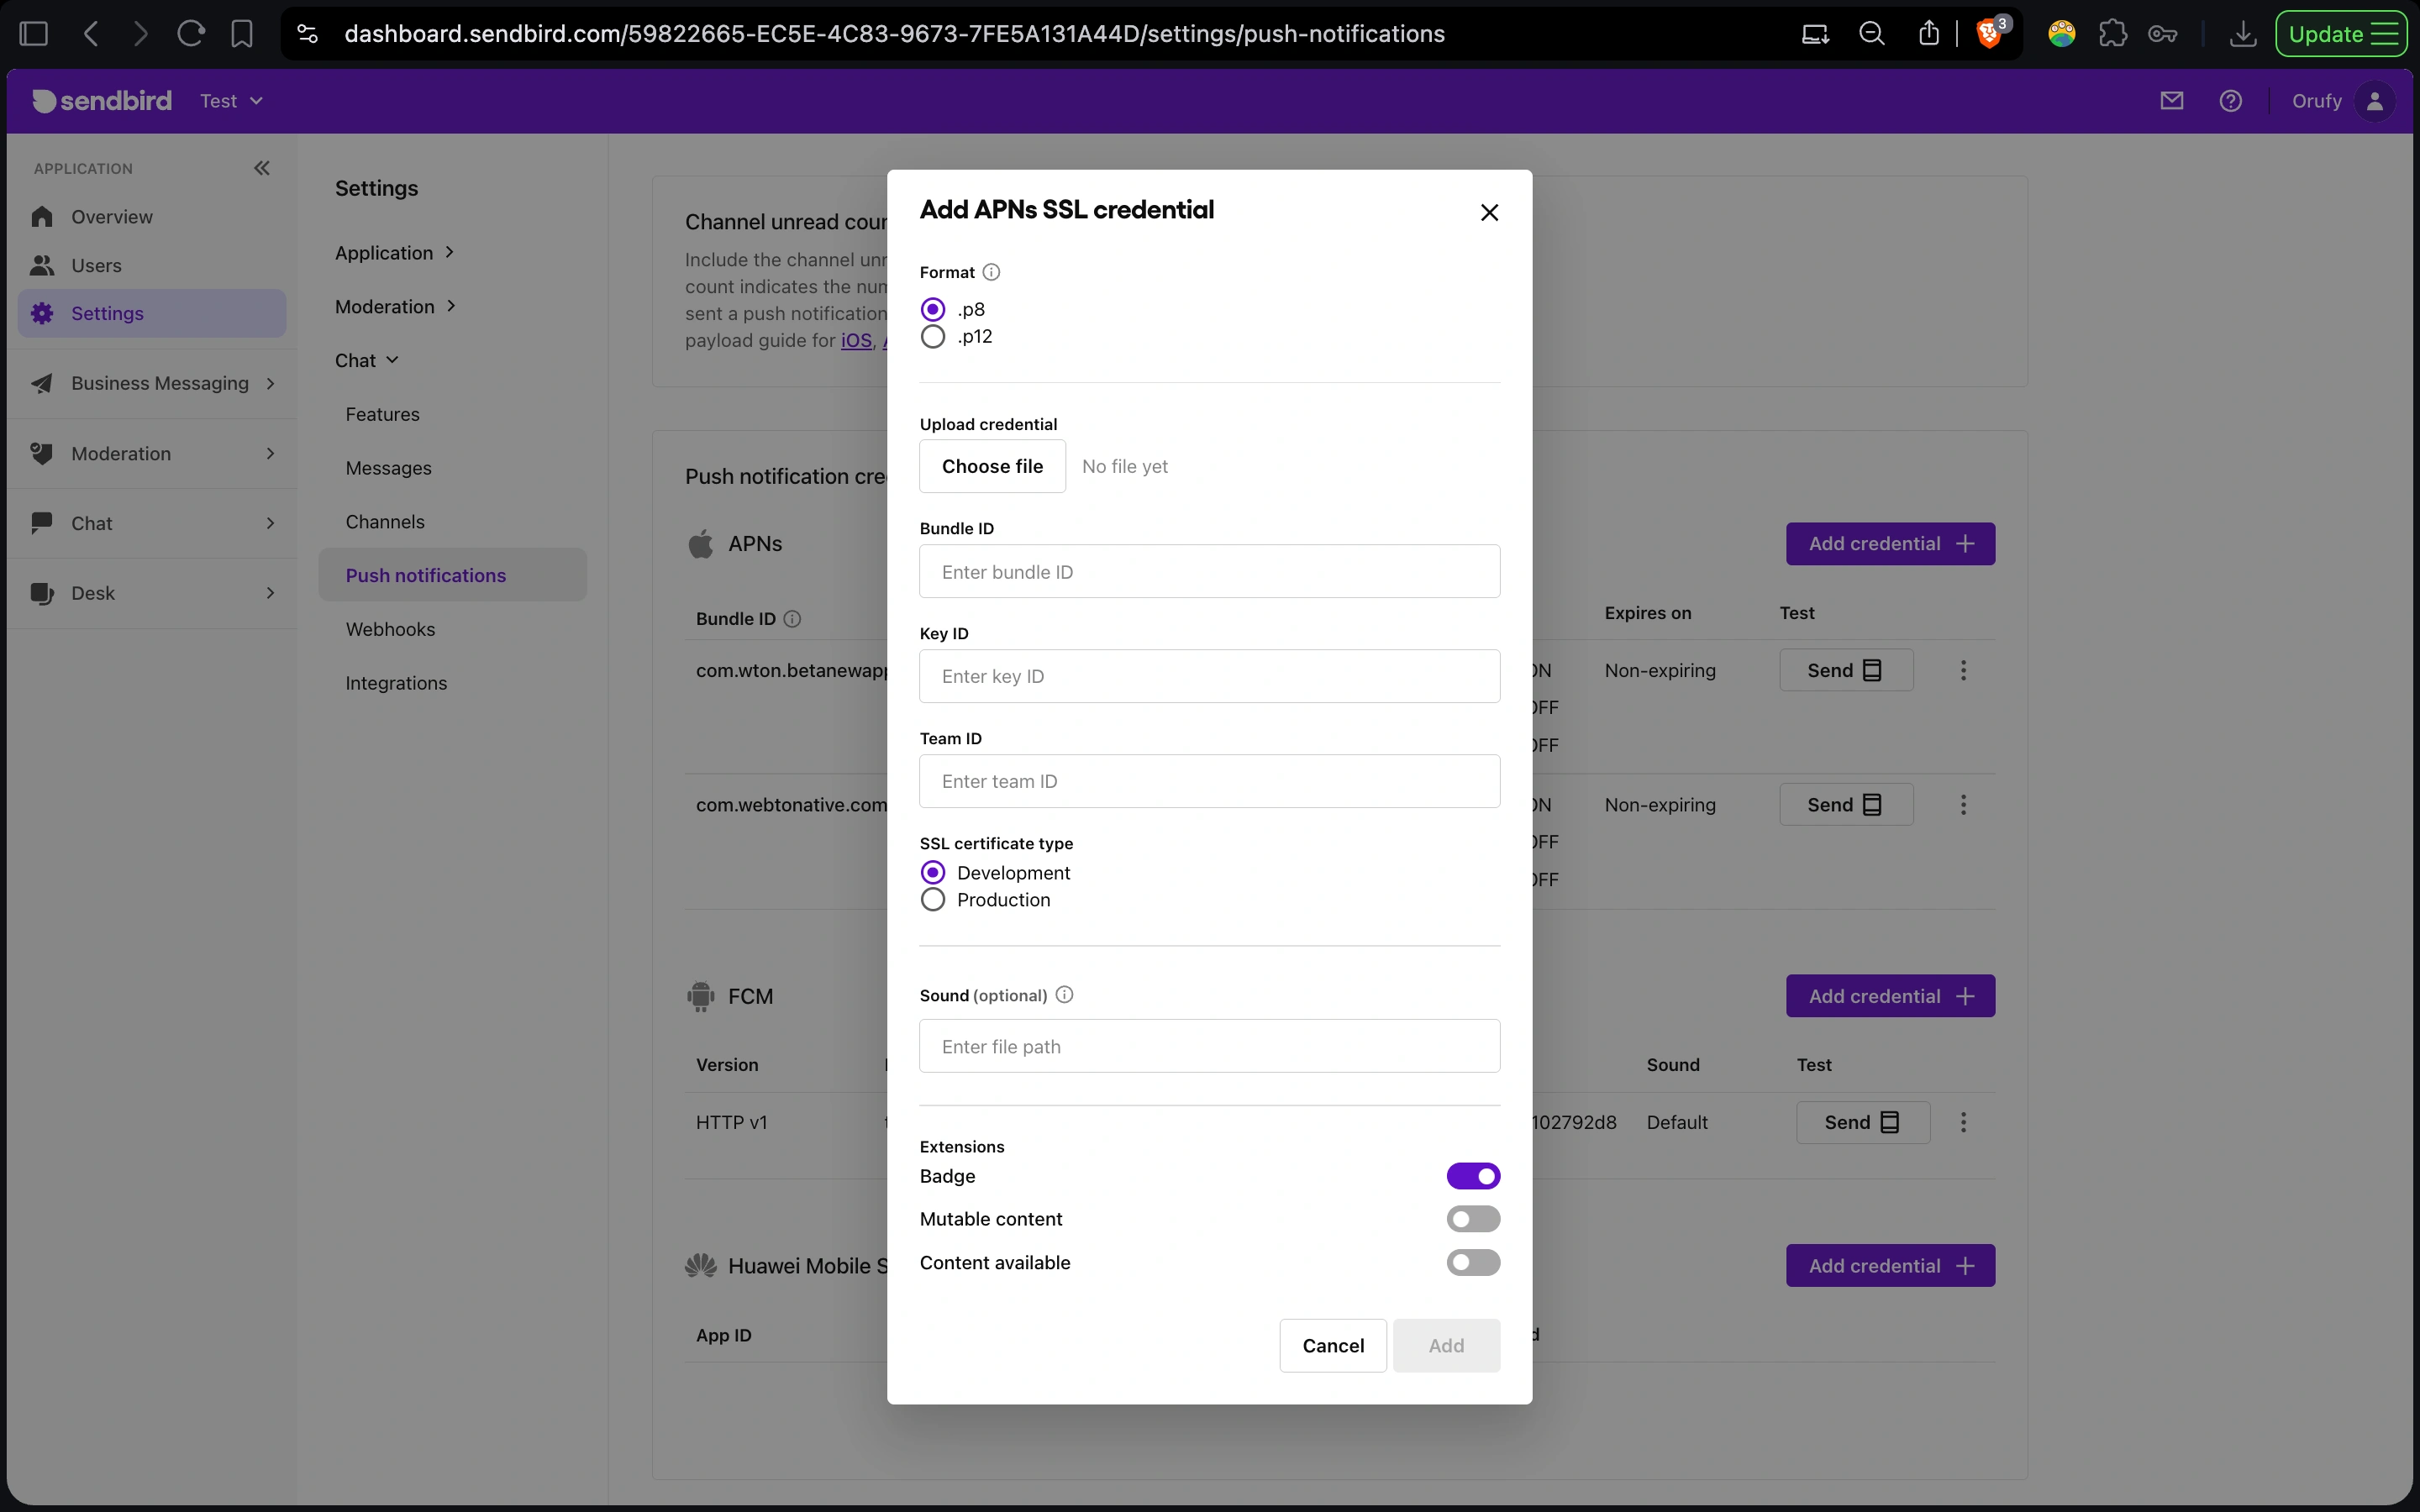
Supported file format:
- .p8 ← WebToNative supports this
- .p12 ← not supported
You can only download the .p8 key once from Apple. If you lose it, you must create a new key and update every service where you've entered the old key. Save the file somewhere secure immediately after downloading.
How to create and download your APNs .p8 key
- Log in to Apple Developer → Keys.
- Click the + button to create a new key.
- Enter a Key Name — something descriptive like "Sendbird Push – MyApp" so you can identify it later.
- Check Apple Push Notifications service (APNs).
- Click Configure → select the appropriate environment → click Save.
- Click Continue → then Download. This downloads the .p8 file. Save it immediately in a secure location — you cannot download it again.
What to enter in Sendbird dashboard
| Field | What it is | Where to find it |
|---|---|---|
| APNs Key (.p8 file) | The authentication key file downloaded from Apple | Downloaded in the step above |
| Bundle ID | Your app's unique identifier (e.g. com.yourcompany.app) | WebToNative dashboard → App Info |
| Key ID | The 10-character identifier of your APNs key | Apple Developer → Keys → your key |
| Team ID | Your Apple Developer Team identifier | Apple Developer → Account → Membership Details |
| SSL Certificate type | Development or Production environment | Select Production before going live |
Switch the SSL Certificate type to Production before your app goes live on the App Store. Development certificates only work for TestFlight builds — production push notifications will not be delivered until this is set correctly.
Frequently Asked Questions
Can the notification behavior settings be used without Sendbird?
Yes — the three notification behavior settings (Disable in Foreground, Ask on Launch, Remove on Launch) are shared settings that apply to all push notifications in your app, including those from OneSignal and Firebase. You can configure them even if Sendbird is disabled.
What's the difference between google-services.json and the Service Account Key?
google-services.json is uploaded to WebToNative and configures your Android app to receive Firebase notifications. Service Account Key (.json) is uploaded to Sendbird's dashboard and gives Sendbird the credentials to send notifications to Firebase on your behalf. Both are required for Android push — they serve different parts of the delivery chain.
I lost my .p8 key. What do I do?
You cannot re-download a .p8 key — Apple only lets you download it once. You must create a new key in Apple Developer → Keys, download the new .p8 file, and then update every service where you've entered the old Key ID (including Sendbird and any other push providers). Always store your .p8 file in a secure password manager or vault immediately after downloading.
Why are my iOS push notifications not arriving in production?
The most common cause is leaving the SSL Certificate type set to Development when the app goes to the App Store. Development certificates only work for TestFlight. Change the SSL Certificate type to Production in Sendbird's push notification settings before your production release.
When should I ask for notification permission on launch vs later?
Asking on launch is simpler to configure but users who haven't yet experienced the value of your app are more likely to decline. Deferring the prompt to a contextually relevant moment — such as when a user first sends a message or reaches the chat section — improves permission grant rates significantly. Use the Trigger URL option to specify exactly which page in your app prompts the user for permission.