


Notification Settings
Notification Settings let you control how your app's notifications look and behave: the notification icon, whether notifications show while the app is open, whether they clear when the app opens, and when and how your app asks users to allow notifications. For the permission, you can show the phone's system prompt as soon as the app opens, or first show your own pre-permission screen that explains why notifications are useful. Users can only say yes once you ask, so the moment matters.

This setting is available for Android and iOS apps. Set it up separately for each platform.
Benefits of Using Notification Settings
Ask at the Right Moment
Show the request after a few app opens, after time spent in the app, on a specific page, or when your website decides.

Get More Users to Say Yes
A short message about the benefit, like order updates or price drops, makes users more likely to allow notifications.

Protect the System Prompt
The phone limits how often the system prompt can be shown. A pre-permission screen saves it for users who are ready to say yes.
Win Back Users Who Blocked
Remind users who blocked notifications to turn them on from their phone’s Settings, with one tap.
How It Works Behind the Scenes
Before your app can send push notifications, the user's phone must allow them. Here's what happens, so you know what your users will see.
-
Your app shows the phone's own system prompt asking the user to Allow or Don't allow notifications.
-
With a pre-permission screen, your app first shows its own message. Only users who tap your Allow button see the system prompt.
-
If a user taps Dismiss on your screen, the app asks again later, based on the wait time and re-ask limit you set.
The phone also has its own limits. Android 12 and below allows notifications automatically, so users there won't see these screens. iOS shows the system prompt only once per install, and Android 13 and above stops showing it after two denials.
Where to Find It in Your Dashboard
My Apps ➡️ Edit your app ➡️ Add-ons ➡️ Notifications ➡️ Settings
The Settings page holds the general notification settings described below, plus the Notification permission setting.
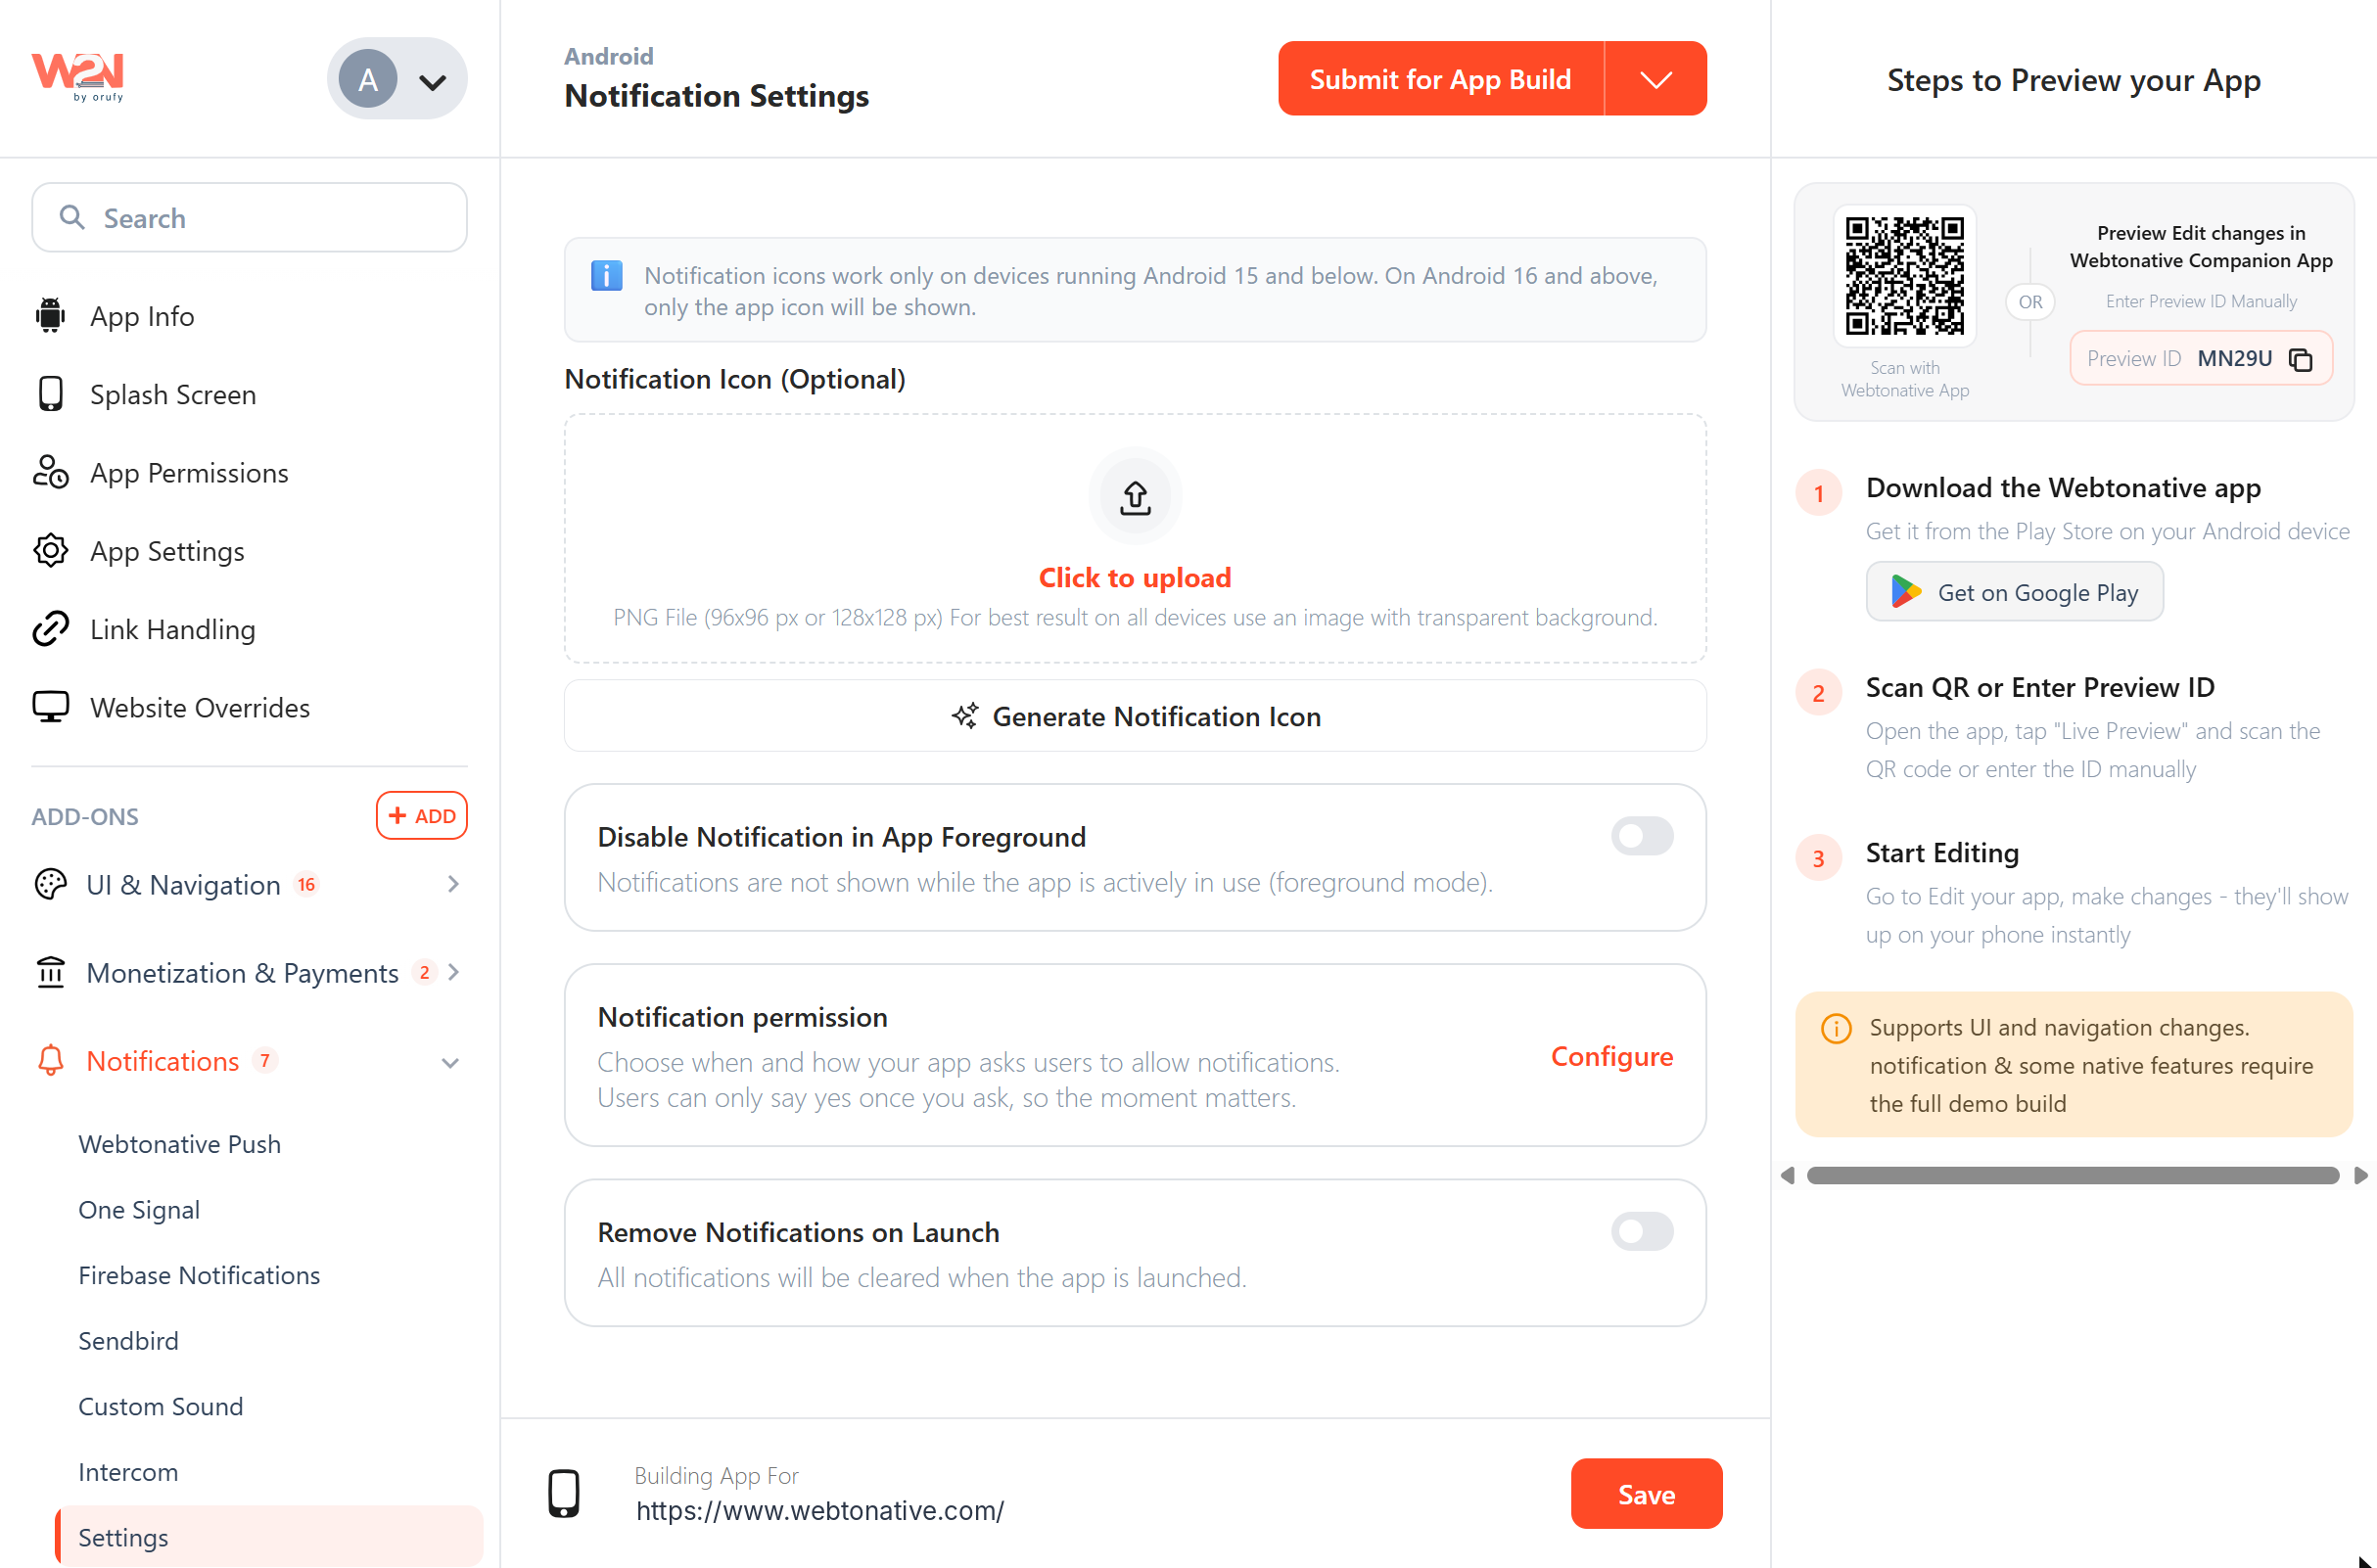
General Notification Settings
The following are the general notification settings that apply to all notifications in your app, whichever notification add-on sends them, such as Webtonative Push, OneSignal, Firebase, Sendbird, etc.
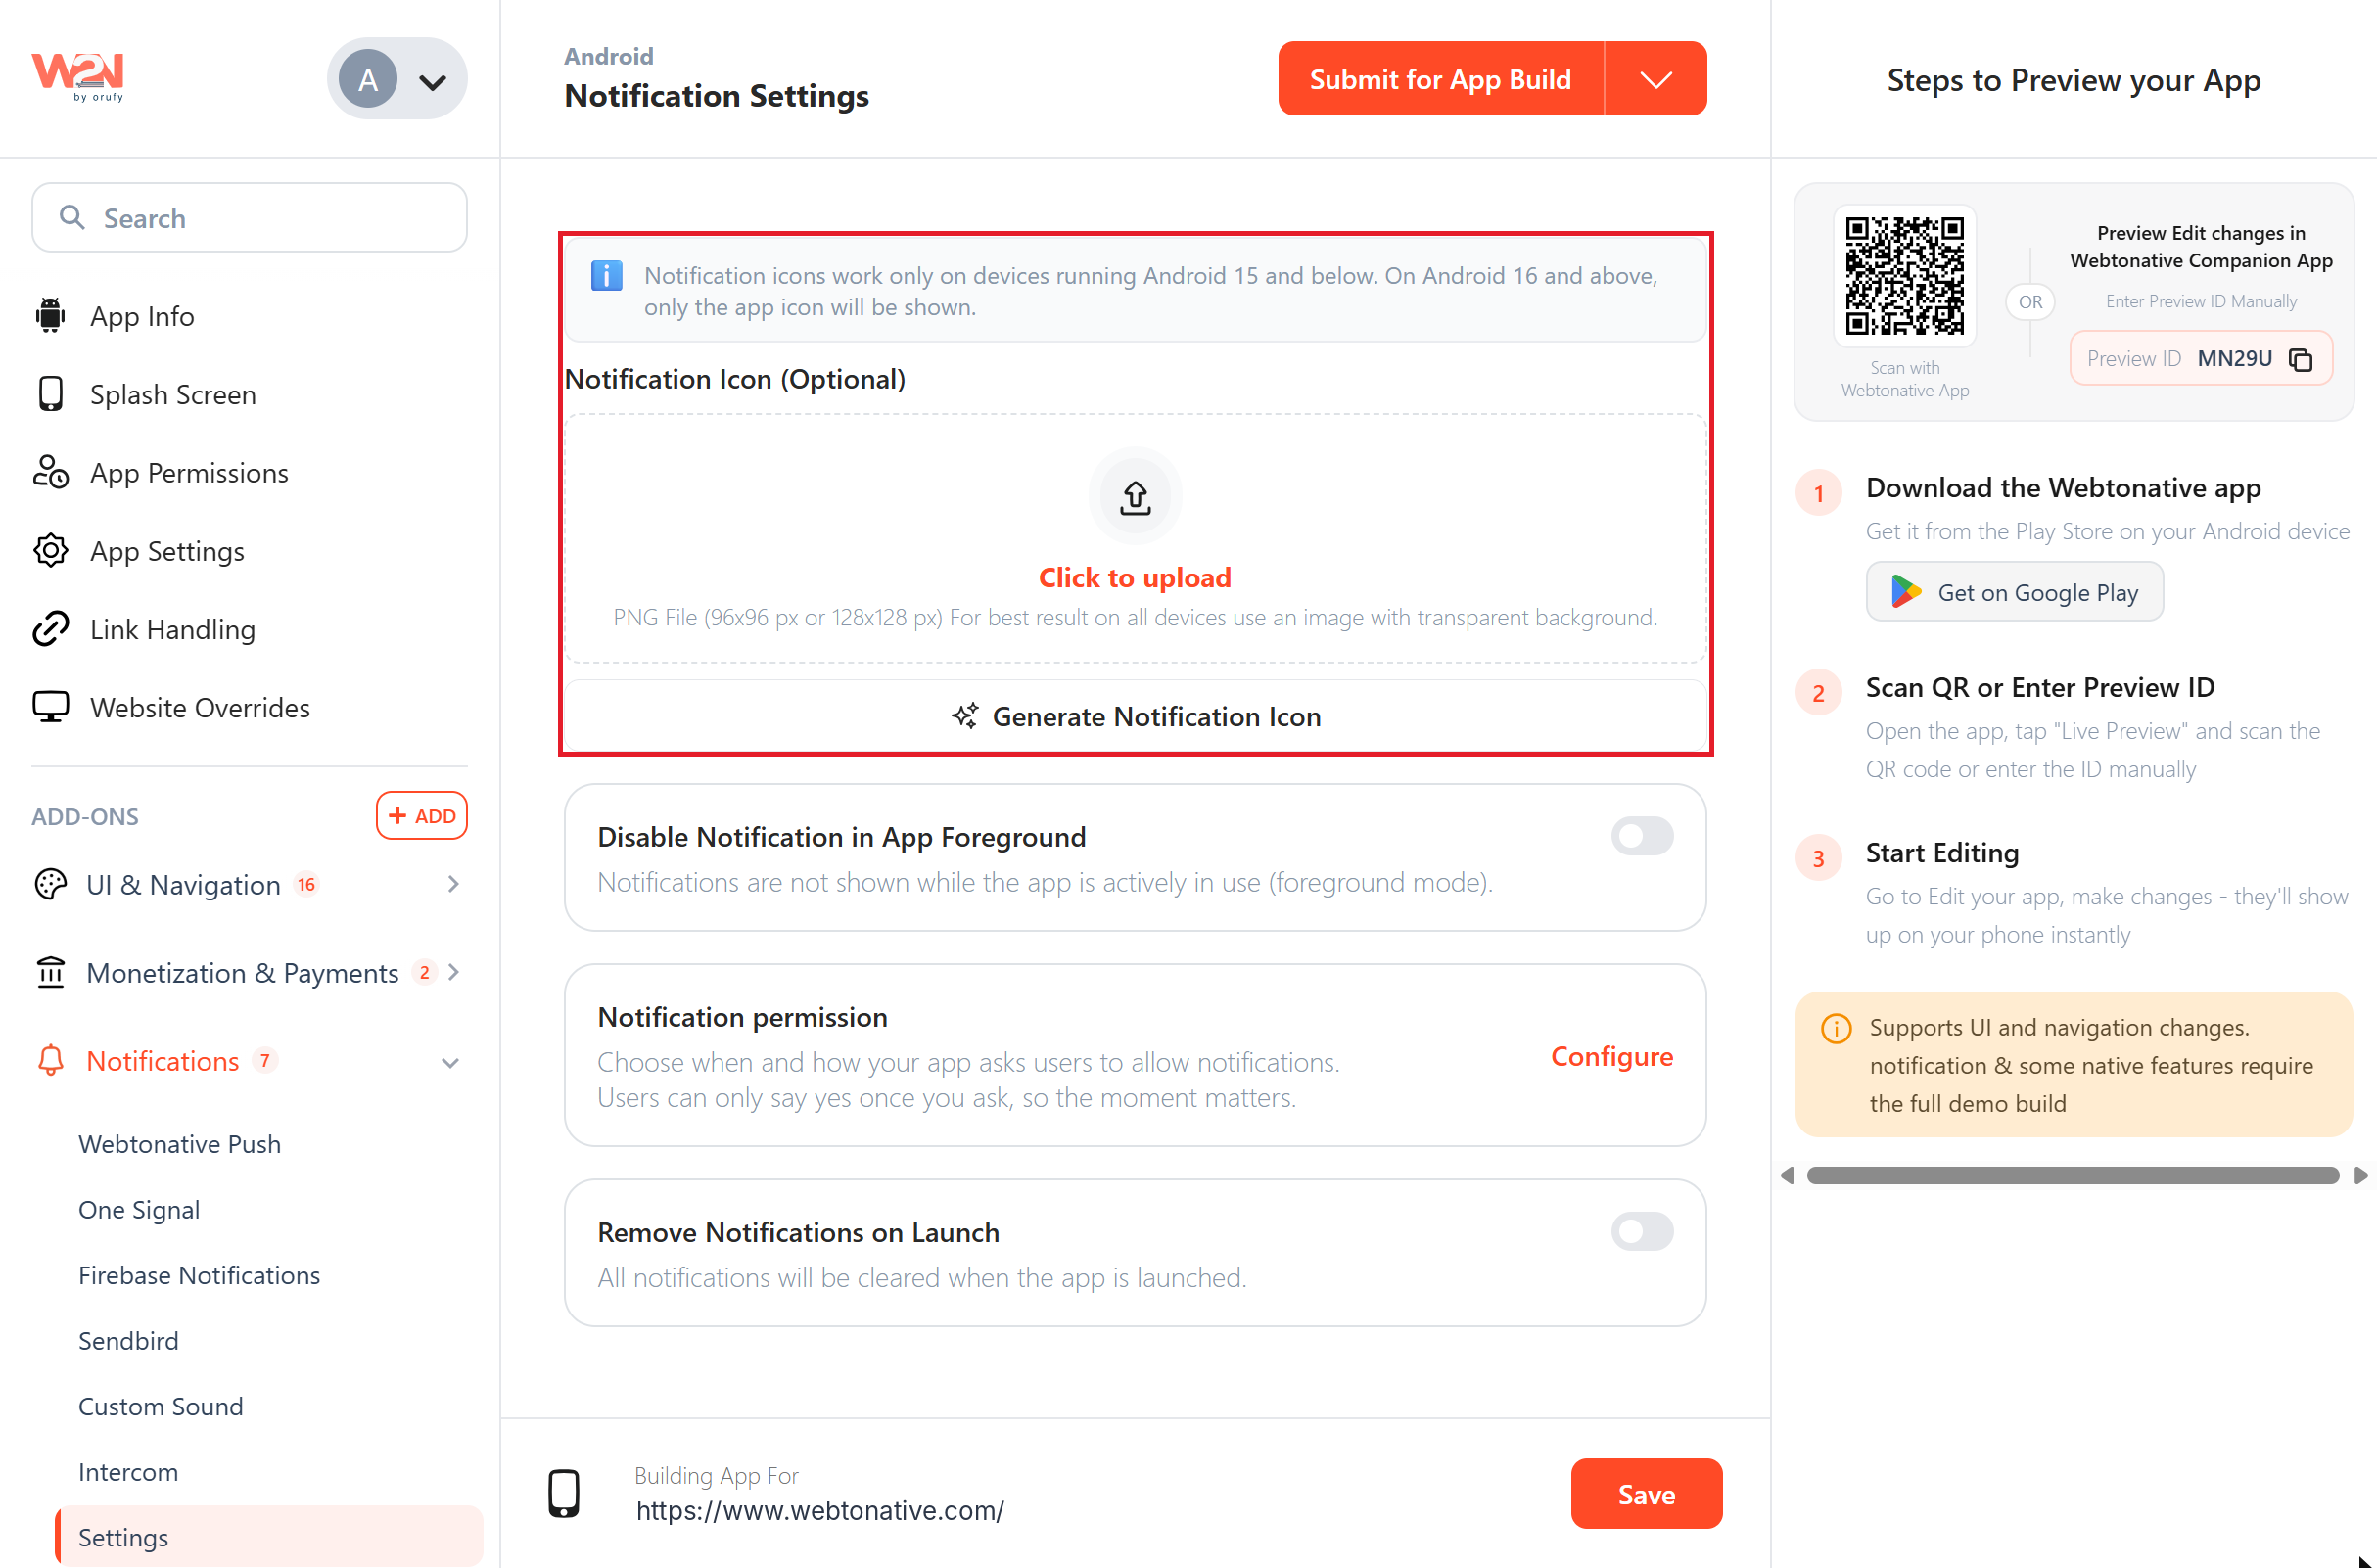
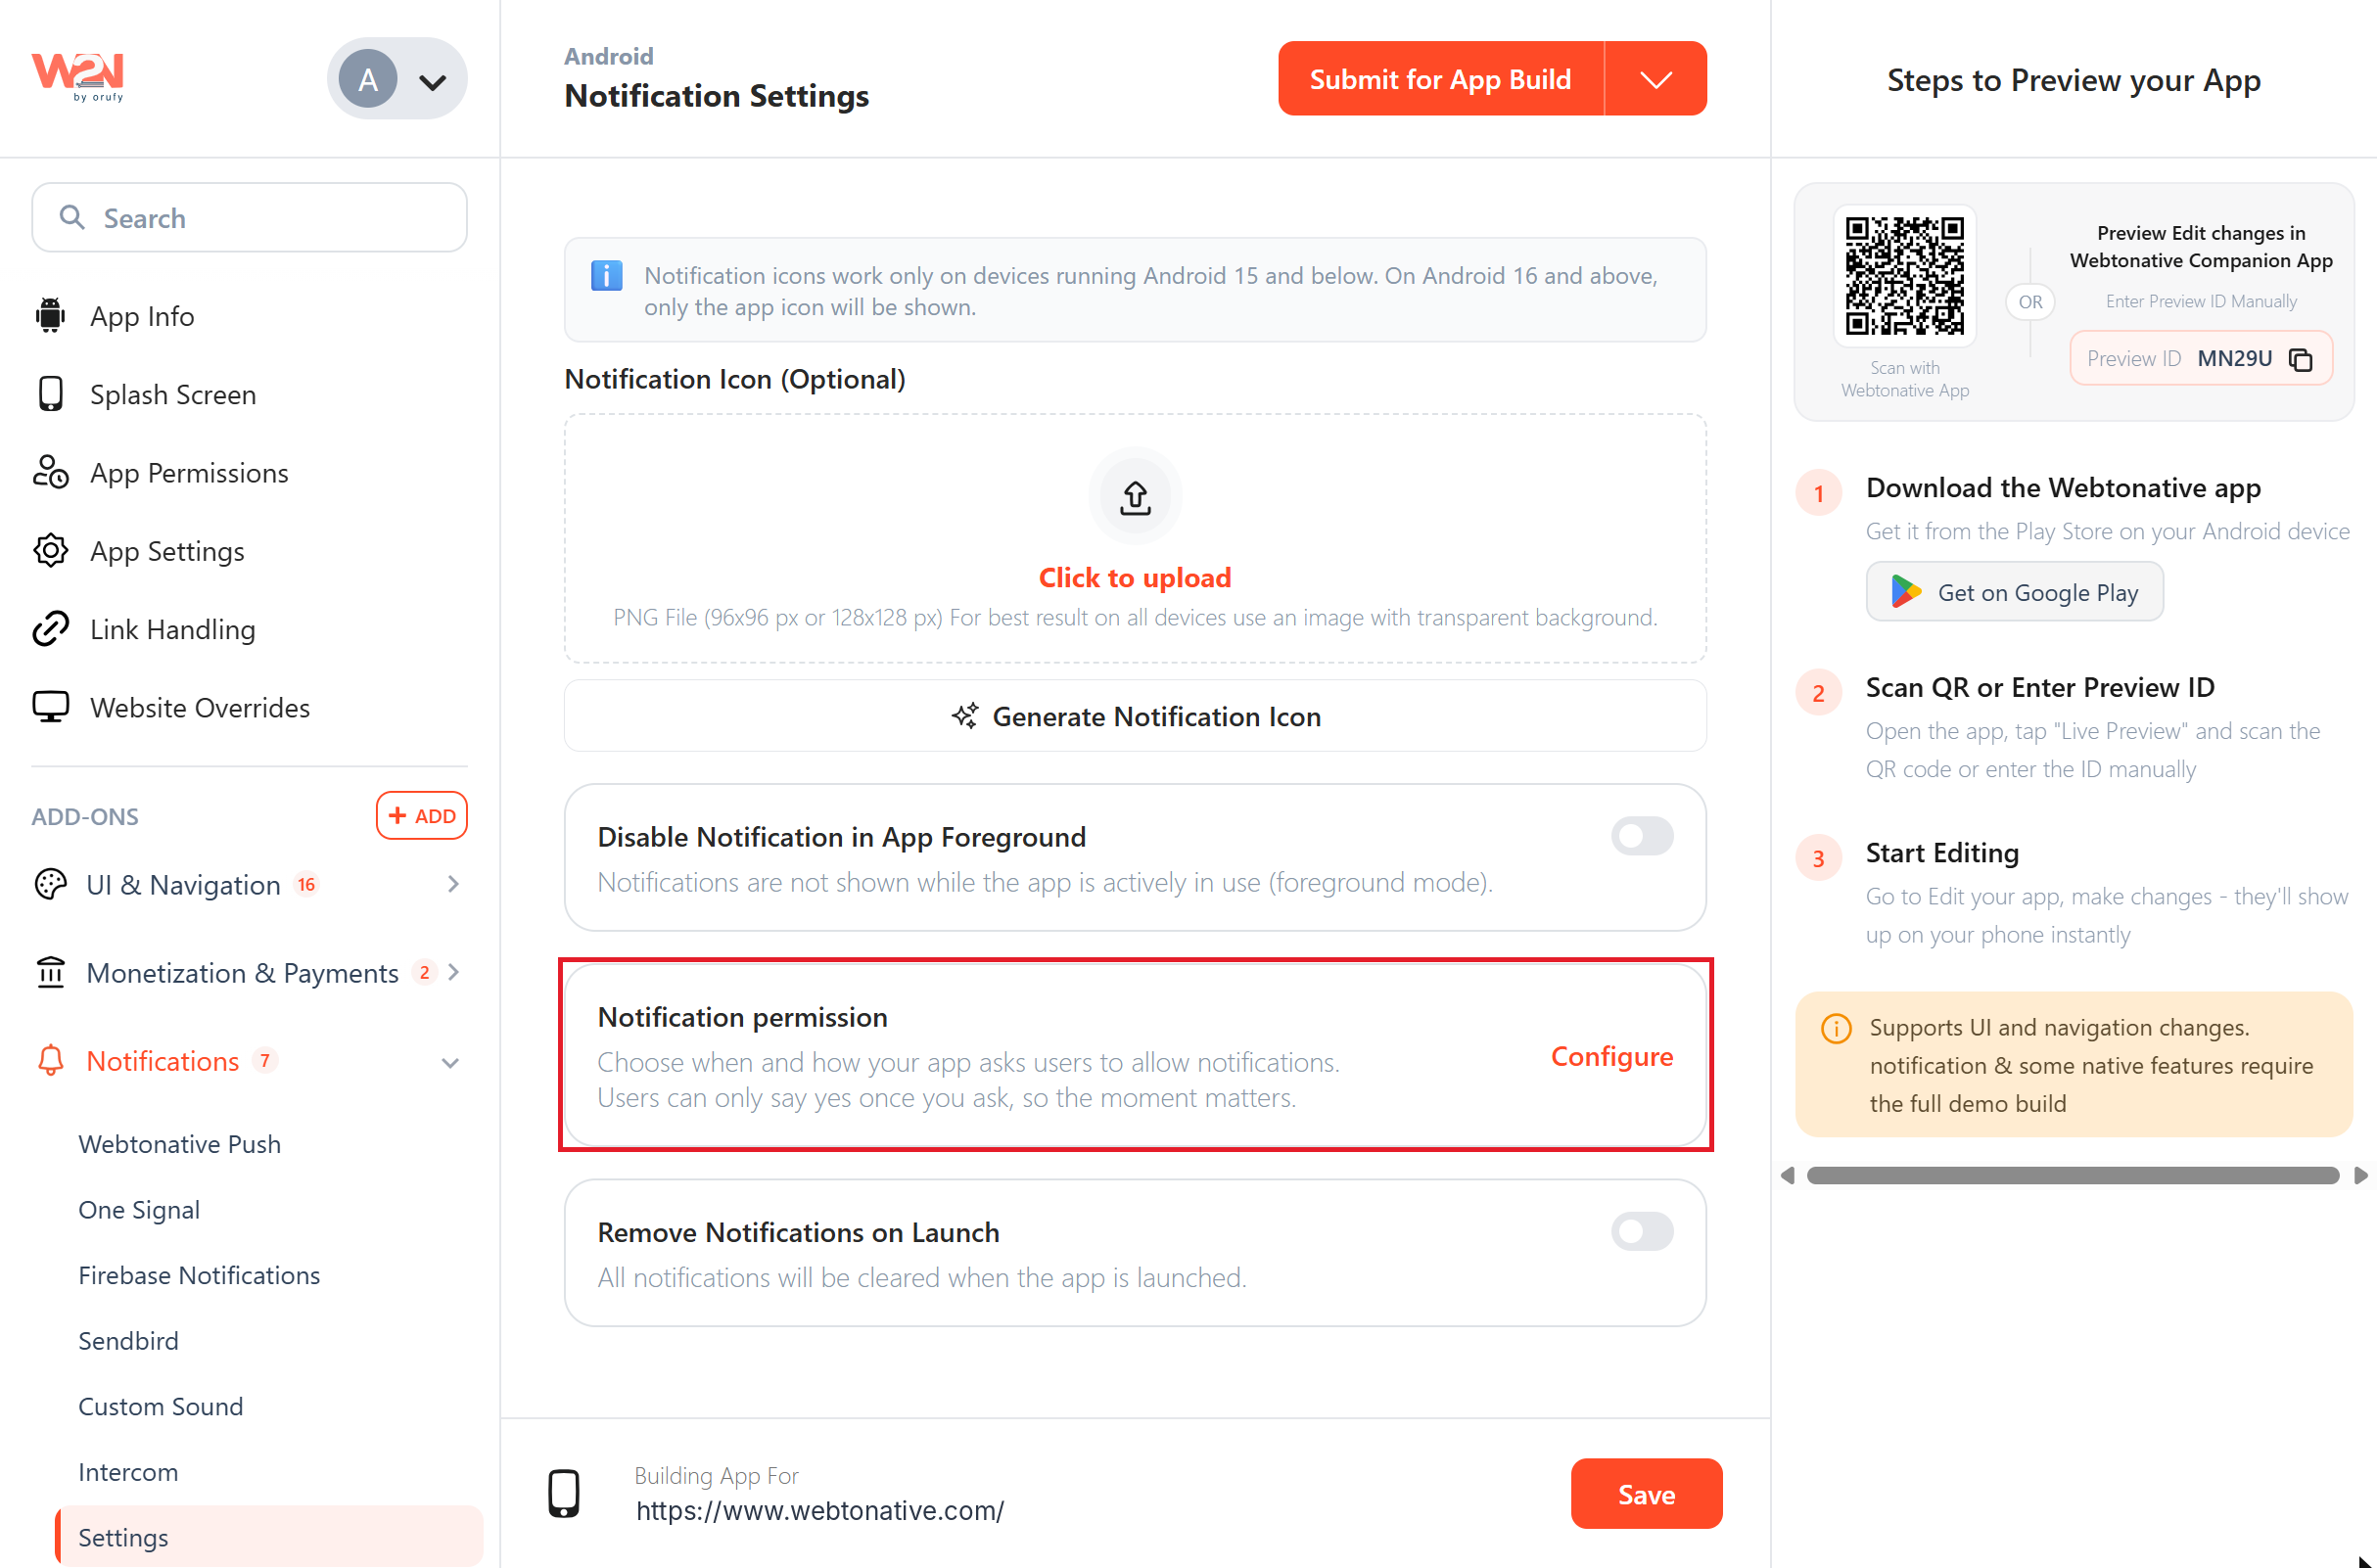
Notification Icon (Optional)
The notification icon is the small icon shown with your app's notifications, for example in the status bar and next to each notification. It is used wherever your app shows a notification.
This setting is available for Android only. It works on devices running Android 15 and below. On Android 16 and above, and on iOS, the app icon is shown instead.
You can add the icon in one of two ways:
-
Upload your own icon: Click Click to upload and choose a PNG file of 96x96 px or 128x128 px. For the best result on all devices, use an image with a transparent background.
-
Generate an icon: Click Generate Notification Icon to create one from your app icon.
In the Generate Notification Icon window:
- Source Image: Your app icon is used by default. Click Change to use a different image.
- Icon Color: Choose White (recommended, works on all Android versions), Custom Color or Original Colors.
- Threshold: Move the slider to adjust how much of the background is removed.
- Check the Icon Preview and Notification Preview, then click Use This Icon.
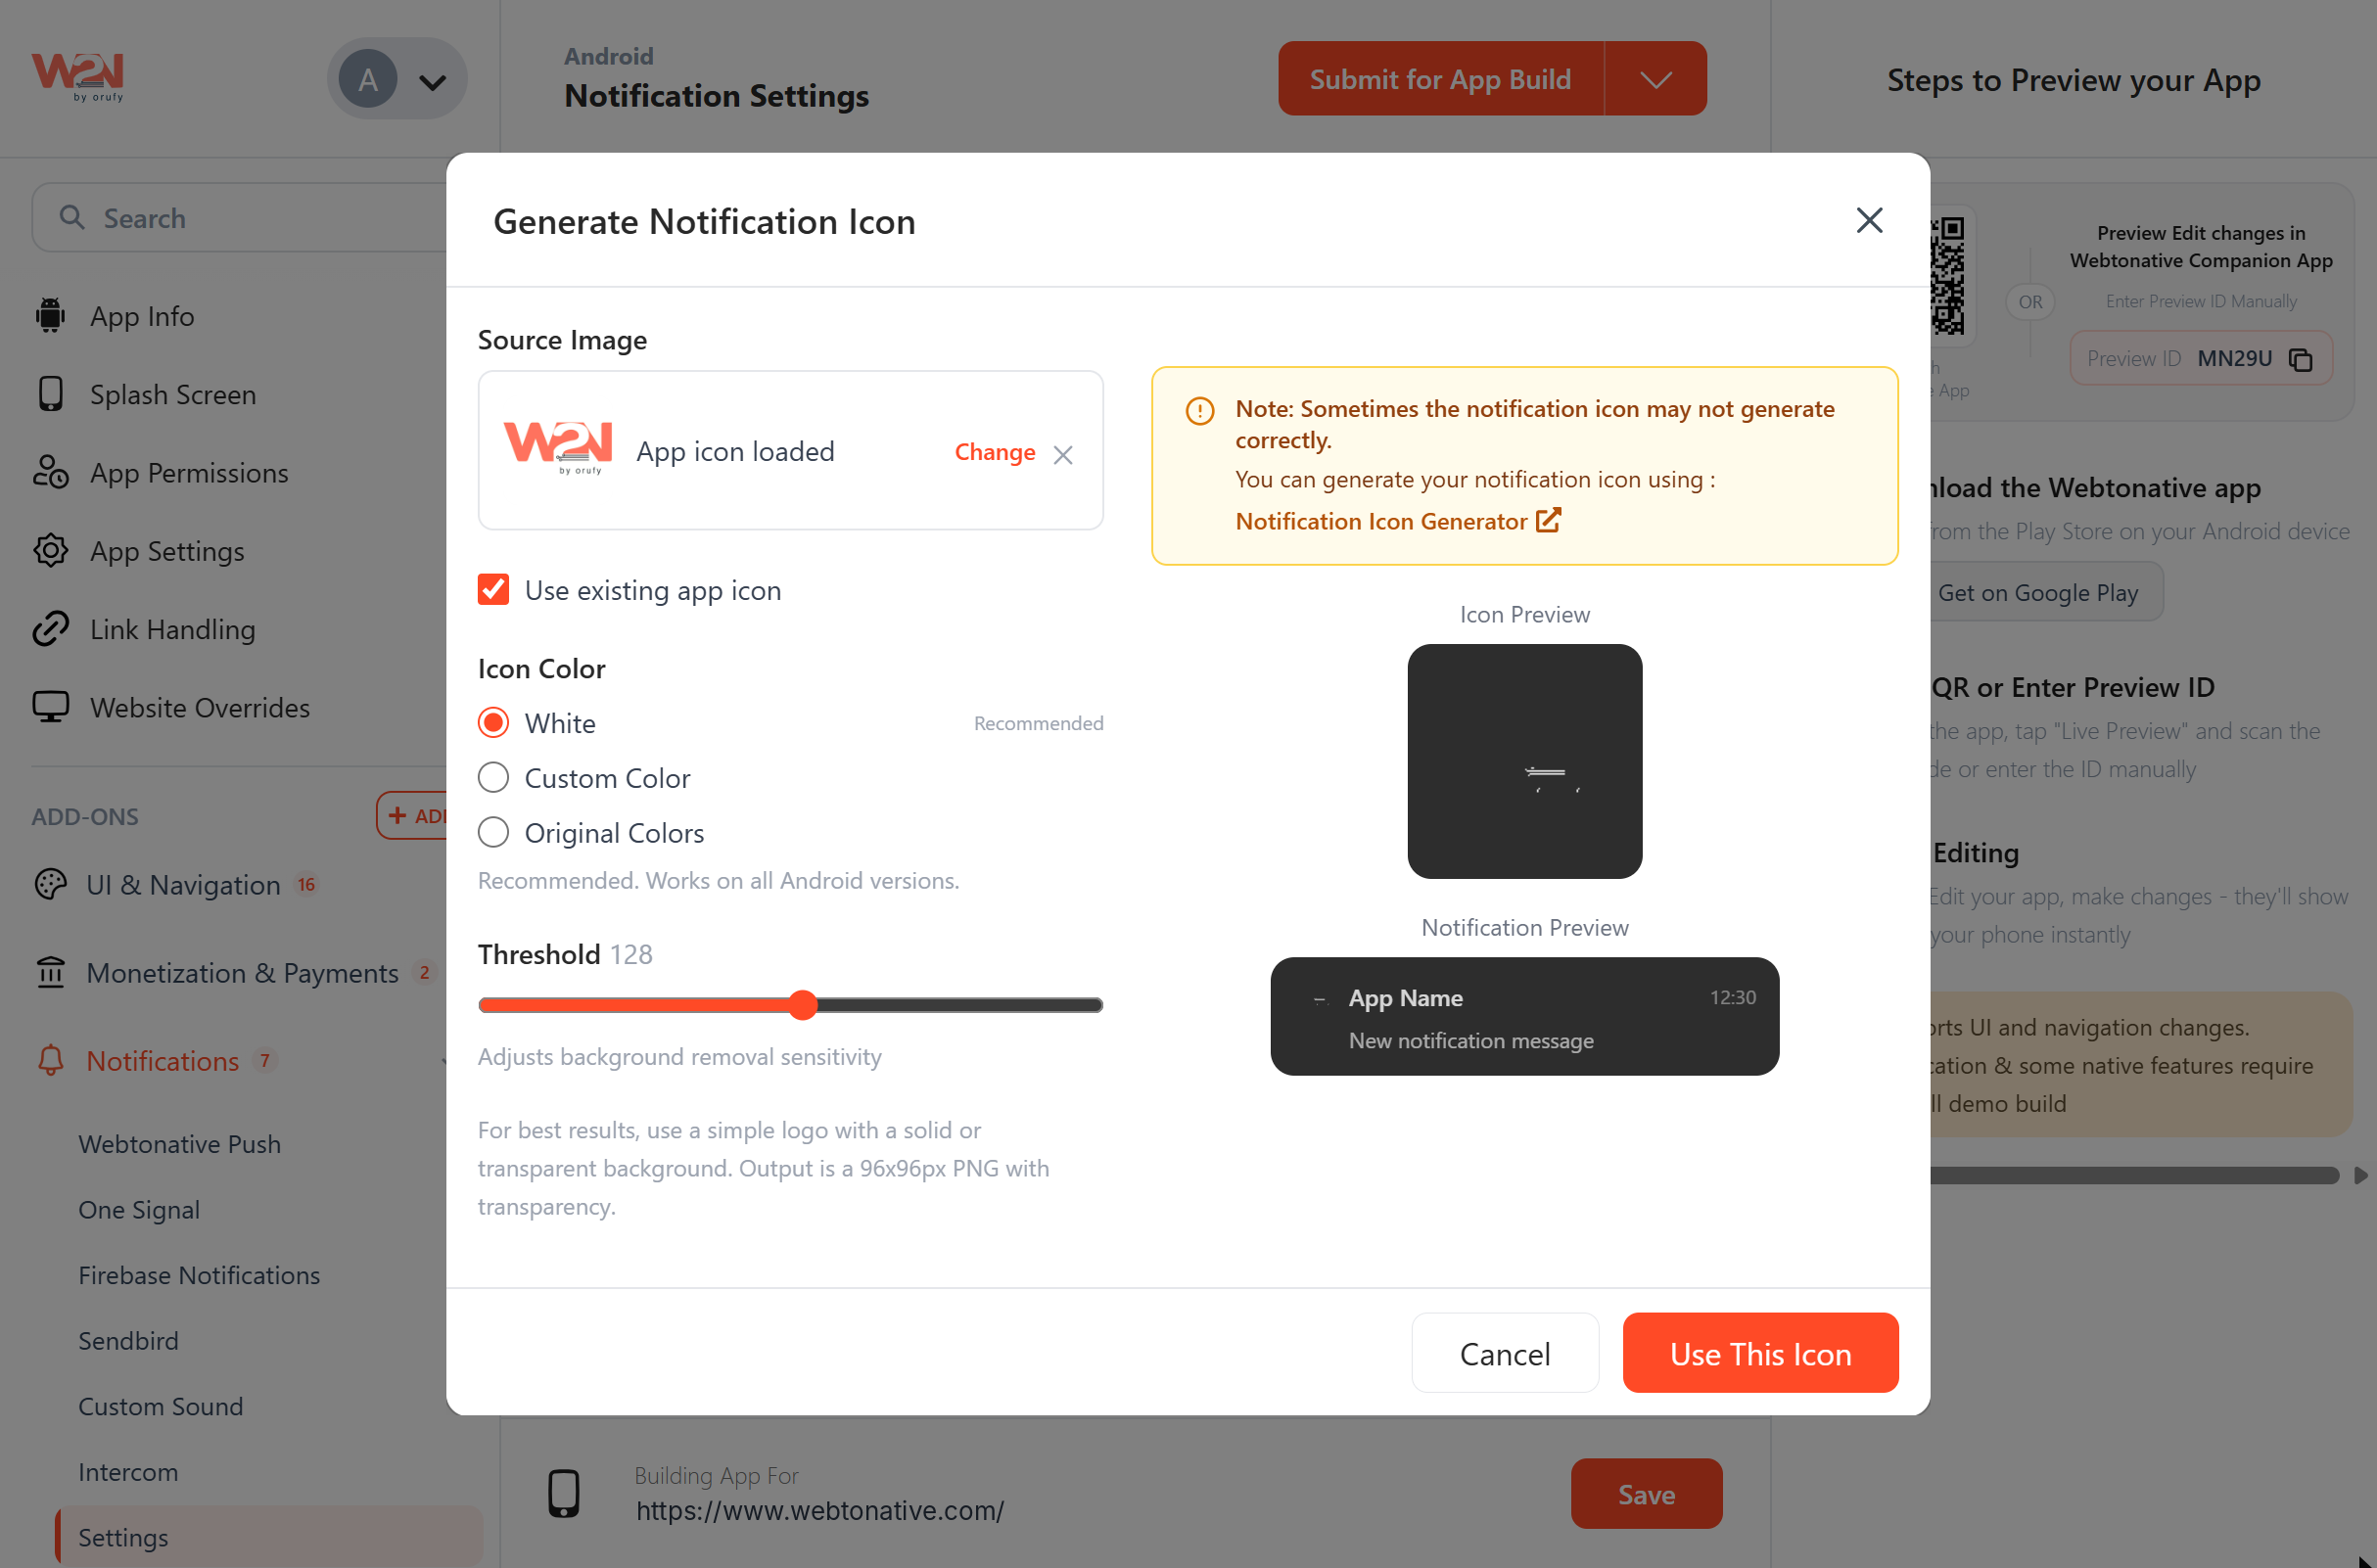
The generated icon is a 96x96 px PNG with a transparent background. For best results, use a simple logo with a solid or transparent background.

Sometimes the icon may not generate correctly. If that happens, create it with the Notification Icon Generator linked in the window, then upload it.
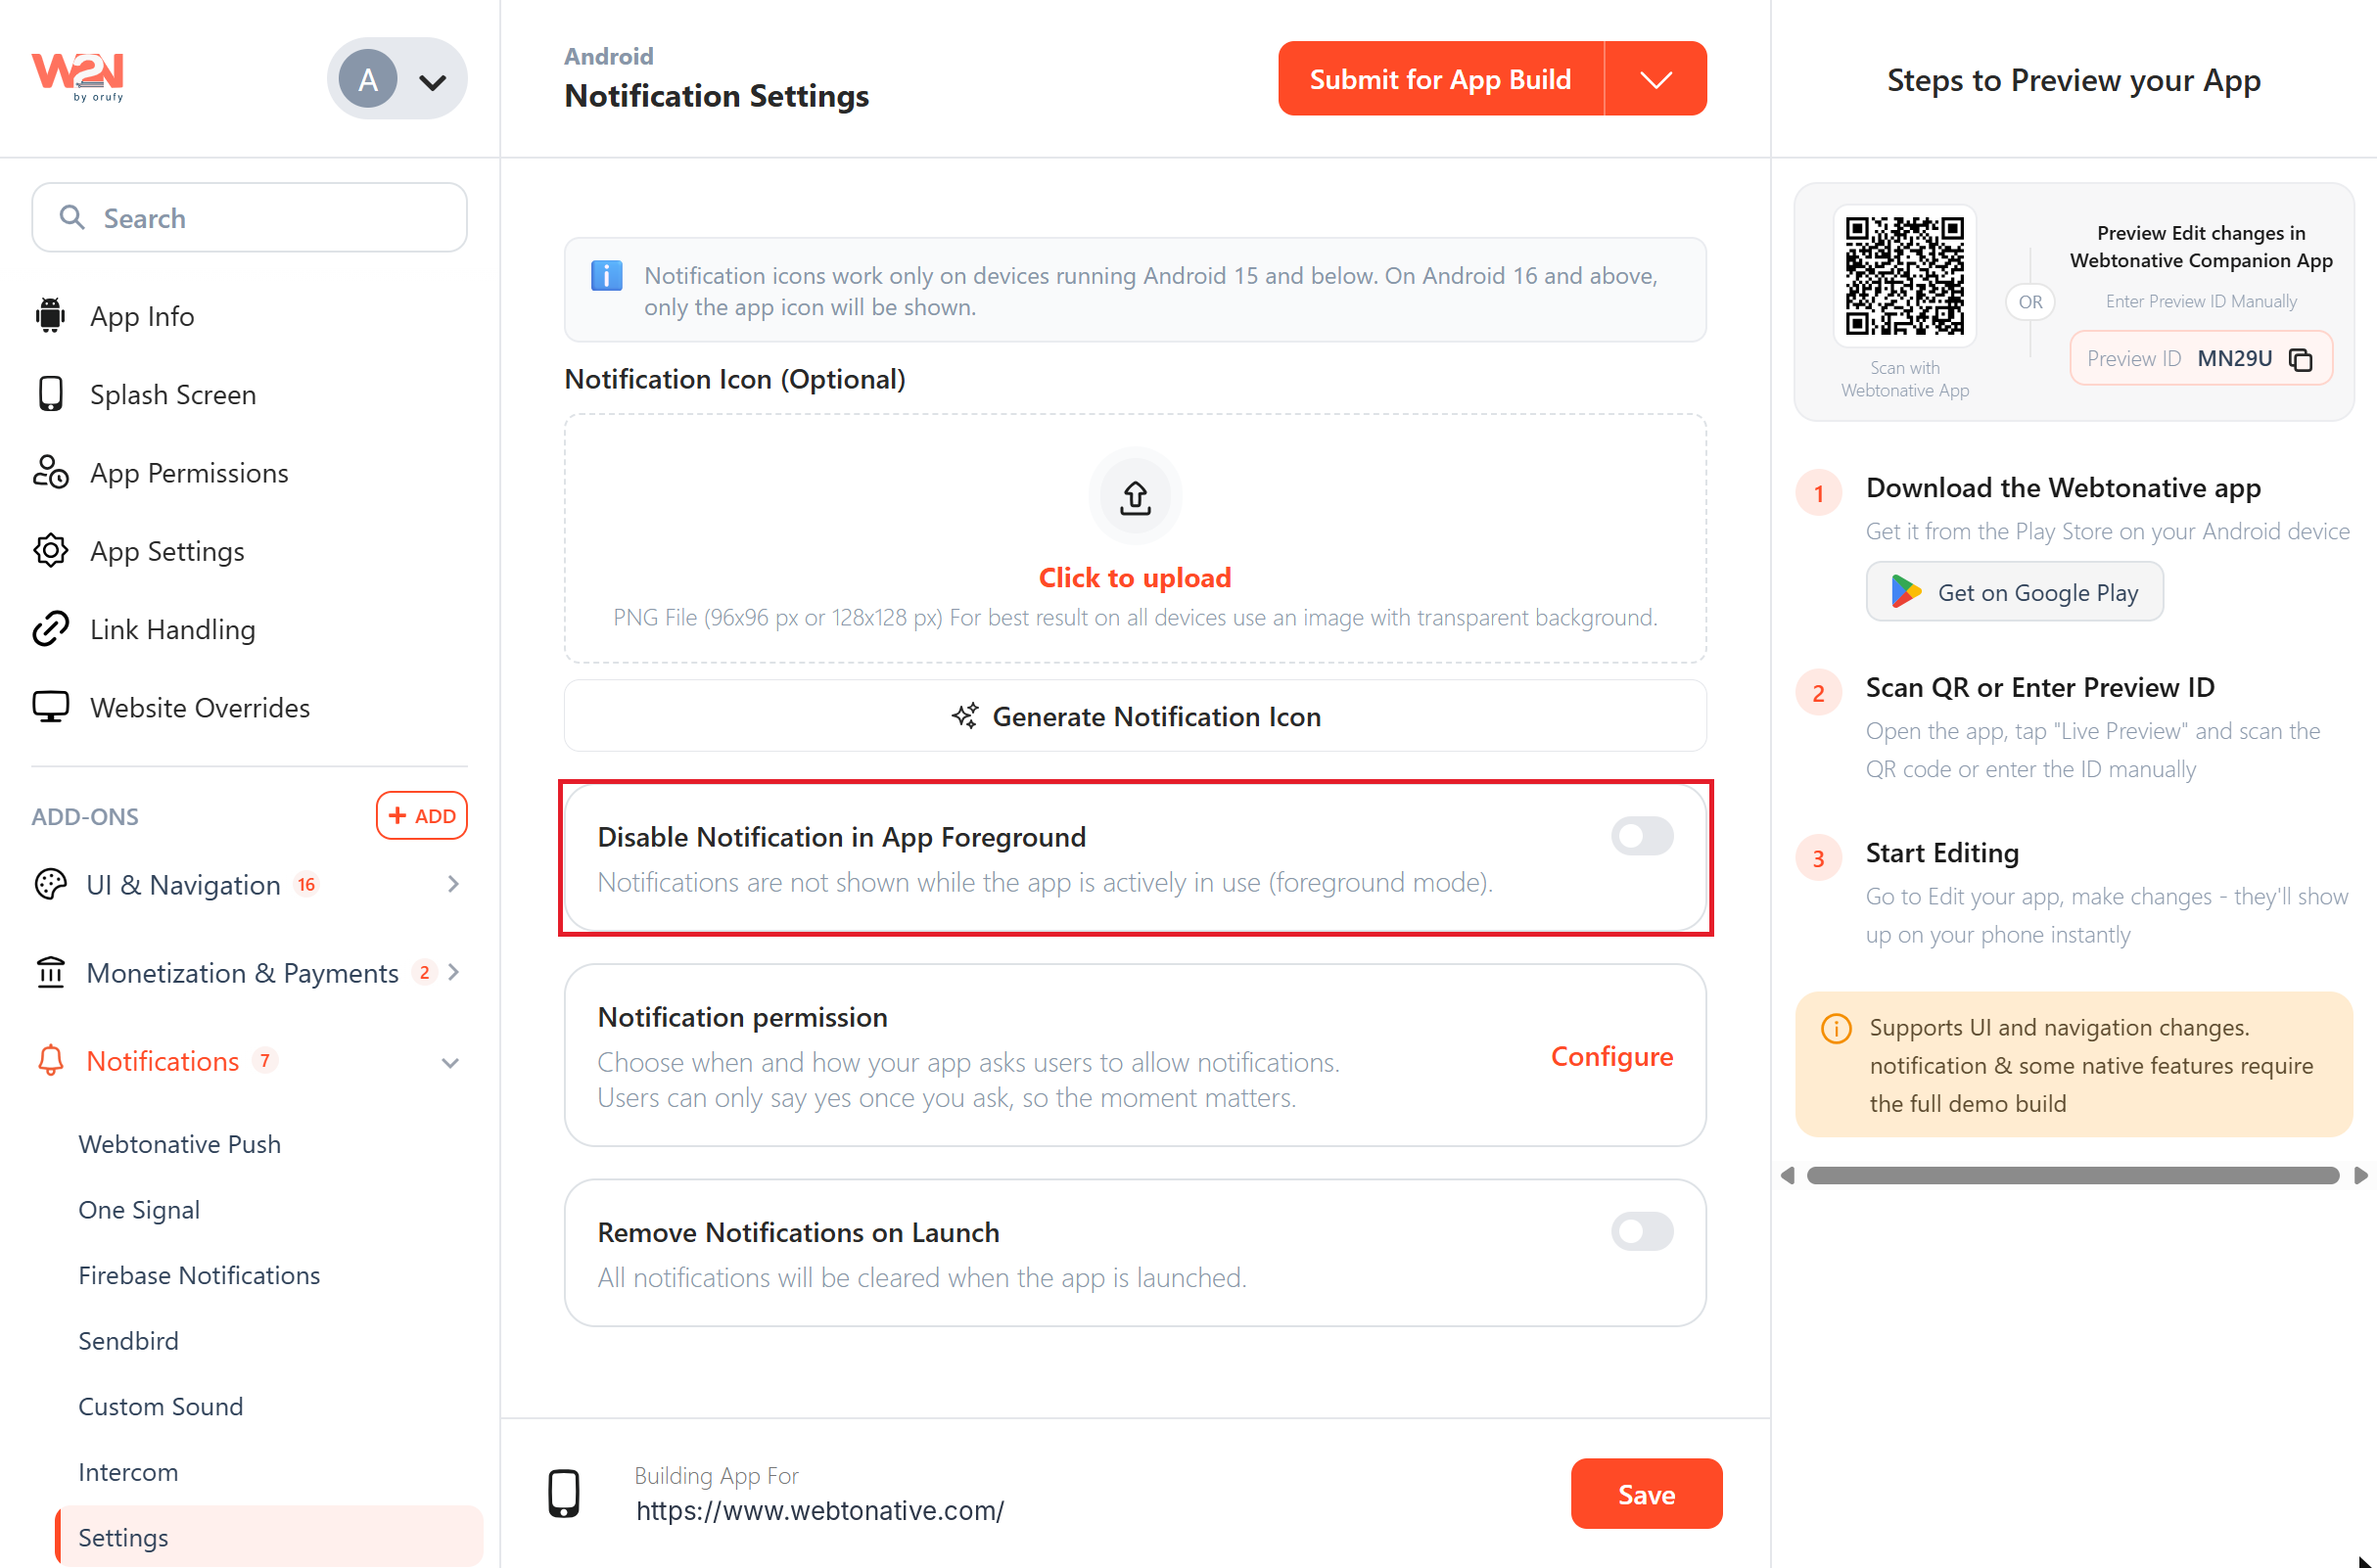
Disable Notification in App Foreground
When ON, notifications are not shown while the user is actively using the app. The notification arrives silently without interrupting them. When OFF, notifications appear even while the app is open.
For example, Instagram doesn't show a full notification banner while you are using the app, so your experience isn't interrupted.
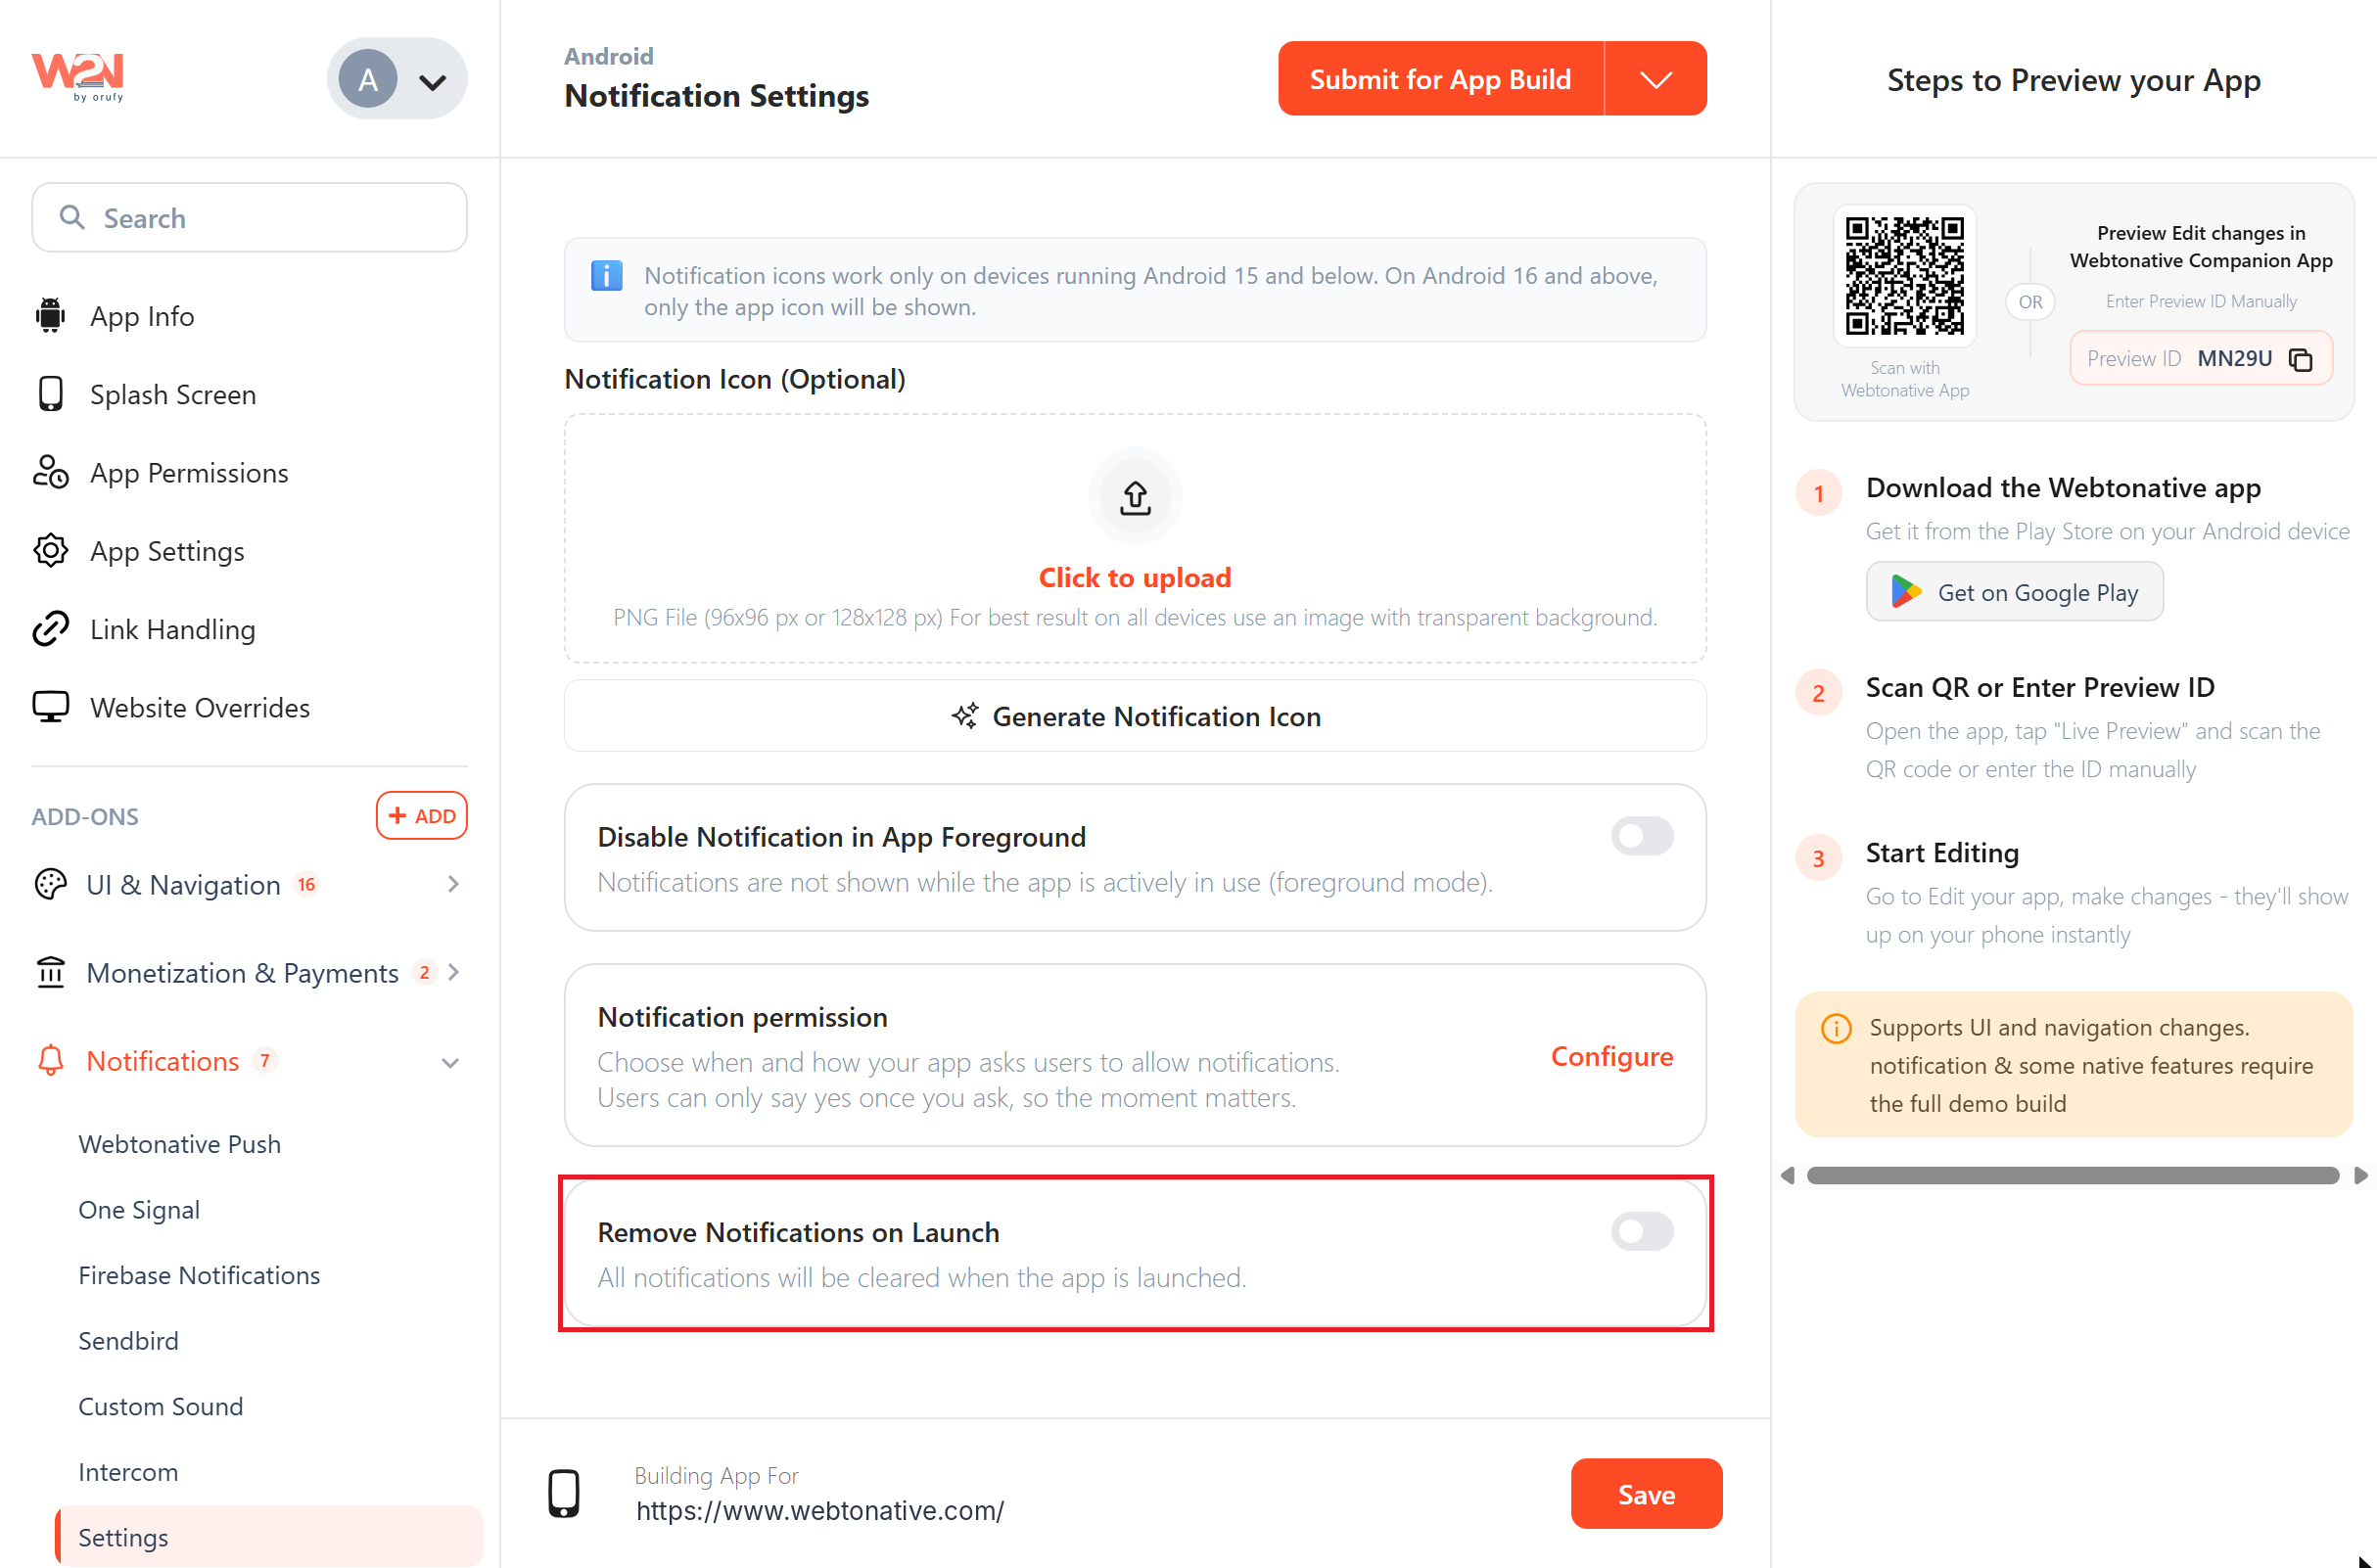
Remove Notifications on Launch
When ON, all your app's notifications are cleared from the device's notification tray when the user opens the app. When OFF, they stay until the user dismisses them.
For example, WhatsApp clears its message notifications the moment you open the app, so you don't need to dismiss them manually.
Notification Permission
Choose when and how your app asks users to allow notifications. Click Configure next to Notification permission and follow the steps below.
Steps to Set Up Notification Permission in Your App
First, choose how your app asks for permission. Then follow the steps for the option you picked: Option A or Option B.
Choose How to Ask
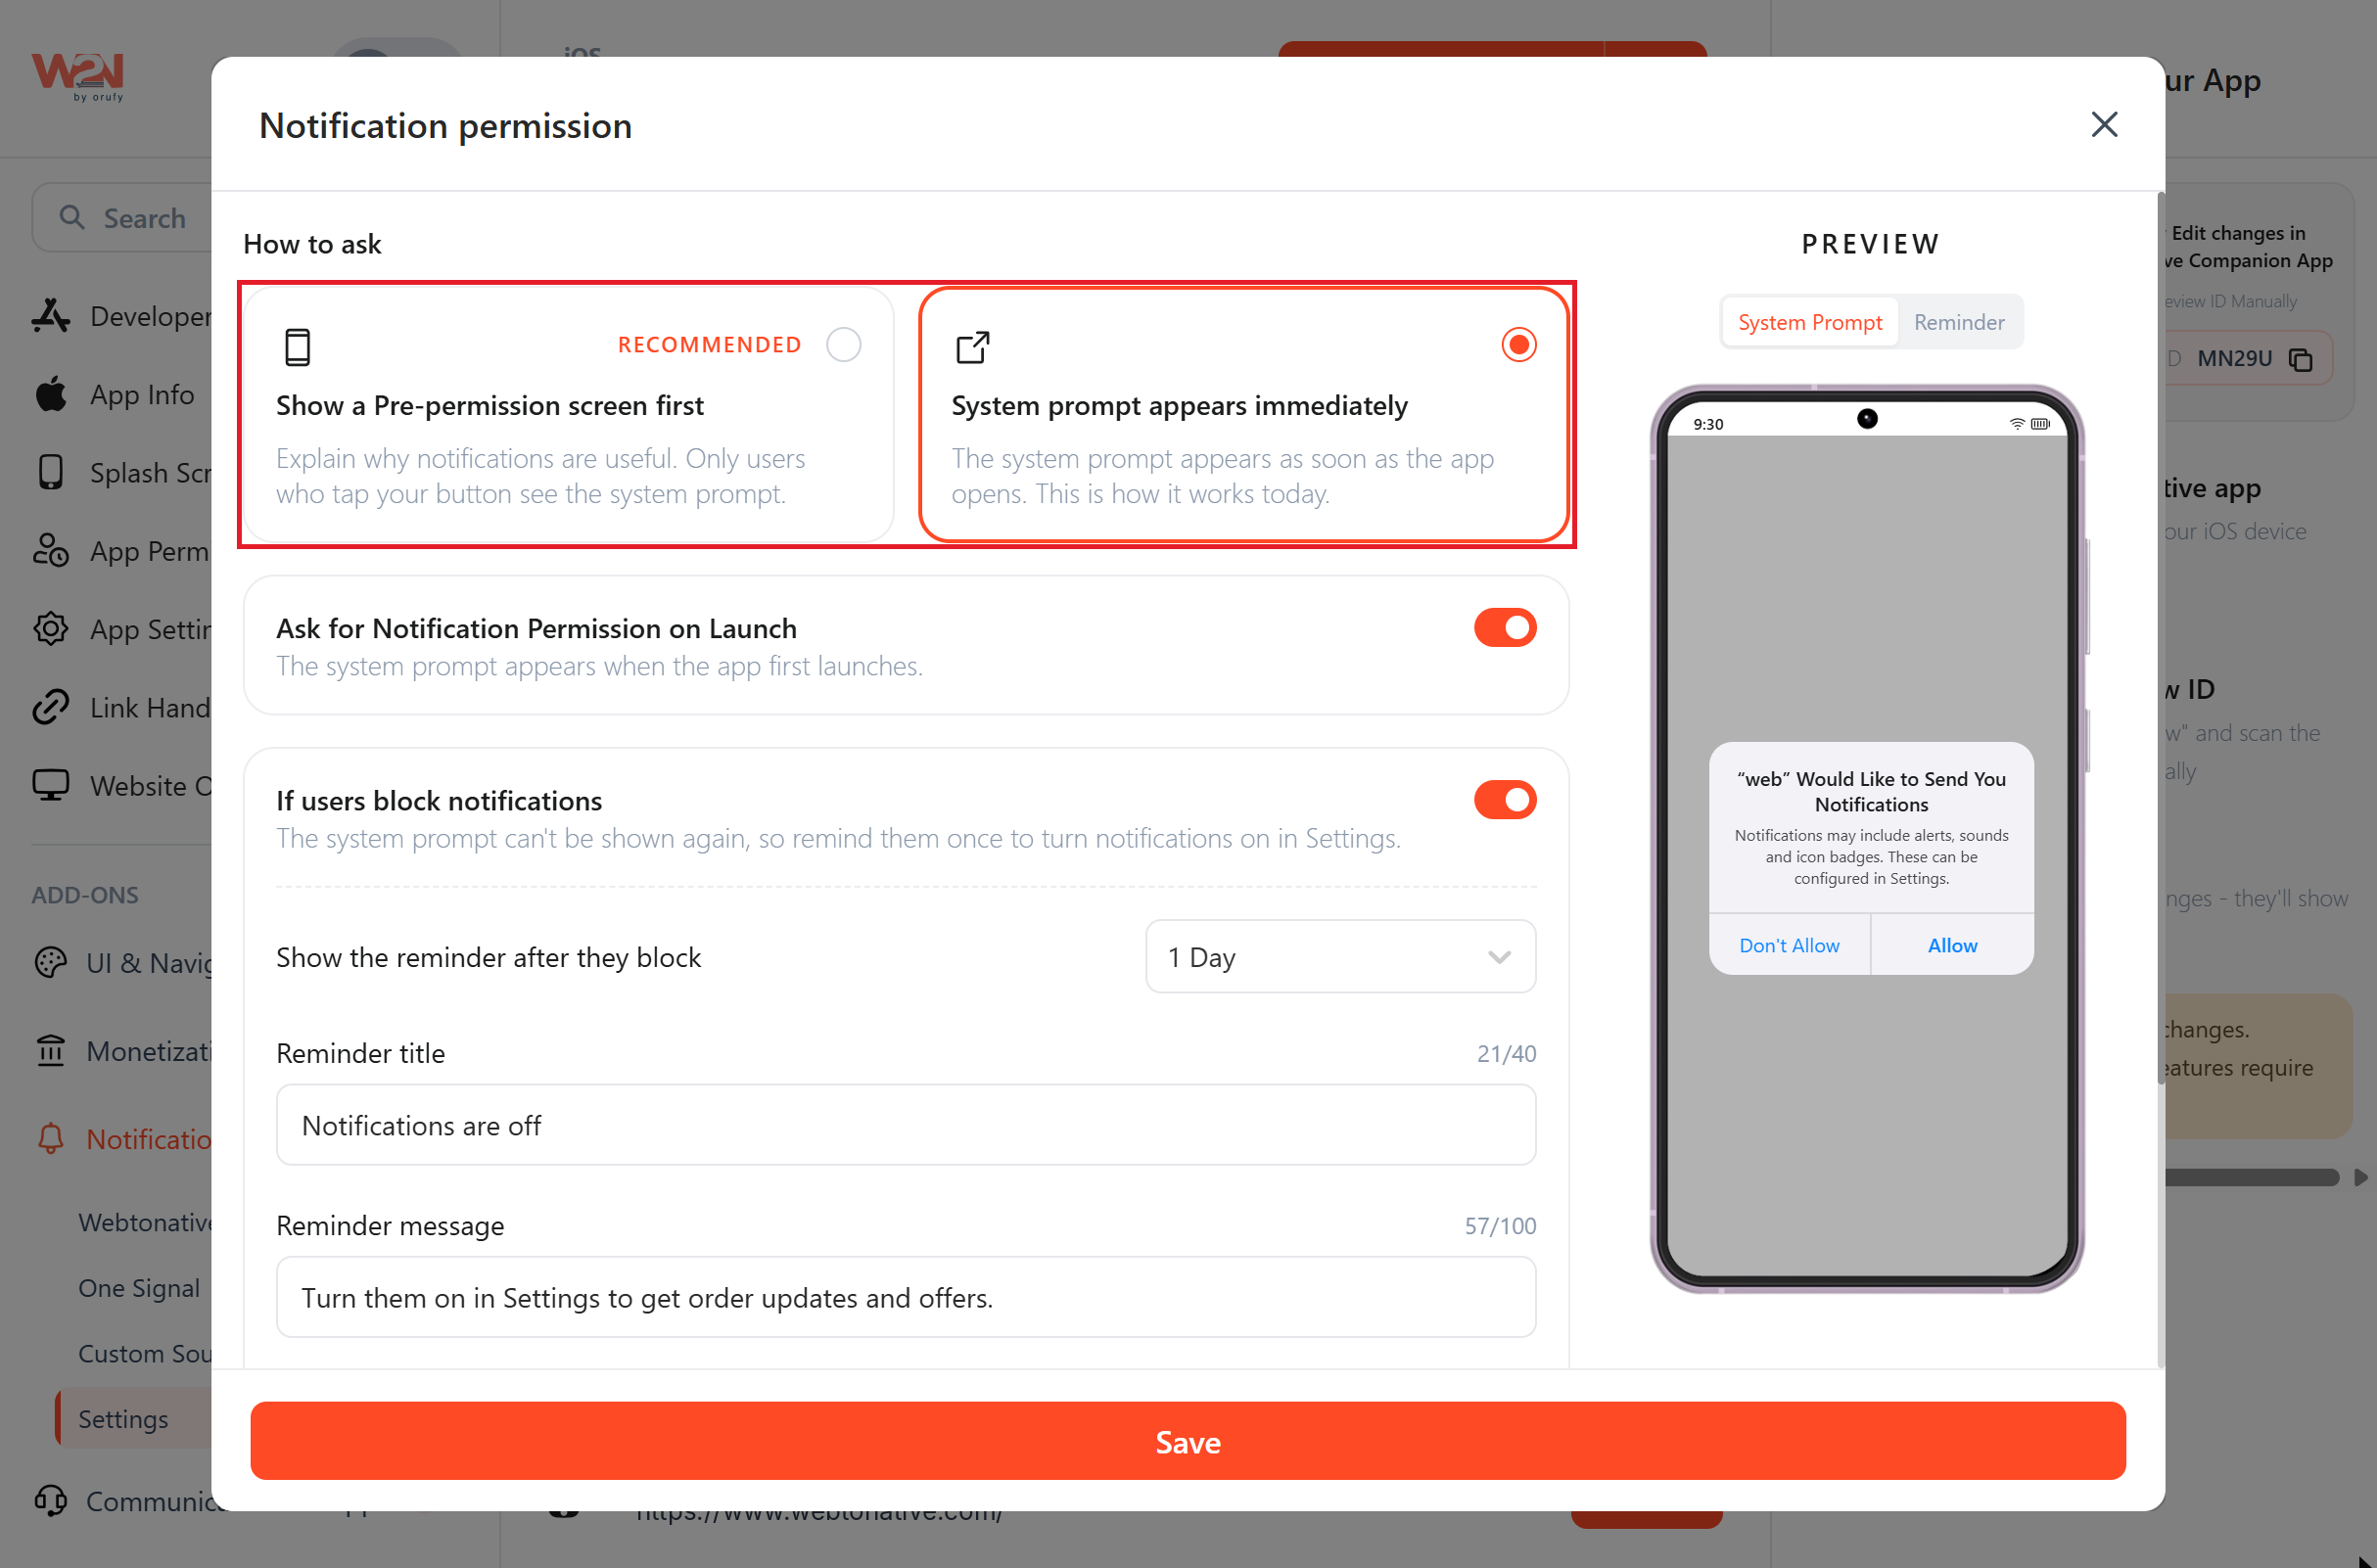
Open Notification permission and click Configure. Under How to ask, select one option:
-
Show a Pre-permission screen first (Recommended): Your app shows its own screen first. Only users who tap your Allow button see the system prompt. Follow Option A.
-
System prompt appears immediately: The phone's system prompt is shown directly, without your own screen. Follow Option B.
Option A: Show a Pre-permission Screen First (Recommended)
Choose When to Show the Screen
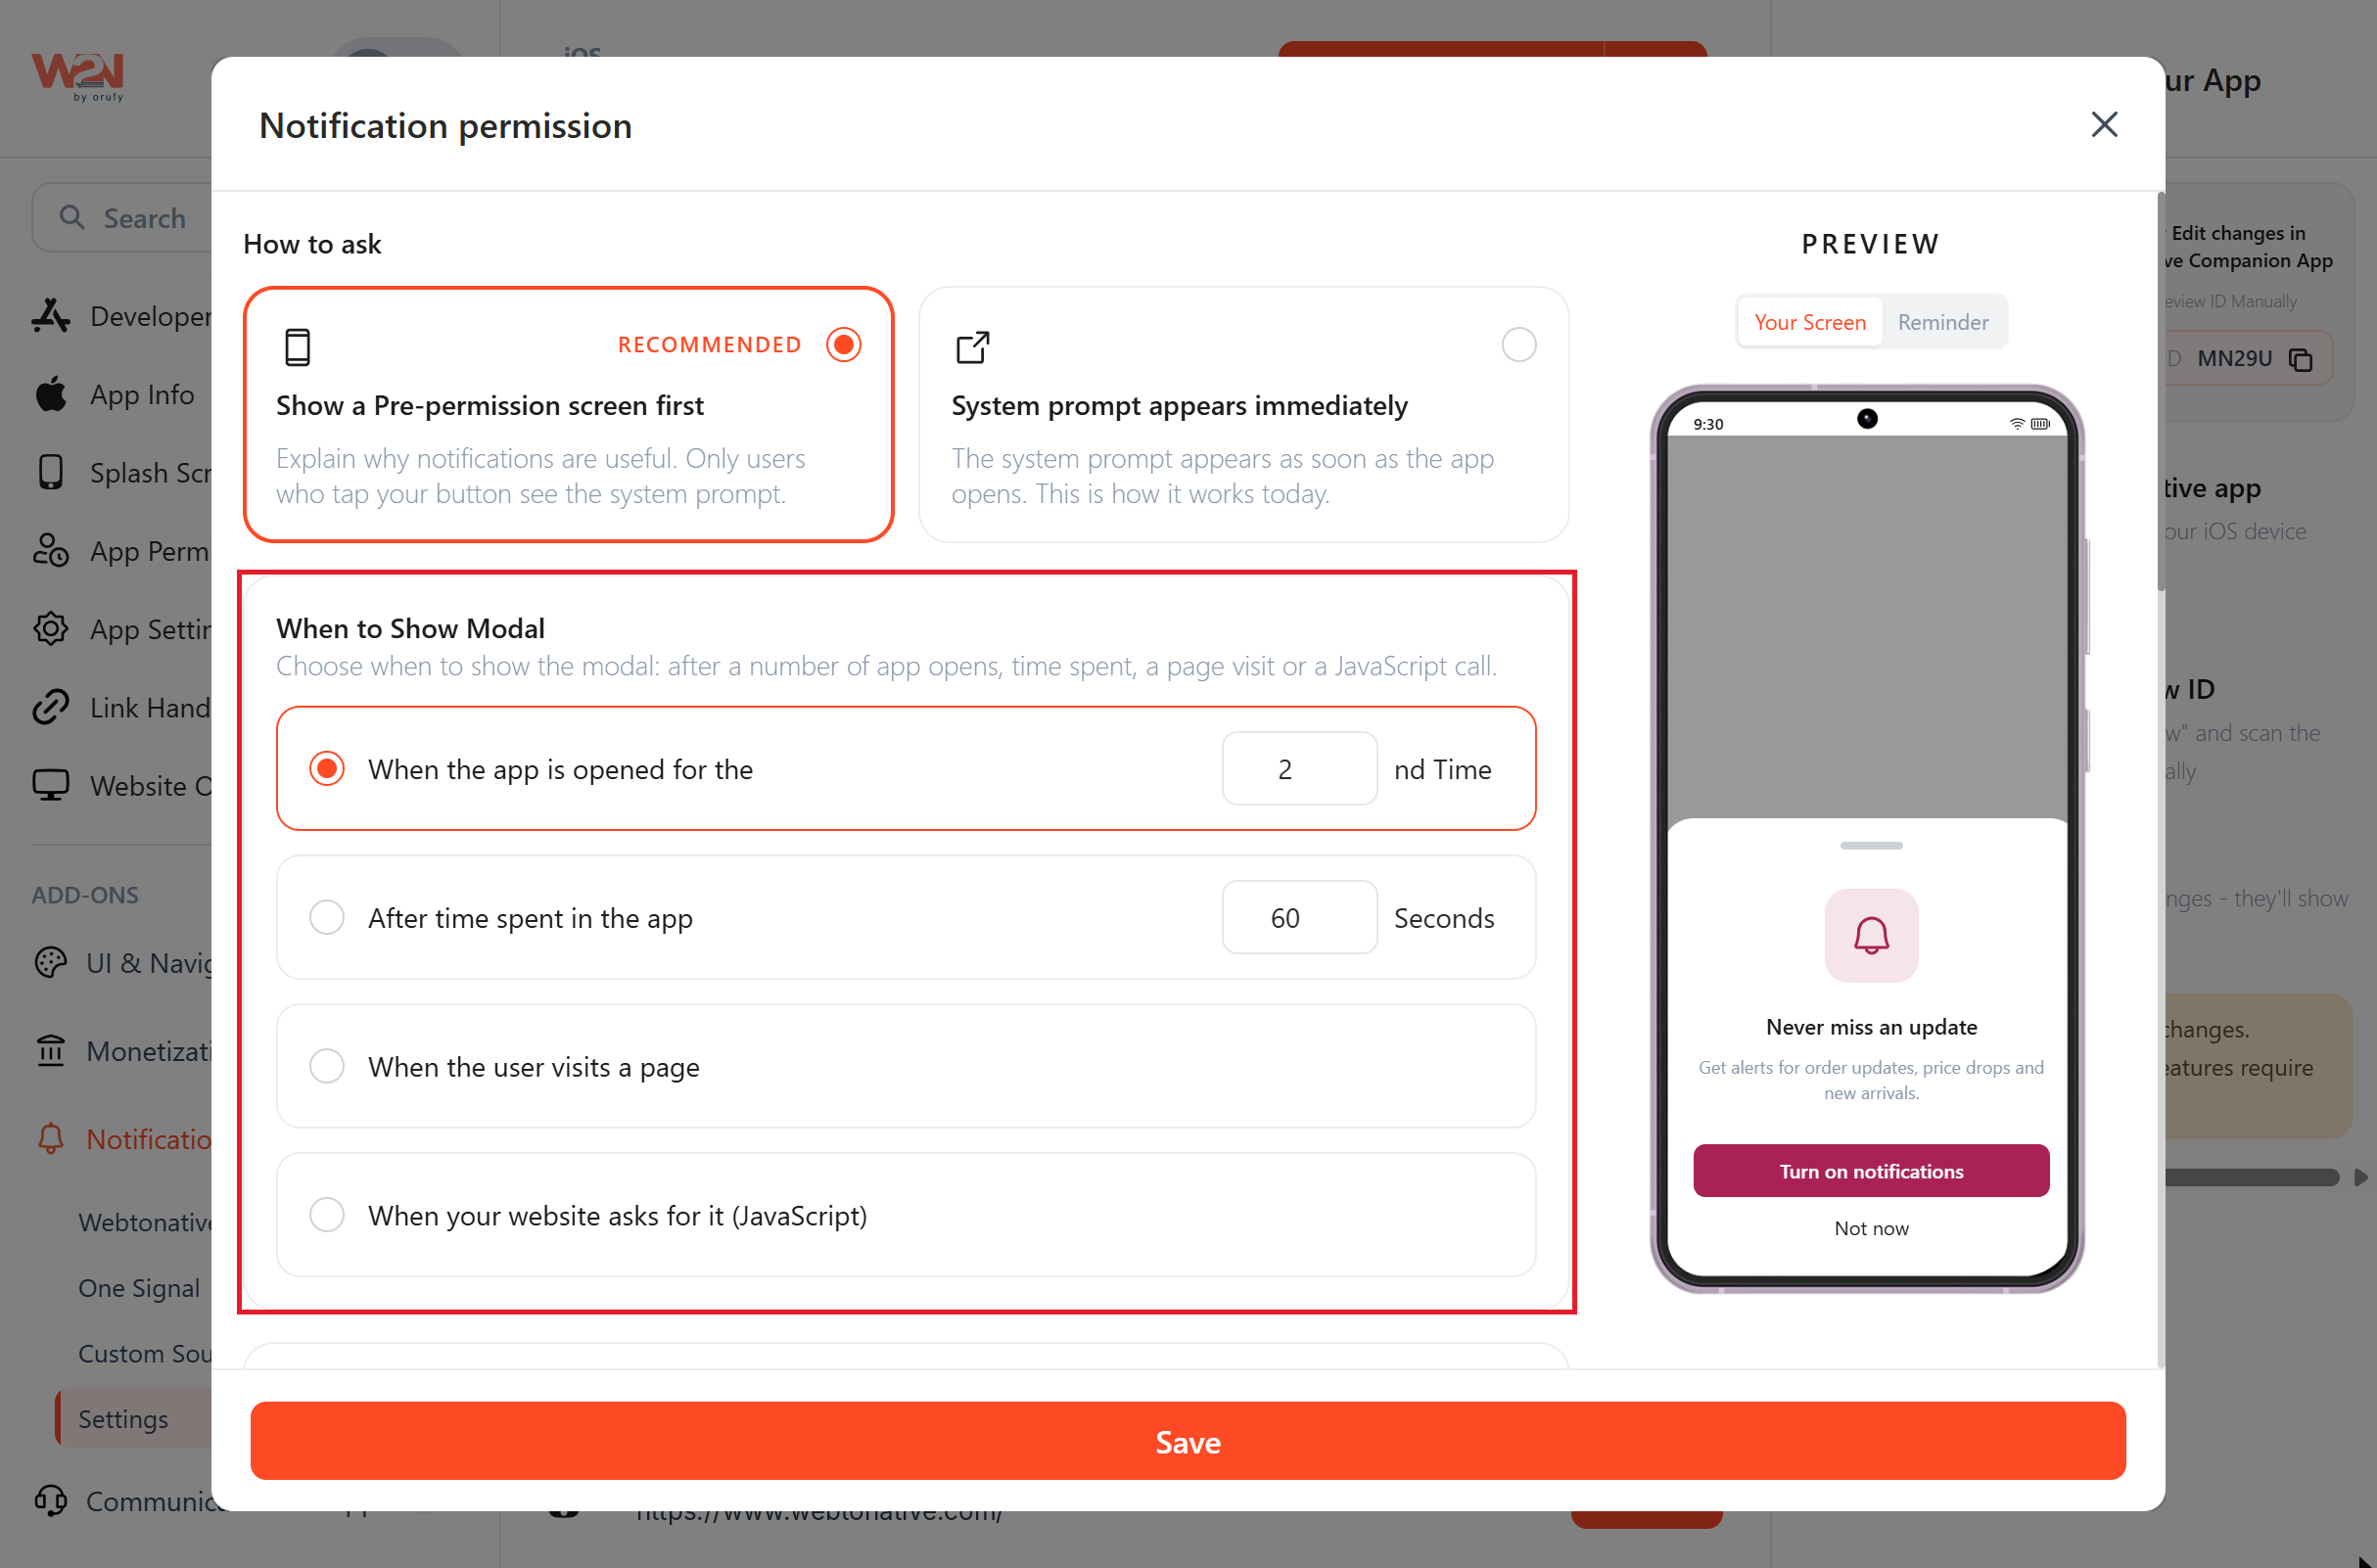
Under When to Show Modal, select one option:
-
When the app is opened for the Nth time: Enter the app open count, for example 2.
-
After time spent in the app: Enter the number of seconds, for example 60.
-
When the user visits a page: Enter a page path or full URL, such as
/checkoutorhttps://example.com/checkout. -
When your website asks for it (JavaScript): Your website shows the screen by calling a function. See Functions for Notification Permission below.
The page option matches that exact page only. Sub-pages won't trigger it.
Design the Screen
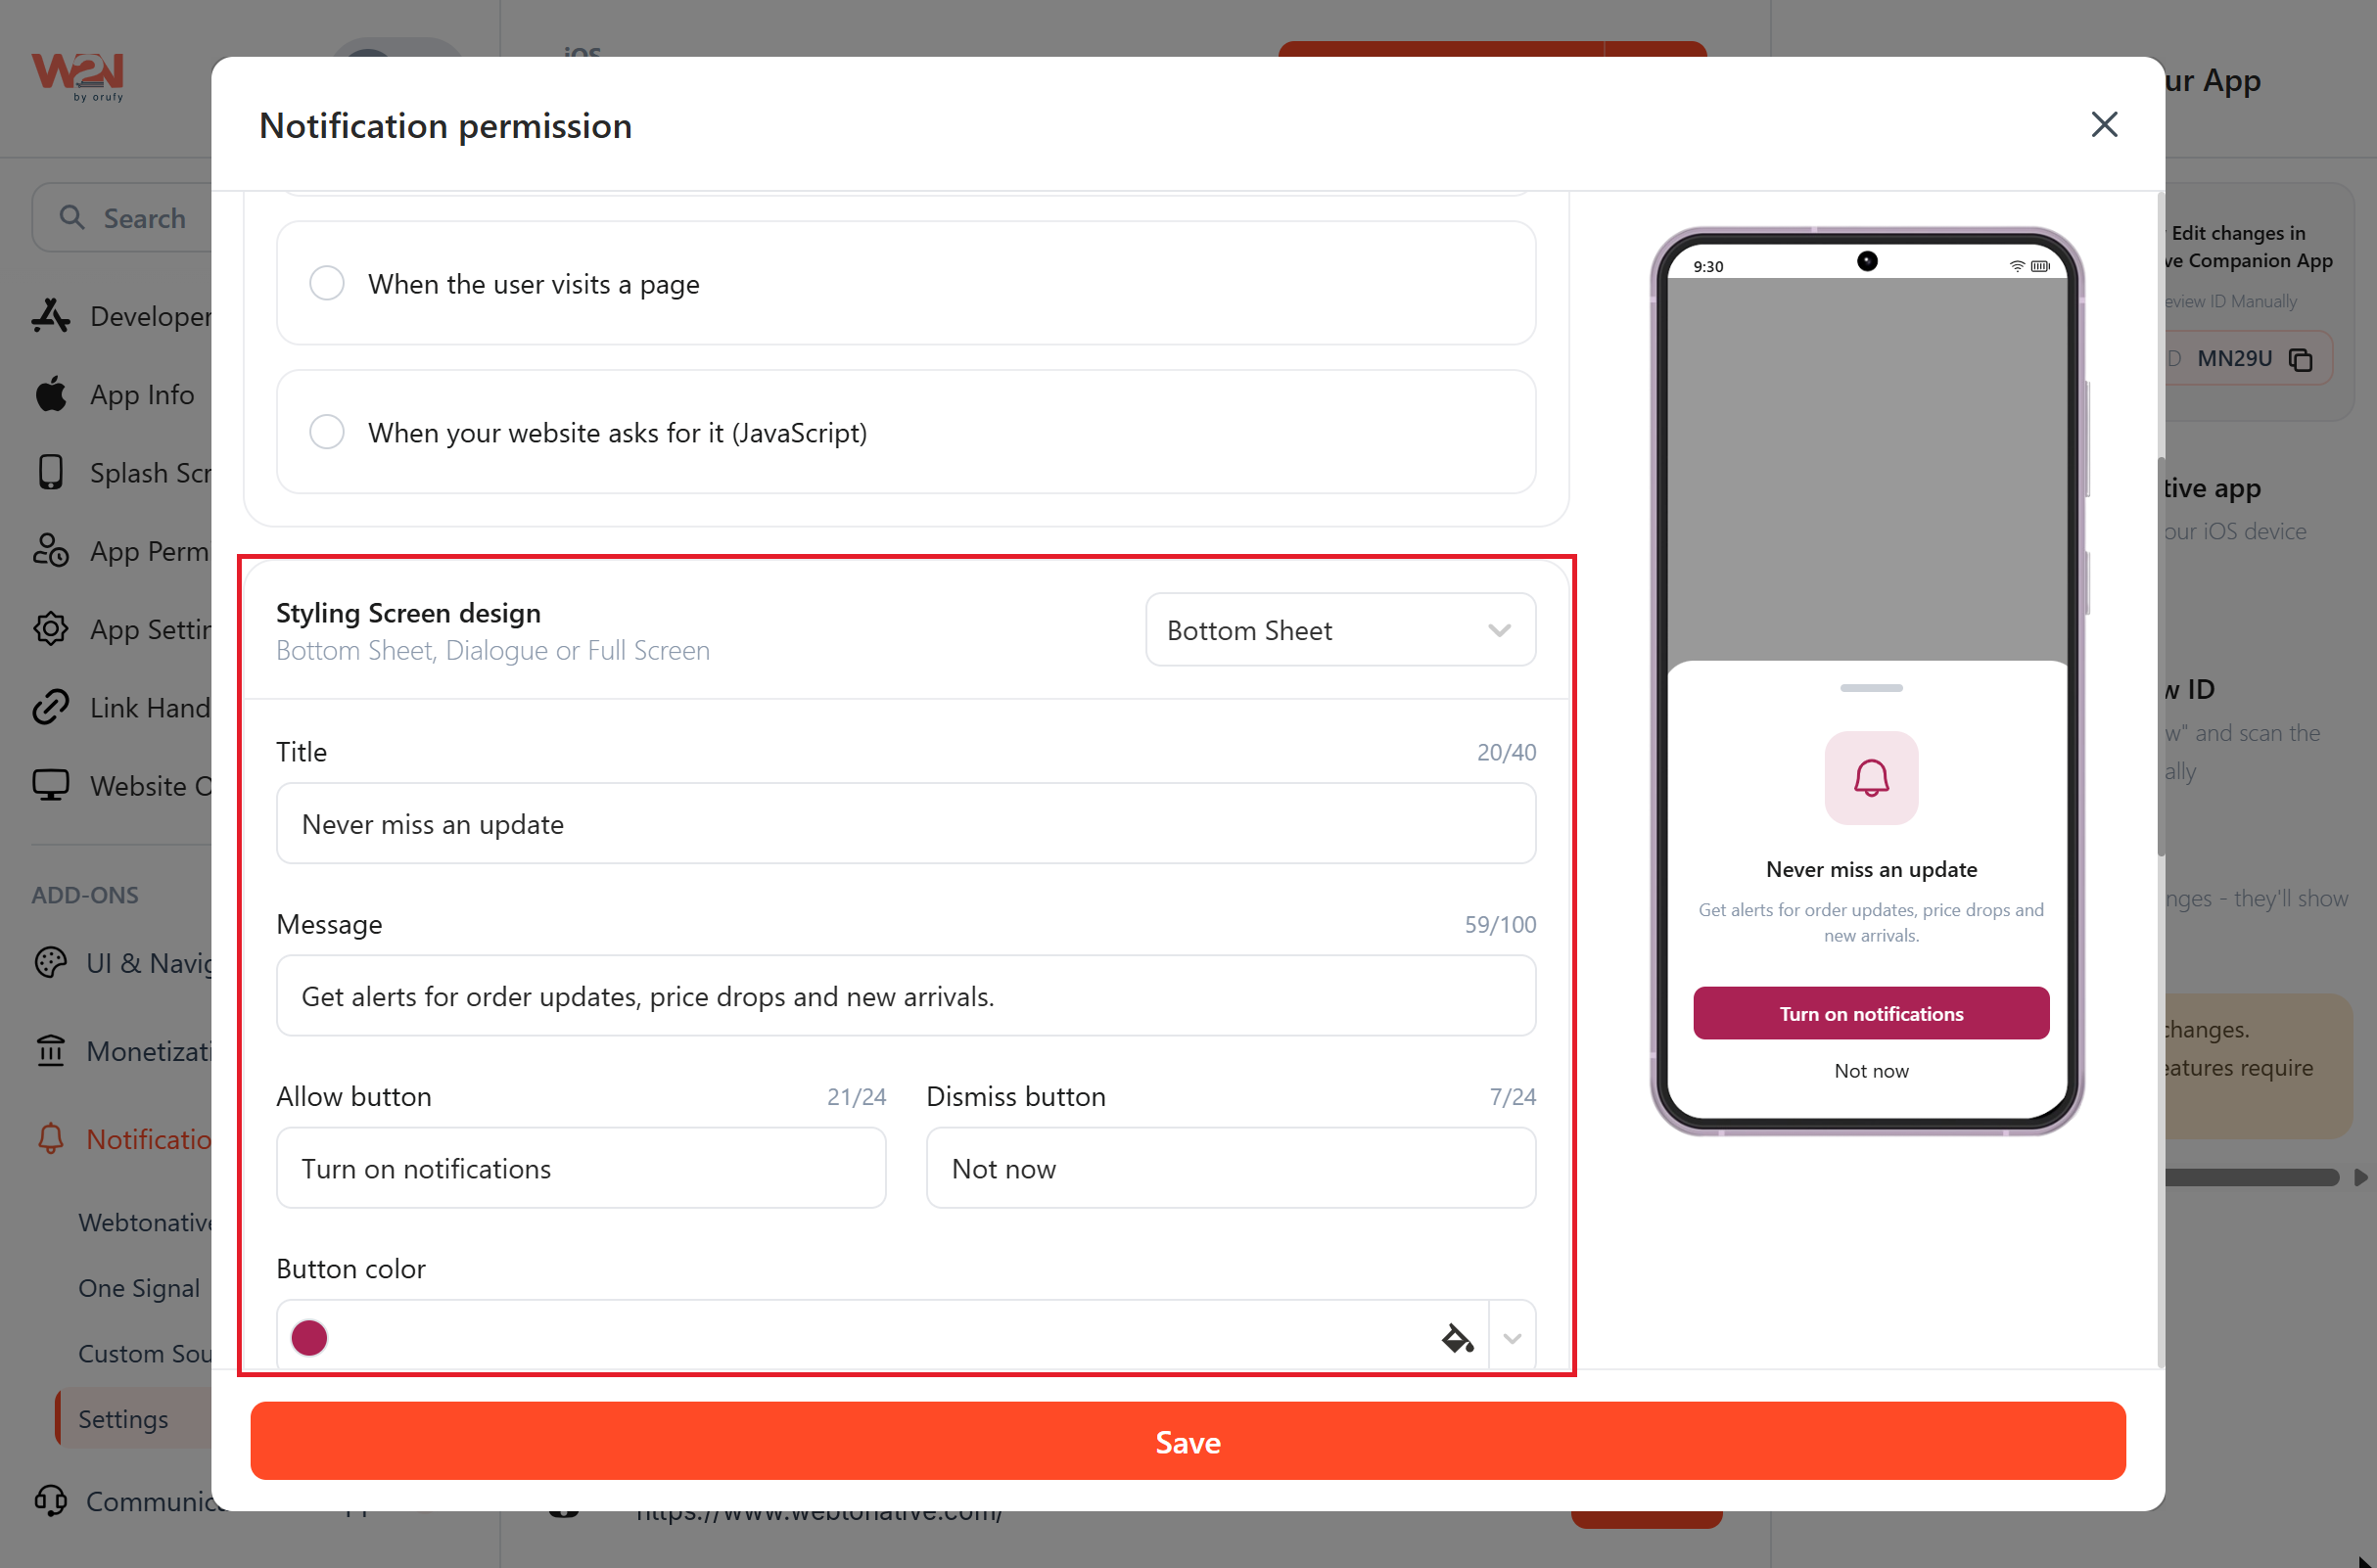
Under Styling Screen design, pick Bottom Sheet, Dialogue or Full Screen. Then fill in:
-
Title (up to 40 characters): for example, “Never miss an update”.
-
Message (up to 100 characters): for example, “Get alerts for order updates, price drops and new arrivals.”
-
Allow button and Dismiss button (up to 24 characters each): for example, “Turn on notifications” and “Not now”.
-
Button color: Defaults to your brand color. The button text color is picked automatically for contrast.
Check the Preview on the right to see how the screen looks on a phone.
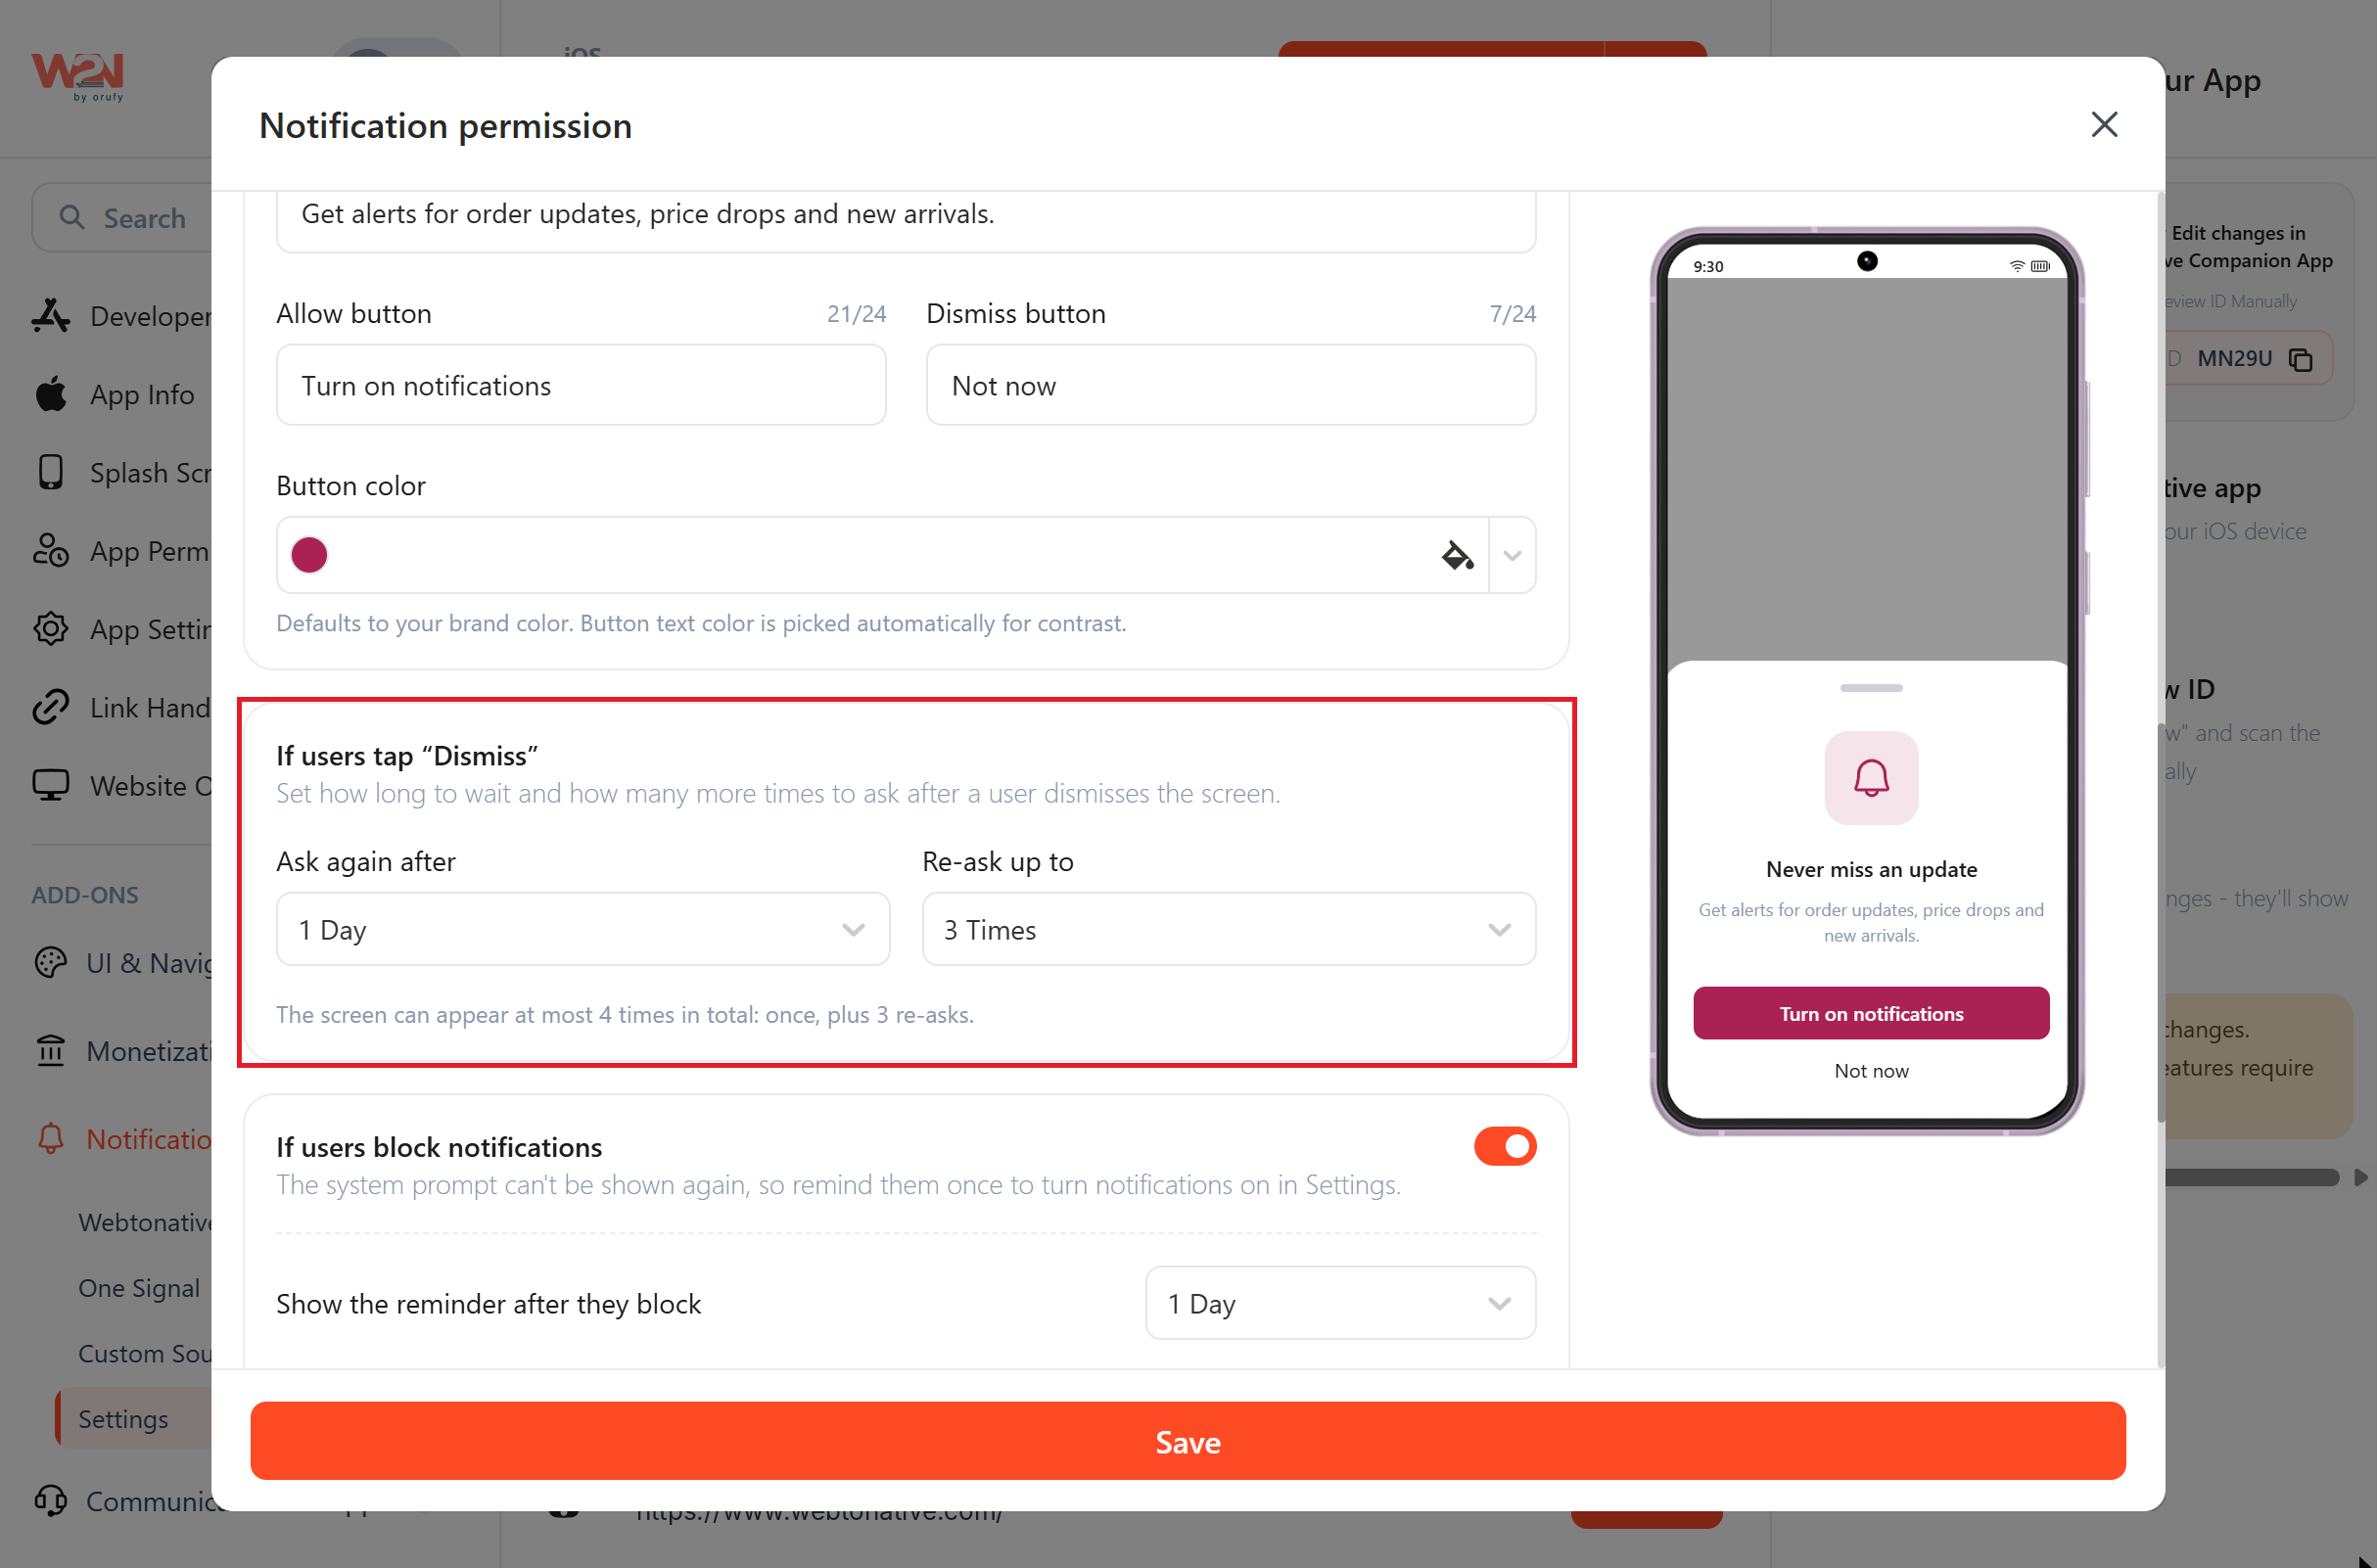
Set What Happens When Users Tap Dismiss
Under If users tap “Dismiss”, set:
-
Ask again after: How many days to wait before showing the screen again, for example 7 days.
-
Re-ask up to: How many more times to ask, for example 3 times.
With 3 re-asks, the screen appears at most 4 times in total: once, plus 3 re-asks.
Remind Users Who Block Notifications (Optional)
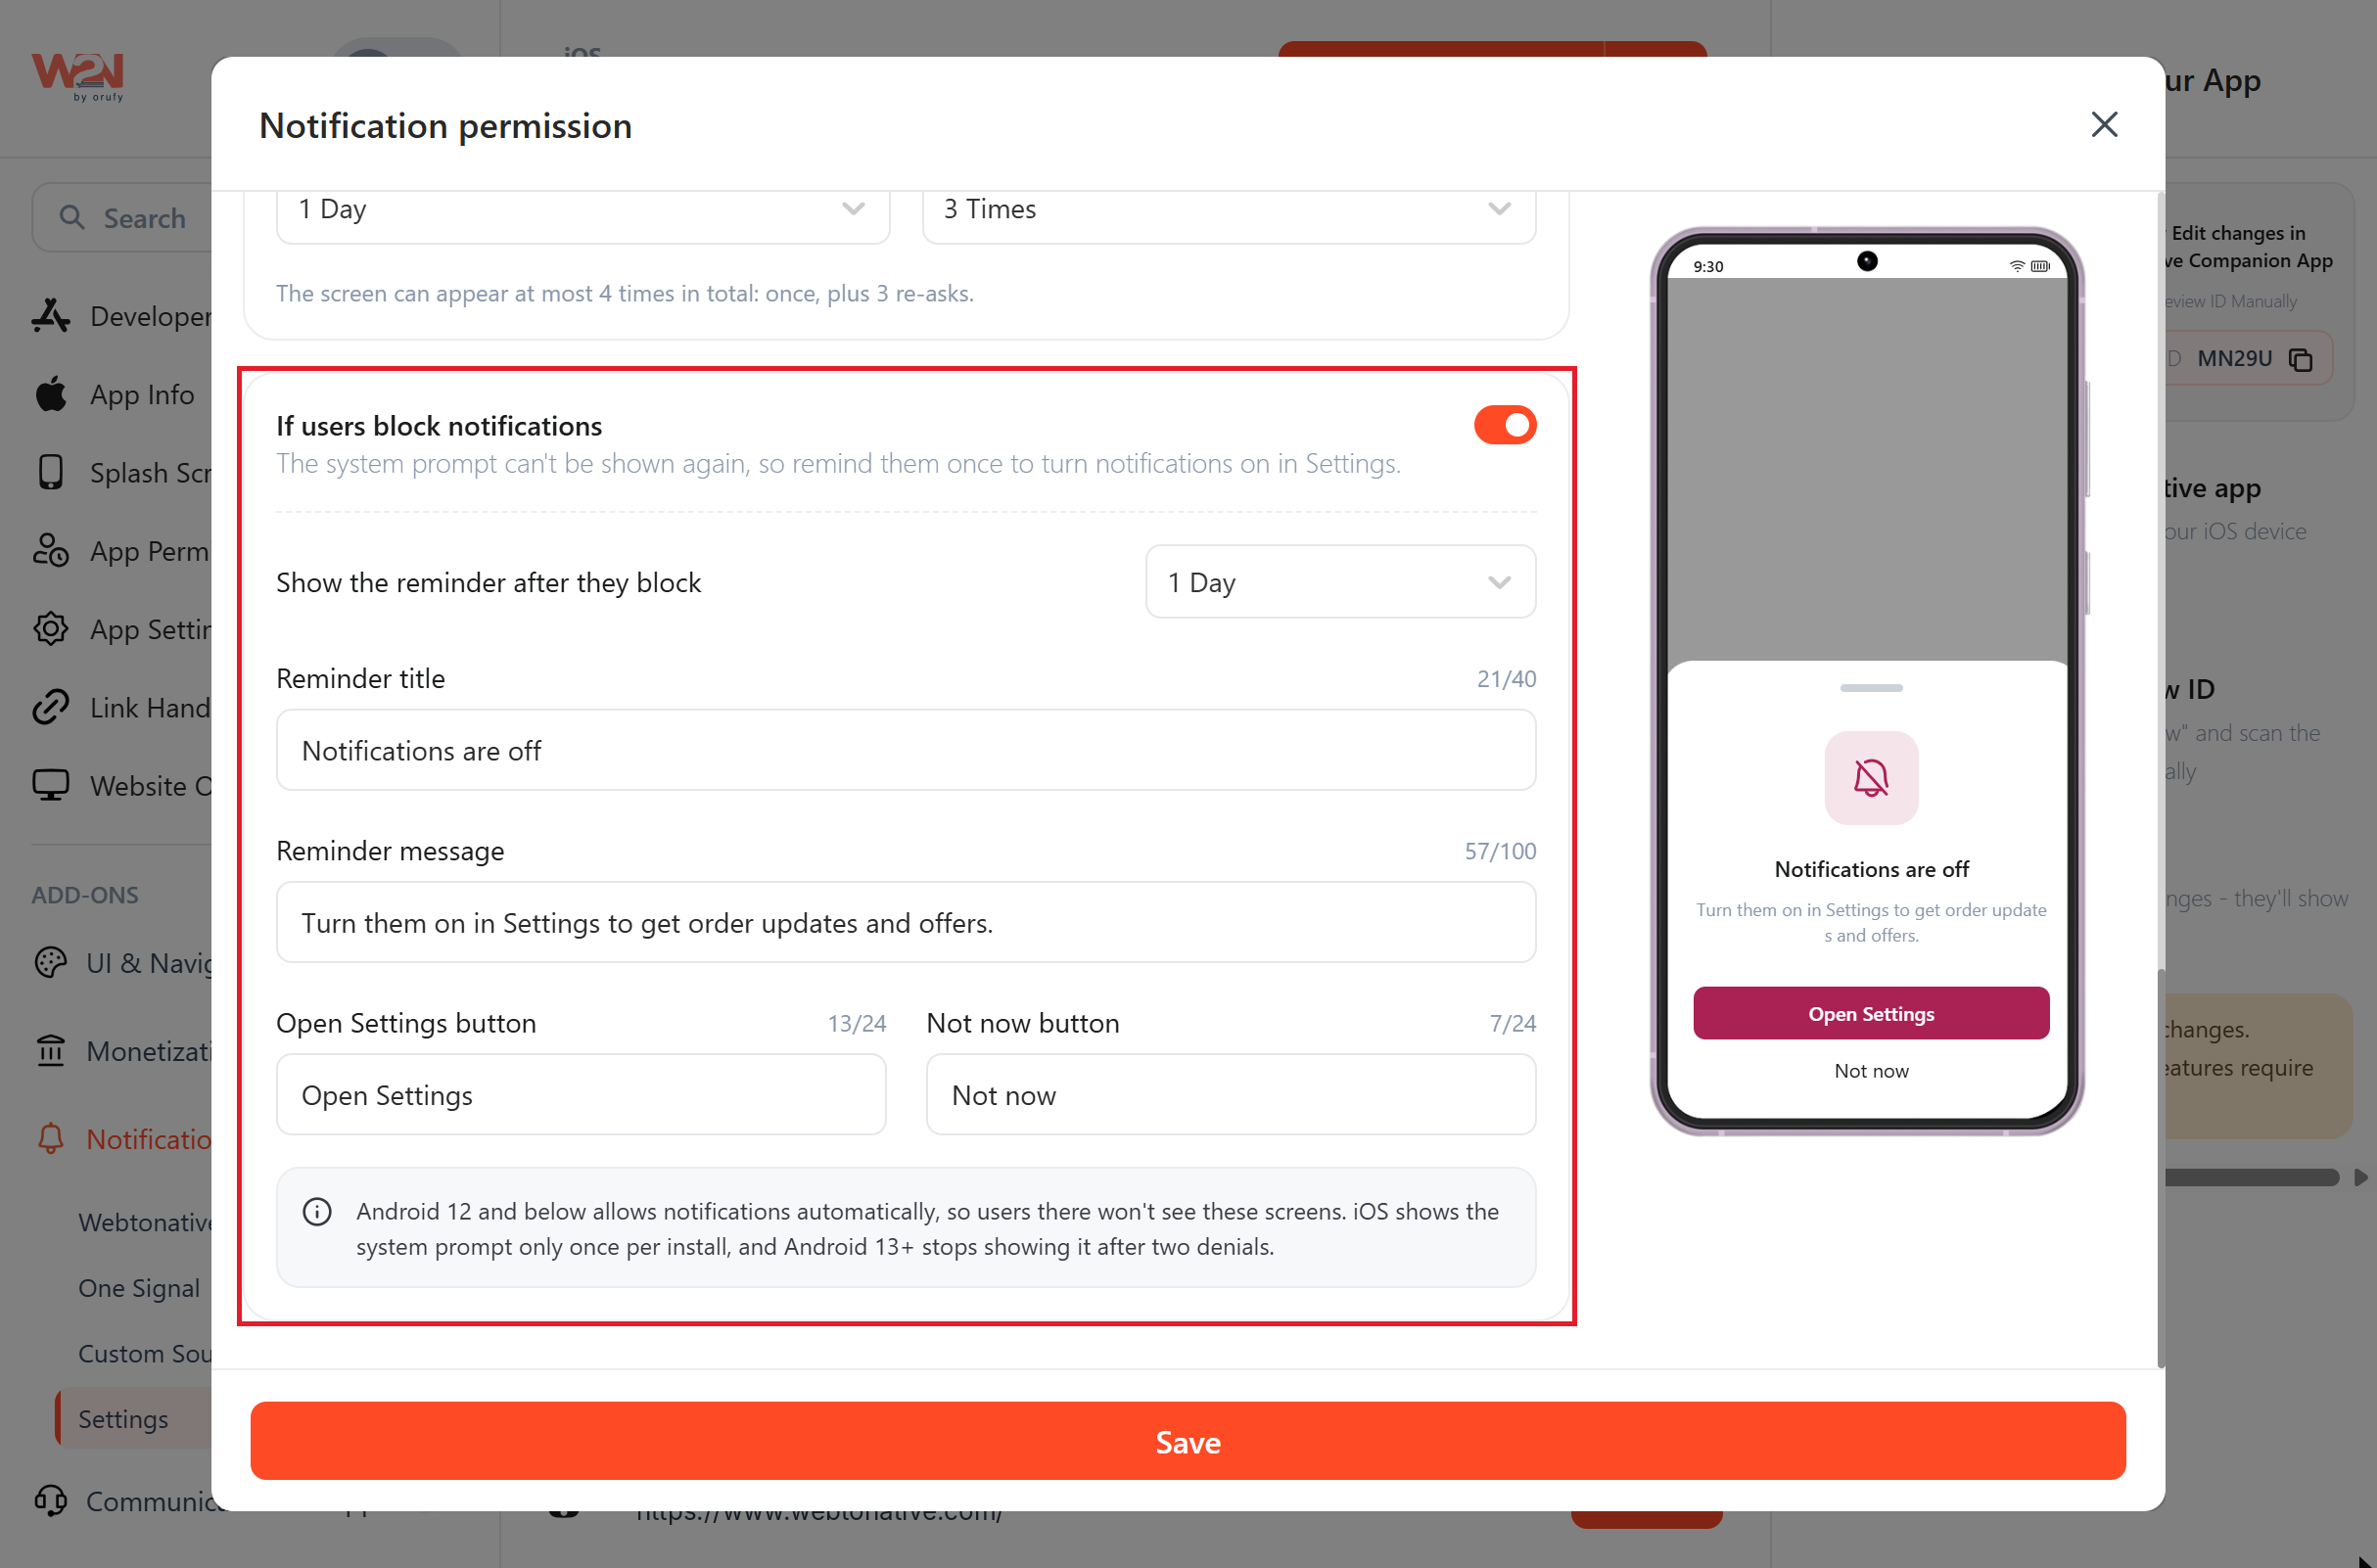
Turn If users block notifications ON to remind users who blocked notifications to turn them on in Settings. Then set:
-
Show the reminder after they block: For example, 14 days.
-
Reminder title and message: For example, “Notifications are off” and “Turn them on in Settings to get order updates and offers.”
-
Open Settings button and Not now button: Open Settings takes the user straight to their phone's notification settings.
To check the reminder, switch the Preview to the Reminder tab.
Save & Rebuild
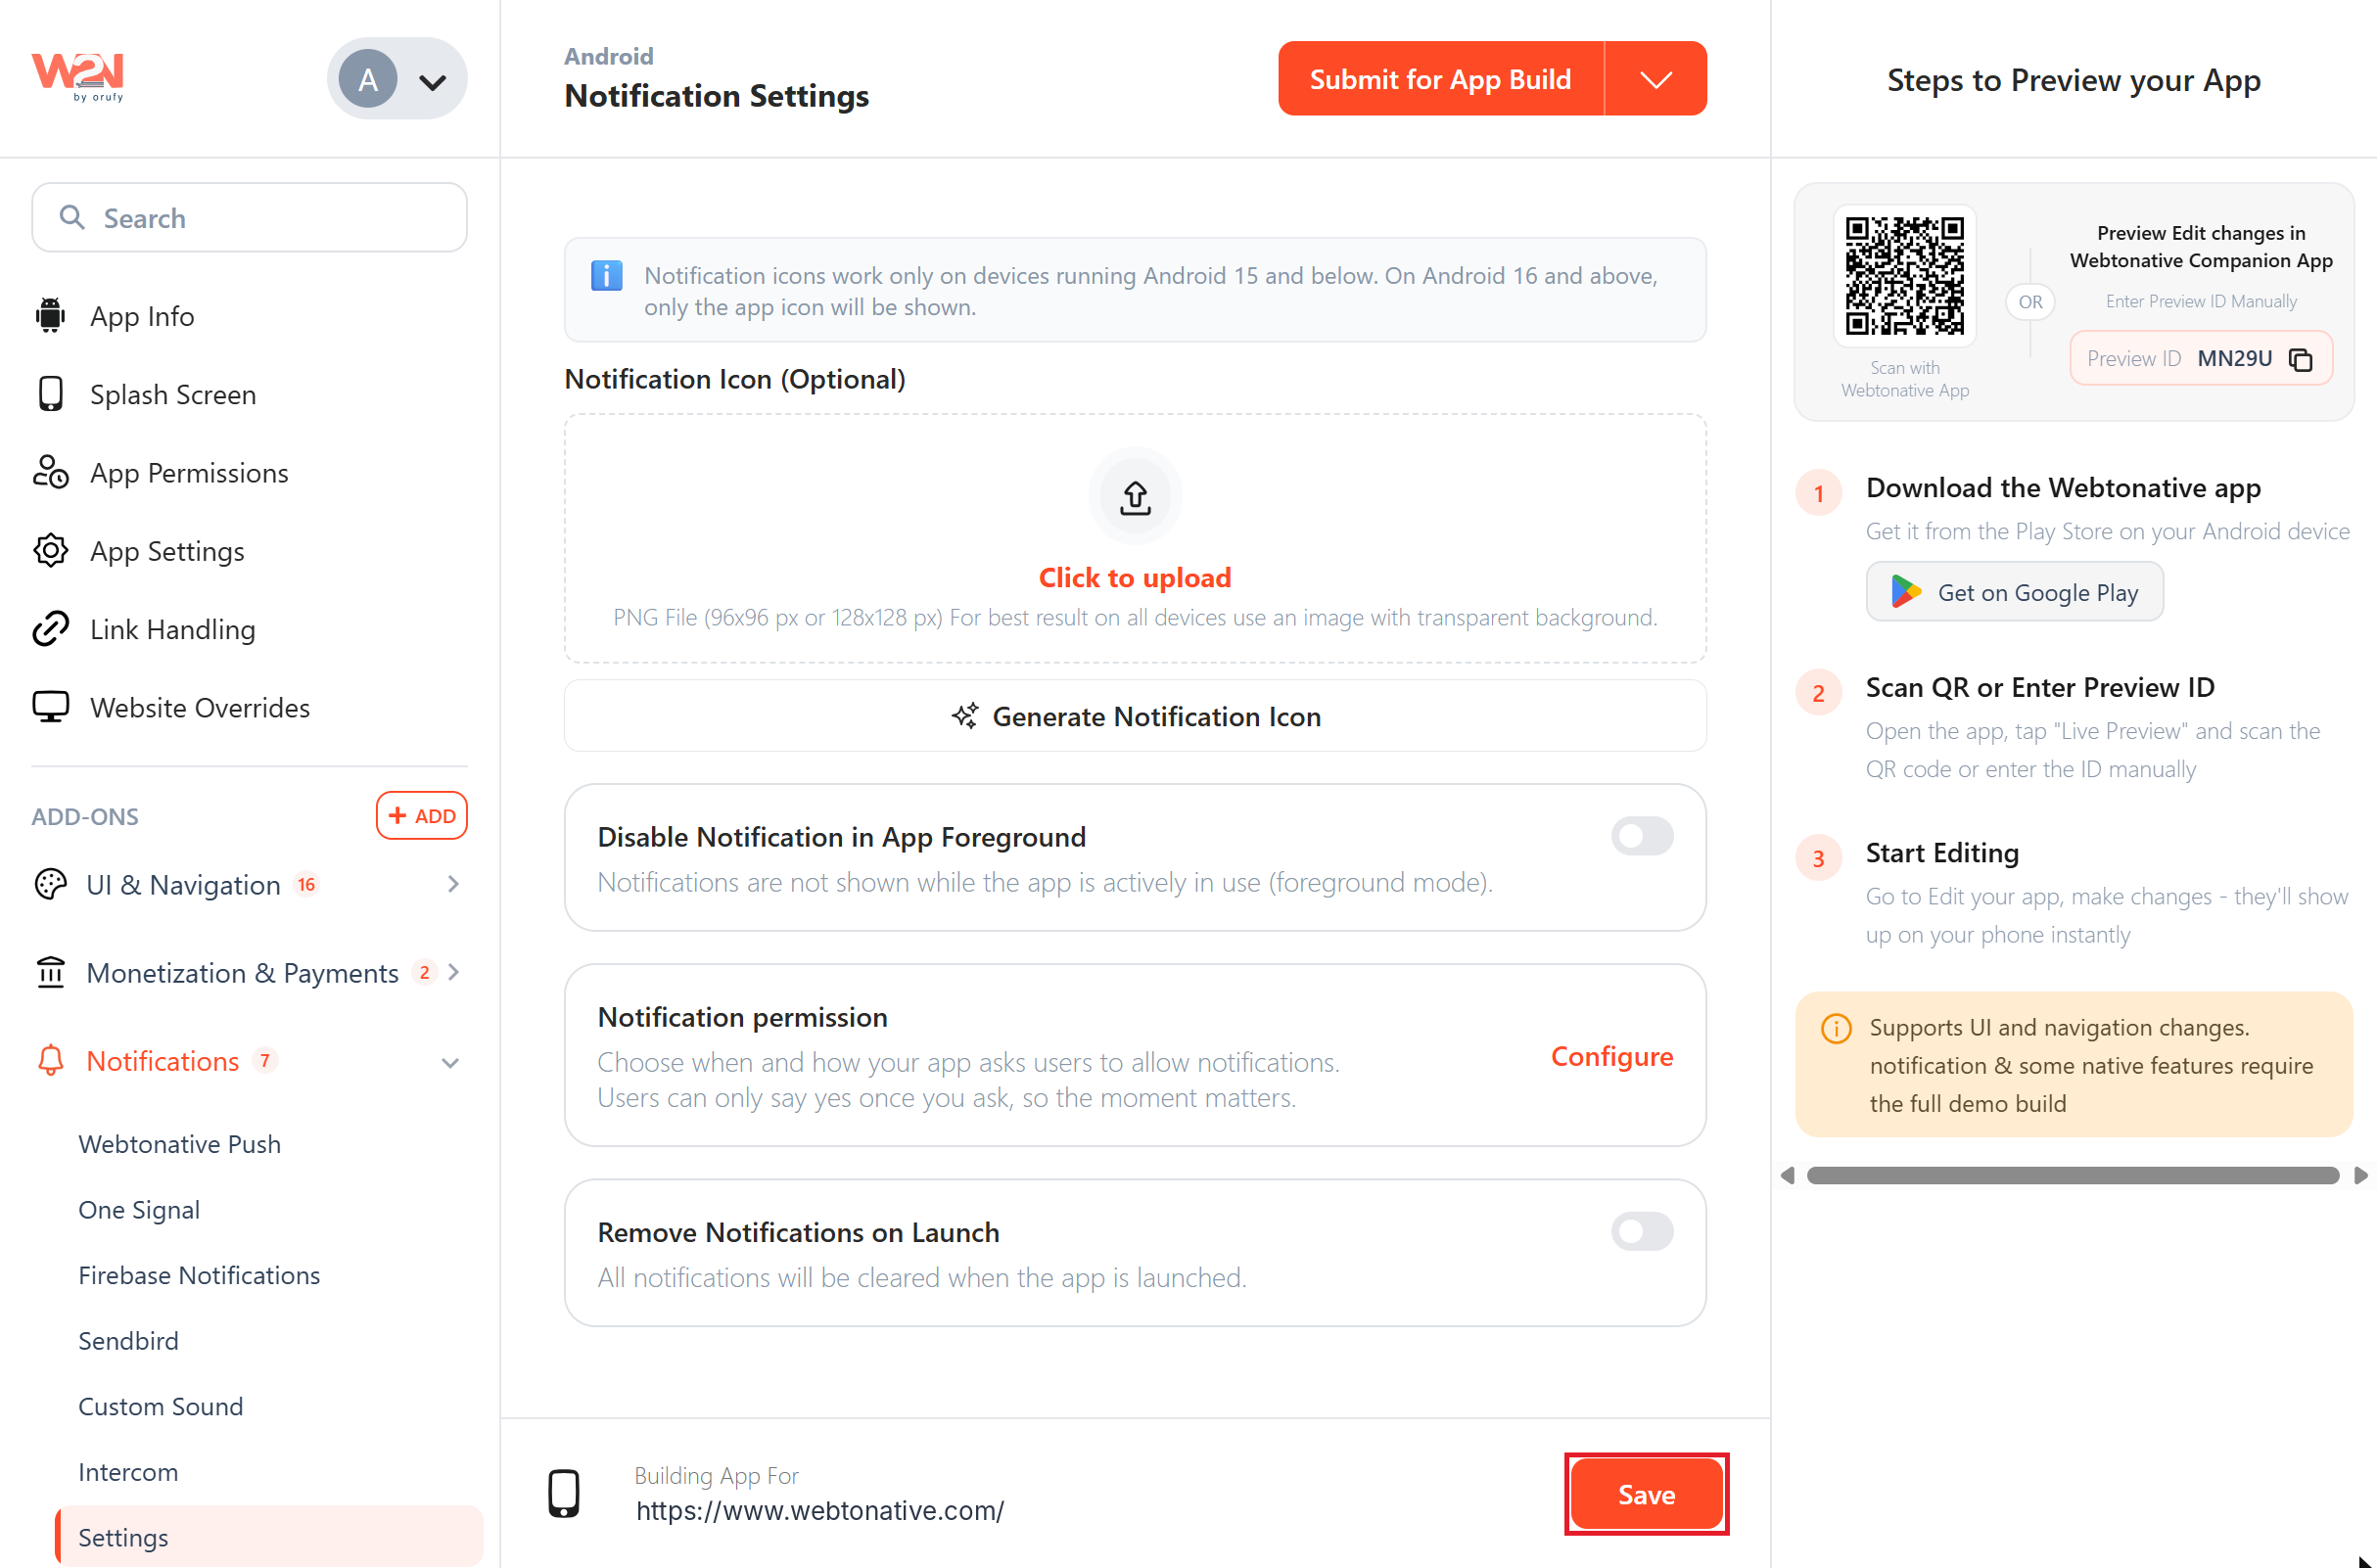
Click Save to close the Notification permission window. Then click Save & Rebuild, or Save and then Submit for App Build, depending on the buttons your dashboard shows, so the changes apply to your app.
Option B: System Prompt Appears Immediately
Choose When the System Prompt Appears
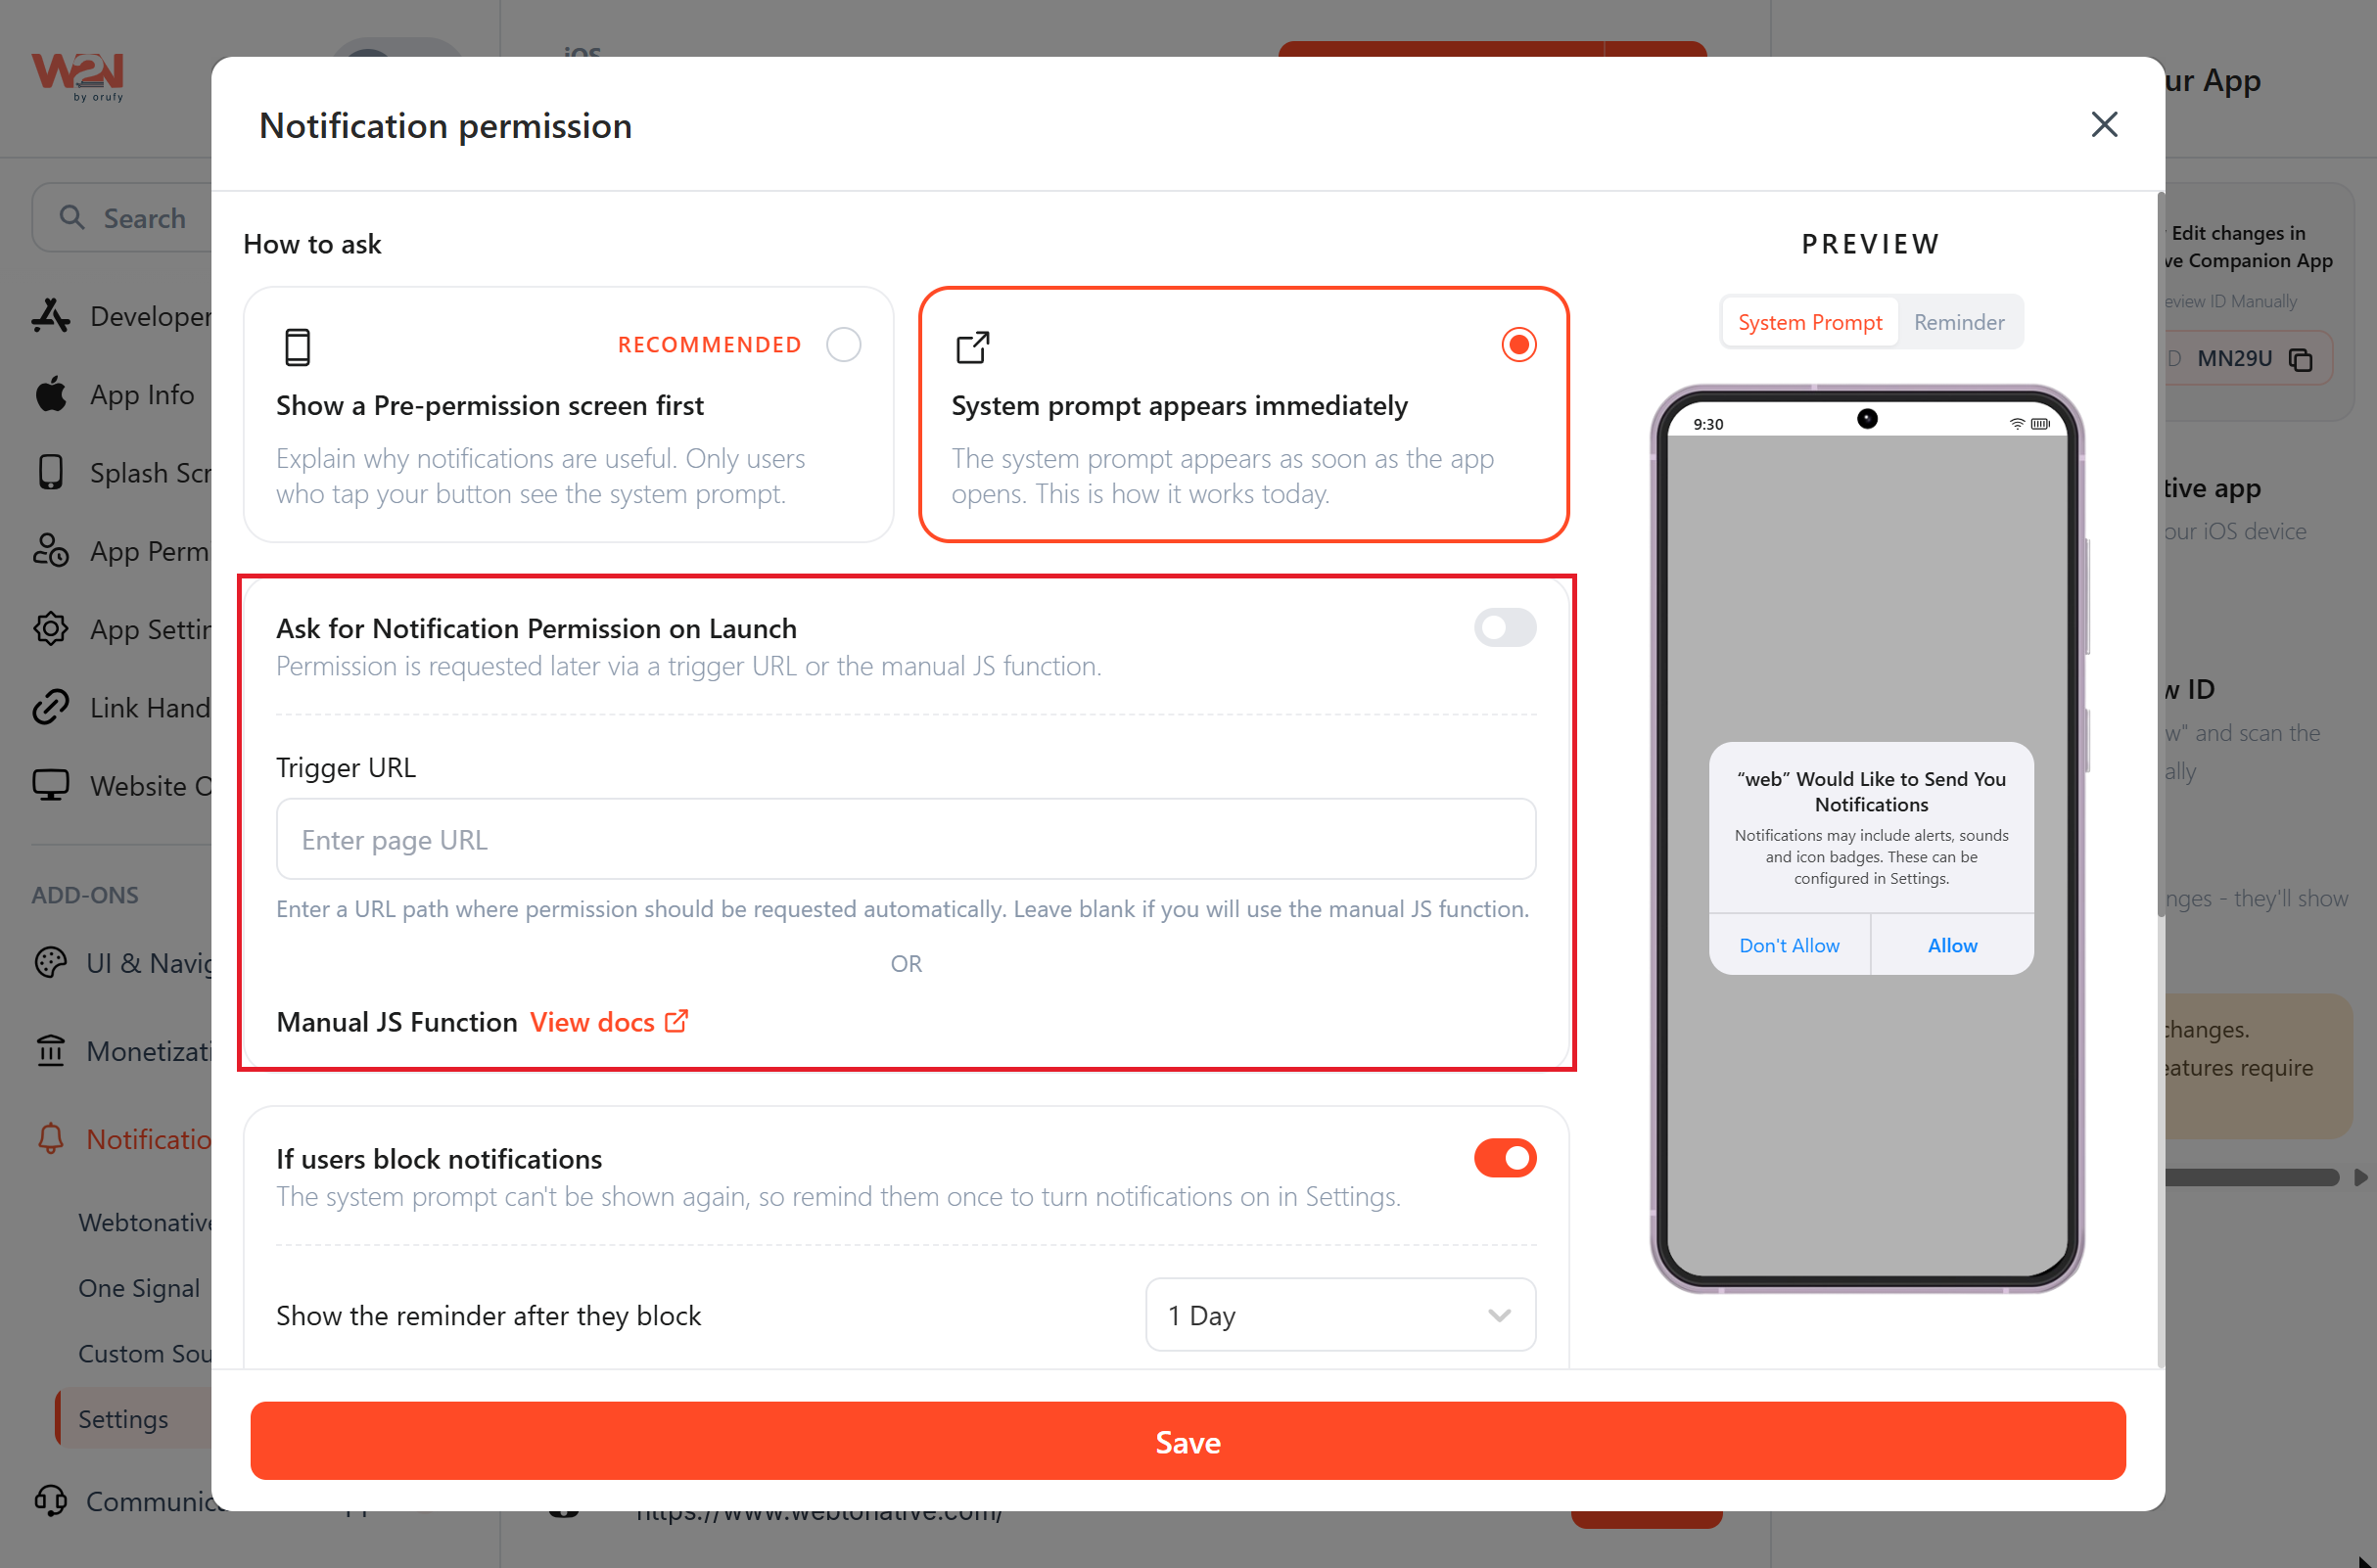
Turn Ask for Notification Permission on Launch ON to show the system prompt when the app first launches.
Keep it OFF to ask later, using one of these:
-
Trigger URL: Enter a page URL or path. The system prompt appears automatically when the user opens that page.
-
Manual JS Function: Leave Trigger URL blank and call the function from your website. See Functions for Notification Permission below.
Remind Users Who Block Notifications (Optional)
Turn If users block notifications ON and fill in the reminder fields, the same way as Option A, Step 5.
Save & Rebuild
Click Save to close the Notification permission window. Then click Save & Rebuild, or Save and then Submit for App Build, depending on the buttons your dashboard shows, so the changes apply to your app.
Functions for Notification Permission
You can use the following functions in code to control notification permission from your website. Pass "notification" as the permission value.

check checks whether the user has allowed notifications, without showing any prompt. Your team can use this before showing an “Enable notifications” button, so it does not appear for users who already allowed them.
request asks the user for notification permission and shows the system prompt if needed. This is the main function used with the Manual JS Function and “When your website asks for it (JavaScript)” options.
open takes the user to their phone's notification settings, with an optional confirmation message first. This is useful when check or request returns PERMANENTLY_BLOCKED, meaning the user must turn notifications on manually.
If your development team needs the technical steps for using these functions, they can find them in our developer documentation: Permissions Handling API (opens in a new tab)
Frequently Asked Questions
Q1. Should I use a pre-permission screen or show the system prompt immediately?
A. We recommend the pre-permission screen. It explains the benefit first, and only users who tap Allow see the system prompt. This keeps the system prompt for users who are ready to say yes.
Q2. What is the difference between Trigger URL and Manual JS Function?
A. Trigger URL shows the system prompt automatically when the user opens a specific page, with no code needed. Manual JS Function lets your website decide exactly when to ask, for example after a user places an order.
Q3. Why don't some Android users see the pre-permission screen or system prompt?
A. Android 12 and below allows notifications automatically. Users on those versions never see these screens but still receive notifications.
Q4. Why did the system prompt stop appearing for some users?
A. The phone limits it. iOS shows the system prompt only once per install, and Android 13 and above stops after two denials. Turn ON If users block notifications to remind these users to turn notifications on in Settings.
Q5. Why doesn't the page option trigger on some pages?
A. It matches the exact page you entered only. For example, /checkout won't trigger on /checkout/payment.
Q6. How many times will the pre-permission screen appear if a user keeps tapping Dismiss?
A. Once, plus the number of re-asks you set. With Re-ask up to 3 times, it appears at most 4 times in total.
Q7. I changed my settings, but nothing changed in the app. Why?
A. Click Save in the Notification permission window, then Save & Rebuild (or Save, then Submit for App Build). Changes apply only after the app rebuilds and the new version is installed.
Q8. Do I need to set it up separately for Android and iOS?
A. Yes. Configure Notification permission in both the Android and iOS tabs of your app.
Q9. Do the general notification settings work with OneSignal, Firebase and Sendbird?
A. Yes. Notification Icon, Disable Notification in App Foreground, Remove Notifications on Launch and Notification permission apply to all notifications in your app, whichever add-on sends them.
Q10. Why is my notification icon not showing?
A. The custom notification icon works only on Android 15 and below. On Android 16 and above, and on iOS, the app icon is shown instead. Also check that you clicked Save & Rebuild and installed the new version.